Printing Tips

Check out my printing tips if you're having problems printing to the right size
If you'd like to support this site and all the free things I post- please check out my Don't Eat the Paste Mandala collection coloring book for 9.99 at Amazon.
Showing posts with label bracelet. Show all posts

Saturday, September 14, 2013

Rainbow Circles Box and a new bead project


I hope you enjoy this printable geometric rainbow colored circles box. The pattern occurred to me while I was reading a sword and sorcery adventure novel (I love Simon Green, it's one of my secret guilty pleasures) and worked out just right on the first try for the 3 inch repeat with the colors.

Currently (9-19-2013 to 9-25-2013) voting in Spoonflower's geometric contest. I'd love to see this pattern made into shoes if you want to vote for me, but there are a ton of great designs to choose from and you can vote for all of your favorites by signing into your Spoonflower account.

Click on the image for a larger version, print on card stock, cut out, score folds, fold, glue!

You can find instructions for this faux arm candy memory wire bracelet HERE. It's super easy and a great way to use leftover beads from other projects.

Thursday, August 22, 2013

Chinese replica coin soft bangle- crochet pattern


I love making soft bangles, and have a few patterns for them available.

This one is done in a single crochet strip with the coins worked into the crochet fabric, then seamed up one side.

You will need:

  • 8 17 mm Chinese replica coins- available from Fire Mountain Gems
  • Size 3 crochet cotton thread- I used Aunt Lydia's Warm Teal
  • Size D (3.25 mm) hook
  • Tapestry needle- large enough for the thread to weave in ends
  • scissors
Pattern in American terminology

Abbreviations:
  • sc= single crochet
  • ch= chain
Start by stringing on 8 coins. If you have larger hands/wrists, do 9 coins, for smaller hands/wrists- 7 coins.

Ch 5
Row 1: Ch 1 to turn, sc in each stitch (5 stitches)
Row 2: Ch 1 to turn, sc in first 2 stitches, insert hook in the next stitch, and yarn over, pull through stitch (2 loops on hook) push 1 coin up, yarn over around the coin, and pull through both loops, sc in next 2 stitches,
Row 3-5: ch 1 to turn, sc in each stitch across
Row 6: Ch 1 to turn, sc in first 2 stitches, insert hook in next stitch and through the middle of the coin, yarn over, pull through the coin and the stitch from the previous row (2 loops on hook), yarn over, pull through both loops, sc in next 2 stitches.

Repeat rows 1-6 until you've used up all the coins. Break off thread, and sew edges of strip together, then weave in the ends. 

This will work with other doughnut shaped pieces but you'll have to adjust for the size. Just remember that it needs to be an odd number of rows between the coins, and behind the coins. In this case, it's one row between each coin, and 3 rows behind the coins.


Tuesday, July 2, 2013

Soft Waves Bangle Bracelet- crochet pattern


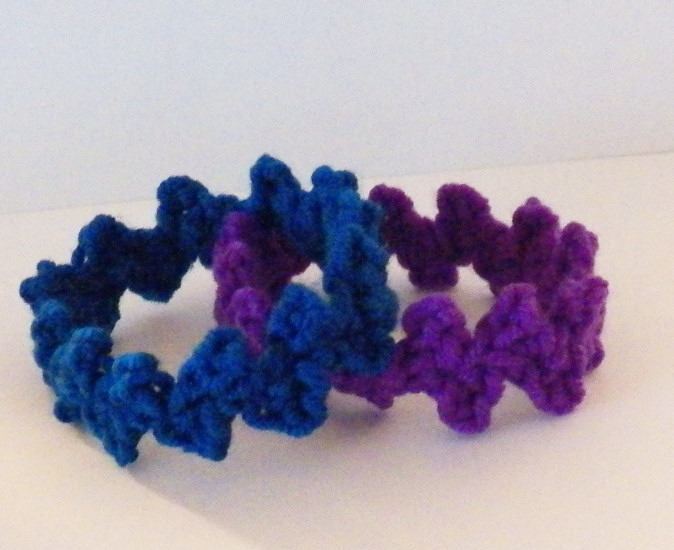
I love making soft bangle bracelets! This one is really easy and uses increases and decreases in single crochets to create a softly wavy pattern that looks great in oceany colors.

You will need:

  • 3 colors of size 3 fashion thread
  • Size D- 3.25
  • Tapestry needle big enough for the thread
  • scissors
I used Aunt Lydia's Fashion Crochet Cotton in Blue Hawaii, Lime and Soft Teal. 

Stitch abbreviations:
st or sts= stitch or stitches
ch= chain
sc= single crochet
dec sc= decrease single crochet
sl st= slip stitch
Repeat ** means repeat the steps between the *asterisks*

To work a decrease- insert hook first stitch, yarn over and pull through the stitch leaving 2 loops on the hook, insert hook in next stitch, yarn over, pull through the stitch, yarn over, pull through all the loops on the hook. 

American terminology. 

You only need a small amount of each color. 

Chain 48, slip stitch to join being careful not to twist the chain.
Round 1: ch 1, (doesn't count as first stitch here or throughout) sc in each st around, sl st to first sc to join. Make sure you have 48 stitches.
Round 2: Repeat round 1, break of yarn.
Round 3: Join in second color, ch 1,  sc in first st, dec sc in next st, sc in next st, dec sc in next st, sc in next st, dec sc in next st, sc in next st, dec sc in next st, 2 sc in each of next 4 sts, *sc in next st, dec sc in next st, sc in next st, dec sc in next st, sc in next st, dec sc in next st, sc in next st, dec sc in next st, 2 sc in each of next 4 sts,* repeat **, sl st in first sc to join.
Round 4: ch 1, sc in each st around. Break off thread.
Round 5: join in new color, ch 1. dec sc over first and second sts, dec sc over next 2 sts, dec sc over next 2 sts, dec sc over next 2 sts, sc in next st, 2 sc in next st, sc in next st, 2 sc in next st, sc in next st, 2 sc in next st, sc in next st, 2 sc in next st, *dec sc over next 2 sts, dec sc over next 2 sts, dec sc over next 2 sts, dec sc over next 2 sts, sc in next st, 2 sc in next st, sc in next st, 2 sc in next st, sc in next st, 2 sc in next st, sc in next st, 2 sc in next st,* repeat **, sl st to first sc to join.
Round 6: ch 1, sc in each st around. sl st to join, break off thead and weave in all ends with the tapestry needle.

I love how this turned out, and it's so simple and quick. I hope you enjoy it too! 

Tuesday, May 28, 2013

Thread crochet soft bangle


This pattern is for the rainbow colored bracelet which is one of my soft bangles. The other bracelet is a wrap bracelet and you can find the pattern for that here.

You will need:

  • Size 10 crochet cotton
  • steel crochet hook- I used a Boye size 7, which is 1.65 mm. If you are using a Susan Bates hook, a size 6 would be a close equivalent.
  • tapestry needle
  • scissors
This is done in chains and single crochets, which means it works up very fast and easily except for the slightly tricky closing of the base. 

Base chain-
Chain 9, single crochet in first chain. Chain 6, skip single crochet and next chain, single crochet in the next chain. Repeat pattern, going back and forth until the bracelet is the right length to fit over your hand, ending with a loop on the opposite side as your starting chain 9 loop. The diagram is in 2 colors and each stitch set begins with the chain 6 and ends with the single crochet.

Chain 4, and single crochet into the 3rd chain from the starting chain. chain 1, and turn to do the last single crochet skipping the single crochet and the chain before it and working in the next single crochet, chain 4, slip stitch to the starting chain/single crochet to join. 

 The outer edge is worked by doing 4 single crochet in each loop, then breaking off the thread to work the single crochets on the other side.

Weave in all ends.

This can be blocked and stiffened into a standard bangle bracelet as well. If you plan to do that, find a bangle you like the fit of, and measure the diameter. Multiply that by 3.14 and make your starting chain that length. To block, I'd wrap a bottle or can with a piece of cardboard and cover with plastic, then use a permanent blocking solution to block. 

The bracelets above were both made with Aunt Lydia's cotton. The pearl bracelet is in Aspen, and the bangle bracelet is in Mexicana. 

Tuesday, April 9, 2013

Crochet Blocks Ribbon Pattern

Crochet Blocks Ribbon Pattern

This ribbon pattern is so easy to make, it just uses chains and single crochets to create nice neat rows of diagonally set blocks. I used the ribbons to make bracelets by stitching snaps on the ends.

American terminology
ch=chain
sc= single crochet

Worst weighted yarn version:
You will need:

  • worsted weight yarn
  • size G (4.25mm) hook
  • yarn needle
  • scissors
Chain 5

Row 1: Sc in second ch from hook, sc in each ch (4 sc)
Row 2: ch 1 to turn (does not count as first sc), sc in each st across
Row 3: Repeat row 2
Row 4: ch 1 to turn (does not count as first sc), sc in each st across, ch 3 (first block made)

Row 5: Sc in second ch from hook, sc in next ch, sc in next 2 stitches (4 sc)

Row 6: ch 1 to turn (does not count as first sc), sc in each st across
Row 7: Repeat row 2
Row 8: ch 1 to turn (does not count as first sc), sc in each st across, ch 3 (block made)

Repeat rows 5-8 for as long as you want the strip to be, on the last block, skip the ending chain 3, and break off yarn to weave in ends.

Size 10 thread version:
You will need:

  • Size 10 thread
  • Size 5 steel hook (1.7mm)
  • Chenille or ribbon needle to weave in ends
  • scissors
Chain 7
Row 1: Sc in second ch from hook, sc in each ch (6 sc)
Row 2: ch 1 to turn (does not count as first sc), sc in each st across
Row 3-5: Repeat row 2
Row 6: ch 1 to turn (does not count as first sc), sc in each st across, ch 4 (first block made)


Row 7: Sc in second ch from hook, sc in next 2 ch, sc in next 3 stitches (6 sc)

Row 8: ch 1 to turn (does not count as first sc), sc in each st across
Row 9-11: Repeat row 2
Row 12: ch 1 to turn (does not count as first sc), sc in each st across, ch 4 (block made)

Repeat rows 7-12 for as long as you want the strip to be, on the last block, skip the ending chain 4 and break off thread to weave in ends.

To make bracelets-
you will also need sewing thread, hand sewing needle and sew on snaps.
Make strips long enough to wrap around you wrist and overlap one block. For the worsted weight, that wound up being 8 blocks, for the thread it was 10 blocks.
Stitch the snaps on each end of the bracelet, with one side of the snap in the middle of one block on one end, then flip the ribbon over and sew the other side of the snap in the middle of the block on the other end.

You could stitch the edges together offset by 2 and 3 respectively to make a bangle but the blocks will stretch more that way. Snaps seemed a good option for keeping the shaping without having to reblock every time I wore the bracelet!

For the worsted weight, I used a stash yarn in cotton. For the thread version, I used Aunt Lydia's crochet cotton in Aspen. I love how the colorway created pretty striping on the finished project.


Monday, July 9, 2012

Super Easy Chained Bead Friendship Bracelets

These are some of the quickest, easiest friendship bracelets to make, and inexpensive.  Just a beaded chain stitch using elastic cord and mini pony beads. I think they would make a good tween project for groups.

You will need:

  • Elastic Beading Cord- I used Dritz Metallic Beading Cord
  • Mini Pony Beads in various colors*
  • Scissors

*Full size pony beads will work too. I just prefer the appearance of the small ones

Cut 16 inch lengths of the cord. If you're making these with a group i.e. a summer camp project or scouting group, it's easier to have the cord pre-cut.

About 4 inches from one end, make a loop with the cord crossed.

Hold the cord where it crosses, and make a loop with the longer end and put it in the first loop.

Pull to tighten.

Now you'll put on the first bead, just push the loop through it. The holes in the pony beads are big enough for the folded elastic cord.
Make a loop in the long end, and put through the loop coming out of the bead. Pull to tighten the first beaded loop.
Add another bead.
You'll continue adding beads in the same manner, 6-10 beads looks good. Then to the beaded section, make a loop and pull it through the previous loop.
Then instead of adding a bead, pass the end of the cord through the loop. Pull to tighten. Until this step it's easy to pull it all apart by giving the working end a tug, this step locks the beads.


Tie the ends in an overhand or square knot, trim ends. Because it's elastic, it's easy to put on and off. 

My grandmother used to make necklaces in a similar fashion. She would use a metallic elastic thread instead of cord, chain from the beginning and intersperse plain chains with beaded chains using plastic pearls. 

Saturday, June 16, 2012

Farmer's Market and Photo Jewelry

This European photo bead bracelet has 4 photos each of my children. It was so easy to put together and you can find more information on BellaOnline Beadwork.


The Spenard Farmer's Market-
We have a lot of local farmer's markets on Saturdays. So many that I know we haven't made it to all of them yet. Out of the local markets we have been to, my favorite is the one in Spenard.

It takes place on Saturdays in the summer here in Anchorage, under the windmill that's in the parking lot of what is arguably Alaska's most well known bar. Saturday nights the place is jumping with young adults all dressed up to party and dance. Saturday during the day it's laid out with tents and tables for various vendors. I've seen this market grow a lot in the last few years.

The reason it's my favorite is the vibe. Each market has it's own feeling. The Spenard market feels like a neighborhood party. There's a hippy feel to it in some ways too. Lots of crafters have tables and booths. You can buy starts for your garden, cheese, honey, and all sorts of things.

When we got there, the first thing we did was get TG a bottle of blueberry kombucha. I would have taken a photo of her drinking it, but by the time I was going to, it was gone. She loves kombucha.

Then we ran into John, who owns Bosco's Comic Book store in Spenard. Since it was kid's day, he was there with leftover Free Comic Day comics and a big Death Star to destroy.

While TG was destroying the Death Star, Michael and I hit up Denali Dreams Soap Company. My daughter had pointed out we were out of soap. William, TG and I all use locally made soaps all the time. My husband uses Dr. Bronner's Peppermint Liquid Soap. So we've been using his soap for the last week. Since we are still pretty tightly budgeted, we bought bags of soap ends from them. Soap ends are the end cuts that just aren't as pretty. They bag them up and sell them for less than half of the cost of their full bars per ounce of soap. They also had a newer product. Soap shreds, the fine trimmings from bars, like a colorful soap confetti. The bags of these were 1.00 a bag, and we picked up 4 bags to use for soap crafting. Since they were giving away samples, TG picked up a blueberry one for herself.

Then TG and I decided it was lunch time. There were a lot more options than last year! I decided on Hawaiian BBQ.

Yum! My husband said he wasn't hungry, I think he took a look at all that food and knew I'd never finish!
I also grabbed a musubi roll for William which is in the fridge now until he comes over later.

TG decided on tacos. Her tacos were messy and tasty. Meat, cilantro, onions and tomatoes.

There was a bowl of sidewalk chalk on the table. Nobody had done any drawing yet, but she grabbed a piece. Michael said "I know what she's going to do."
He was right.
The last thing we got before we left was quail eggs. If you haven't cooked with quail eggs before, they are incredibly beautiful and tiny.


Tuesday, June 12, 2012

Paper Bangle Bracelets- Tutorial


I'm really excited about these super easy upcycled paper bangles because there are so many possibilities for them, using a strip of paper for the outside I could put images or type a quote using one of my typewriters on it. They are made very easily using things would normally be thrown into the recycling bin and a new kind of paint which I won from the weekly drawing at Craft Test Dummies.

Luminarte's Silks Acrylic Glazes makes the perfect paint for these because they are sheer but well pigmented. You can use them wet on wet or wet on dry. I thought of doing stripes or something more ordered, but I really like the look of the layered random effect of the paints.

You will need:

  • Thin cardboard
  • strips of paper- I used newspaper for the one above.
  • White PVA glue- I used Aleene's Tacky Glue 
  • Silks Acrylic Glazes- I used Sky Blue, Watermelon Mist and Solar Gold
  • Acrylic Spray Sealer
  • Scissors
  • Paint Brushes
  • foam brush
This made much like paper mache, but using straight PVA glue instead of a paper mache mix. 
The base of the bracelet is a strip of cardboard from a cereal box or something similar. The easy way to size it is to cut a strip and wrap it around your hand at the widest part, then add an inch for the overlap.
For a quick reference though-
8 inches for a small bracelet (7 inches in circumference, 2.22 inches in diameter)
8.5 inches for a medium bracelet (7.5 inches in circumference, 2.38 inches in diameter)
9 inches for a large bracelet (8 inches in circumference, 2.54 inches in diameter)

Cut the cardboard the width you want the finished bracelet to be, and measure a 1/2 inch in from both ends. Cut slits on both ends to overlap them together on opposite edges.

Glue the overlapping pieces down. Cut lots of 1/4 inch wide strips of your paper. Put a thin layer of glue on the base, an inch at a time, and wrap on a slight diagonal, overlapping the edges. Apply more glue, and keep wrapping. Do at least 3 layers of paper, and set it aside to dry.

After it's dried, decide what you want the outer layer to be, and apply that. You can either cut a strip that's the same width and circumference around, or you can do what I did and cut more 1/4 inch strips to wrap around it. Apply with a thin layer of glue. Let dry.

Then the fun part, painting! The glazes are gorgeously pigmented, and work on a lot of different mediums. I wish I could properly photograph how they look on black rubber! They are very sheer and add a nice sheen of color to the rubber. On paper, they look a lot more like they do in the jar, but in sheer layers. Just paint, have fun layering colors. I put on the pink first, then put the blue on the outside. Let that dry, and added more pink and gold in spots. The end result is a lot of subtle shades of purple and green on the blue.

Let the glaze dry, and spray with an acrylic sealer. The end result is a lightweight, inexpensive bangle bracelet.


Saturday, April 21, 2012

Duct Tape Comic Book Cuff Bracelet

Also from my old blog.

Super easy to make.

Measure your wrist, add 1.5 inches for the overlap where the Velcro dots are, then add two inches, cut a piece of duct tape that long. Fold over one inch on both ends. Cut a picture from a comic book or magazine or print out something nifty to fit, and put it on the sticky side between the folded over ends.
Put clear packing tape or clear duct tape over that.

Use two sets of Velco sticky dots, and the rough side to the soft side so you have them in matched pairs. Peel of the backing from the rough side and position them on the upside (graphic side) of your bracelet, then pull the backing off the soft side, and wrap the bracelet around to place them on the other side. (perfectly placed to match up now!)

Duct tape is generally about 2 inches wide, and I recommend 3M Scotch tape whenever the colors work because it's a thinner tape than the other major brands so it makes a fabric that molds a lot better. It seems like it's more expensive, but if you work it out at price per foot, it's usually about the same or with coupons or BOGO deals, a lot less expensive.

The first Saturday in May is Free Comic Book Day. Look for participating locations in your area. In Anchorage, that's Bosco's, and they will also have a concert that evening with Marian Call. 

Sunday, April 1, 2012

Crochet Beaded Wrap Bracelet Pattern


I used light spring colors, but this would work in other shades, and the basic technique will work with other weights of yarn. Just size the beads up or down to match and the number of stitches.

You will need:

  • size 10 thread (bedspread weight)
  • size 6 steel crochet hook (1.6 mm)
  • tapestry needle
  • 5/8th inch button
  • size 8 seed beads - a size 8 seed bead is about 3mm
  • needle and thread for loading beads
All of the supplies for mine came from my stash, the thread is from a thrift store, the button is from my button box, and the beads are one of my favorite colors, Orange Opal Gold-Lined. 

American terminology
  • ch=chain
  • sc=single crochet
  • repeat ** means repeat the step between the asterisks.

To work a beaded single crochet: Insert hook into stitch, yarn over, pull loop through stitch, push up bead, yarn over, finish stitch. 

Loading beads on size 10 thread is easy, if you're using hanked beads, you'll pull a string loose, take off a couple of beads, then tie the thread and string together and slide the beads off the hank onto the thread. For beads that aren't on a hank, thread the small needle with sewing thread, double it and tie in a knot, then put the crochet thread through the loop, and load the beads on the needle and slide them down on to the crochet thread.

String 61 beads on thread (66 for a large wrist, 56 for a smaller wrist, 51 for a child)

Loosely chain 147 (157, 137, 127)

Row 1: Beaded single crochet in 17th chain from hook (button loop formed),* ch 1, skip stitch, beaded single crochet* repeat **, sc in last 10 chains.

Row 2: Ch 1 to turn (does not count as first stitch), sc in last sc of previous row, sc in next 9 stitches, sc in beaded sc,* sc in ch space, sc in beaded sc*, repeat ** to the end of the beaded section, 16 sc in ch 16 space, sc in each stitch down the other side. On the last stitch, cut the thread, leaving a tail to weave in, and pull through last stitch. I secured the last stitch with a half hitch knot, then wove in the ends.

Sew button to center of the 10 stitch single crochet end. 

You can also make this a choker style necklace. 


Sunday, March 18, 2012

Zig Zag Soft Bangle Bracelet Pattern- crochet

This is the easiest of all my crocheted bracelet patterns. It's just chains and single crochets, worked in a strip then sewn together to make a ring. My daughter loves her chunky soft bangles, including these.
The ones shown above were made using Lion Brand Fun Yarn, which is an acrylic yarn that comes in small skeins that using a 20% off yarn coupon at my local Fred Meyers costs 80¢. It comes in bright colors, and I got several skeins for my daughter to use in her projects.

You will need:

  • Worsted weight yarn
  • Size F or 3.75mm hook
  • Yarn needle
Pattern written in American terminology

Chain 4
Row 1: 2 sc in first chain, ch 3
Row 2: 2 sc in last sc of previous row, chain 3
Row 3-24: Repeat row 2
Break off yarn and stitch ends together, making sure they aren't twisted. Weave in ends. Size it up or down in 2 row increments.

This simple technique creates a nice soft zig-zag effect and works up super fast. Great way to use up small amounts of yarn. It can be done in other yarns, just use a hook size that's 1 or 2 smaller than the hook recommended and increase or decrease the rows as needed for length. Good project for beginning crocheters or crocheters who just want a super simple tv watching project.

Previously posted crocheted bracelet patterns on this site-
A thread and button bangle bracelet pattern
Thread crocheted cuff fastened with buttons pattern
Ribbed yarn bangle bracelet pattern
Yarn bangle bracelet pattern-2 colors

Sunday, August 7, 2011

Rose Rulers


Because it's absolutely essential that rulers print out exactly, the rulers are in PDF format. Both colorways to be printed on one sheet of cardstock in US letter and A4 format. The rulers are 3 inches wide and 10 inches long marked in both cms and inches. I suggest either laminating or spraying with clear acrylic. 
Right click and save the US Letter format rulers HERE.
Right click to save the A4 format HERE.

I also posted a memory wire charm bracelet project at BellaOnline.

Friday, March 25, 2011

Japanese Seed Beads FTW!


Believe it or not, that's a color photo. Auntie's Beads sent me a wonderful selection of black and white themed seed beads.

I love Japanese seed beads. They are so uniform and have really large holes to work with, and for designs like this bracelet

-
EDIT: Just finished instructions, which you can find here.
the rounder shape of seed beads works a lot better than cylinder beads. 
I use the larger sizes in seed bead designs like the bracelet above, which is made with size 8 gunmetal, size 8 silver gray ceylon and size 11 matte black and crystal. I also use the larger sizes a lot in thread crocheted amigurumi dolls. They work perfectly for eyes and small details. 
I think my favorite thing about them is the range of colors and the consistency of them. 
I'll be posting instructions for the bracelet on beadwork at BellaOnline after I get it all diagrammed. My husband thinks the technique would work very well for USA flag bracelets so I'll graph one. I think this bracelet design would also work very well using seed bead mixes, and Auntie's Beads has some lovely color themed mixes available on their seed beads page.
The button clasp came from my personal button collection.


Thursday, March 17, 2011

Crocheted Button Bangle


This pattern, like my dice bag pattern, is very modifiable. It can be adjusted according to the thread, hook sizes and buttons you have. My instructions are for size 10 thread with a size 6 (US) steel hook (1.8 mm), and vintage 3/8th inch buttons from my collection. US terminology.

The button crochets are done by sliding the button up the thread to the bracelet and inserting the hook into the stitch behind the button yarn over, pull through the stitch, 2 loops on hook, yarn over, and pull through the loops. So basically it's a just a single crochet after you push the button up.
This pattern is confusing in the second part. Just try it. It works up fairly fast since it's only 64 stitches and 3 rows, if the last row doesn't work right for you the first time, pull it out and try again. 

Button Bangle Pattern:
Size 6 (US) steel hook
Size 10 Bedspread weight cotton
8 3/8th inch buttons with 4 holes
Tapestry needle that you can thread with the size 10 cotton and that will go through the button holes
Scissors

Thread the 8 buttons on the cotton making sure they are all facing the same way.

Chain 64, join chain with a slip stitch, be careful not to twist.
Row 1: Chain 1,single crochet in each stitch around, slip stitch to join
Row 2: Repeat row 1
Row 3: ch 1, single crochet in first 3 stitches, slide button up to the bracelet, single crochet in stitch behind button, *single crochet in next 7 stitches, add button single crochet*, repeat **  6 times (until all buttons are added), single crochet in next 4 stitches, slip stitch to join, break off thread.

Now for the kind of tricky part. Thread the 8 buttons on the thread the hole diagonal from the first one and slide down the thread. You'll need to be able to slide it down the thread a few times to finish this, just pull up a thread after the 4th button to make a loop from the ball of thread, then pull it through the other 4 buttons to give yourself more working thread.

Chain 64, join chain with a slip stitch, be careful not to twist.
Row 1: Chain 1,single crochet in each stitch around, slip stitch to join
Row 2: Repeat row 1
Loosen up the thread in buttons so the bracelet is open, and put the part you just worked inside the first part of the bracelet, add more thread to your working thread as needed by pulling it off the ball and pulling up loops between the buttons a little at a time until you have enough thread to work with.
Row 3: ch 1, sc in first 3 stitches, pull the thread between the first and second buttons until your working end is right up against the button, button single crochet, single crochet in next 7 stitches, now you need to take a good look at your bracelet to see which direction to go in, spreading out the this part inside the first part worked best for me. Pull thread between the second and third button until the row you are working is flush with the button, button single crochet. Continue that around, with 7 single crochets between each button single crochet, ending with 4 single crochets and a slip stitch to join.

Weave in ends.

Modifying this pattern is easy. Just make sure you have a number of stitches divisible by the number of buttons you want to use and that the buttons won't be too crowded, you can also adjust size this way. So if the best fit for your wrist is 70 stitches, you could use 7 or 10 buttons easily. Because it's a soft bangle, you can make it a bit smaller than your favorite metal bangle. The flexibility makes it easier to put on.  With smaller thread you may want more plain rows. 

Check out my Ravelry pattern page here.


Monday, October 11, 2010

Crocheted Bracelet Pattern

First, thank you for the nice comments on my post about my mother's birthday. My family had a lovely time going out to eat and going to the thrift store. Someone had come in and bought ALL their craft books that day so I missed out on those, but I did find a great little pamphlet of honey recipes and some pressed glass dessert dishes exactly like mom's. The teens both found things they wanted and I found a mechanical egg beater for a 1.00 that just needed a minor fix. Mike fixed it and the Turnip is thrilled. She just thinks it's the neatest thing ever.

2 Color Crochet Bangle Bracelet
The ribbed crocheted bangles are still being worn a lot by my daughter. Last night I made her this one as well.

It's very quick to stitch, 2 chains, 7 rows total, and 2 hook sizes, then sew it together.
You'll need:
yarn- worsted weight - 2 colors- I used stashed kitchen cotton yarns (the kind you use for dishcloths or potholders)
a size F hook
a size G hook
yarn needle
scissors

ch=chain
sl st= slip stitch
sc= single crochet
dc=double crochet

With the base color,  F hook 
Ch 32, slip stitch to join, being careful not to twist the chain
Round 1: Ch 1 (does not count as first stitch), sc in each stitch around, sl st in first sc to join.
Round 2-4: Repeat round 1 (I said this was easy right?)
Break off yarn and weave in ends. 
The inside of your bracelet is done. Now to do the outside.
Contract color, G hook
Leave a 12-15 inch long tail for stitching one side of this part of the bracelet to the other part. 
Ch 32, slip stitch to join, being careful not to twist the chain
Round 1: Ch 1 (does not count as first ch), sc in each stitch around, sl st in first sc to join.
Round 2: Ch 3 (counts as first dc and ch space), ch 1, skip one stitch, dc in next stitch,* ch 1,skip one stitch, dc in next stitch*, repeat ** around, ch 1, sl st in 2nd ch of starting ch 3 to join. (16 spaces total)
Round 3: Ch 1 (does not count as first ch), sc in each stitch around, sl st in first sc to join.
Break off yarn leaving a long tail for sewing and weave in ends.

Put the first part of the bangle inside the part you just finished, and sew them together using a running stitch. Try not to pull the stitches  tight, you want to have some give in the bracelet. Weave ends in.


Thursday, July 29, 2010

Ribbed Soft Bangle (crocheted)


Originally, I was going to make a wrist wallet for my daughter who doesn't always like to carry her purse or wear something with pockets if she's just going to the convenience store. The idea didn't work out as planned so a few rows in, I decided "bangle bracelet".
That's the one on the bottom. She loved the bangle and has worn it every day since I finished it.

Really easy to make, and I think I'm going to try a beaded variation soon.
Abbreviations:
ch= chain
sc= single crochet
sl st= slip stitch
fpdc= front post double crochet, yarn over,  insert your hook around the post of the dc on the previous row from the front, finish double crochet as usual.
bpdc= back post double crochet, yarn over, insert your hook around the post of the dc on the previous row from the back, finish double crochet as usual.
After the first row of fpdc and bpdc all the fpdcs and bpdcs are worked on the previous row of them which forms the ribbing. It's a very simple technique if you haven't tried it before.
Ribbed Soft Bangle Pattern
Supplies:
Worsted weight cotton (dishcloth type yarn)
Size F hook
Size G hook
As shown, the finished bracelets have a 3 inch inner diameter.
For both bracelets:
Chain 30 loosely and join chain with a slip stitch being careful not to twist the chain.
For different sizes, a multiple of 6 for the top bracelet, a multiple of 2 for the bottom.
With F hook
Round 1-5: Ch 1(does not count as first stitch), sc in each stitch around, sl st to join.
For the bottom bracelet:
Switch to G hook
Round 6: ch 2 (counts as first dc), dc in back loop of each stitch around. Sl st to join.
Round 7: ch 2 (counts as first dc), fpdc in next stitch, bpdc in next stitch, alternate fpdc and bpdc all the way around, ending on a fpcd. Sl st to join.
Round 8: ch 2 (counts as first dc), fpdc in fpdc of previous round, bpdc in bpdc of previous round. Repeat all the way around ending with a fpdc, sl st to join. 
Break off yarn leaving a long (at least 14 inches) tail. 
Fold the tube in half with the single crochet rows on the inside and the ribbing on the outside. Stitch closed all the way around working in the back loops of the ribbed rows and through the beginning chain on the single crochet side. Weave in all ends.
For the top bracelet:
Switch to G hook
Round 6: ch 2 (counts as first dc), dc in back loop of each stitch around. Sl st to join.
Round 7: ch 2 (counts as first dc), bpdc in next 2 stitches, fpdc in next 3 stitches,* bpdc in next 3 stitches, fpdc in next 3 stitches*, repeat ** around ending with 3 fpdc. Sl st to join.
Round 8: ch 2 (counts as first dc), bpdc in all bpdcs, fpdc in all fpdcs. Join with sl st. 
 Break off yarn leaving a long (at least 14 inches) tail. 
Fold the tube in half with the single crochet rows on the inside and the ribbing on the outside. Stitch closed all the way around working in the back loops of the ribbed rows and through the beginning chain on the single crochet side. Weave in all ends.

You can vary the ribbing counts to make different styles. It makes a nice, chunky soft bangle bracelet. 


Tuesday, June 22, 2010

Reclaimed rubber bracelets


The people at Alaska Bicycle Shop have been very kindly saving damaged bike tire inner tubes for me. When I went to pick them up they had 37 in a basket for me. More than enough to make lots and lots of bracelets, but given how versatile this material is for crafting, I suspect still not enough.
If you have a bicycle tire inner tube from your own bike, or can get them from a local bicycle shop or friends, these bracelets are very fast and easy to make.
You will need:
A prepared piece bicycle tire inner tube
snaps and snap setter - I used Dritz snaps
scissors or craft knife- I used tiny sharp scissors that aren't quite sharp enough anymore for my beading thread, but still in fine shape for the rubber
a light colored gel pen
rubbing alcohol
stencil

To prepare a piece of the inner tube, cut off a length that's an inch longer than the bracelet you want to make. Cut it open and with hot soapy water and a dish scrubbie, scrub off the white powder residue from the inside of the inner tube. Let dry.

Prepare the stencil. I just printed it out on paper and cut out the pieces. Click on the image for the full sized version. You may need to modify it somewhat for the width of the inner tube you are working with, making the flower petals a little closer or maybe a little bigger. 


Using the stencil, trace the design on the back of the inner tube using the gel pen, then cut out the negative spaces. 
Cut around the whole design leaving about 3/8th of an inch border around it and tabs on either side to attach snaps to. Double check the size on your wrist before cutting the tabs!
Attach snaps following the instructions on your package of snaps. The gel pen marks from the back can removed with a bit of rubbing alcohol.
On, these look almost like tattoos. The rubber may try to curl some when it's lying flat, but once it's on it's flat. Some of the inner tube may have printing on it, and that adds a nice bit of character to these sorts of bracelets. My son plans to do some mystery braid bracelets using the same material. Absolutely one of the best reclaimed materials I've ever worked with.

Comments locked because of spam. Sorry about that! 

Thursday, January 14, 2010

Hugs and Kisses bracelet project


You can find instructions for this bracelet on Beadwork at BellaOnline. It was an adventure making it. I don't like 2 needle techniques. I like them even less when the phone rings, I go to answer it, come back and find out one of my needles has mysteriously disappeared. Then later in the project,  no idea how, I lost a second needle. Oh well, Mike will probably find it.
Sally says my cookie boxes are good for bracelets. Wouldn't that be fun? I can make my daughter one of these and package it up in one of the hugs and kisses cookie boxes I posted earlier this week!