Printing Tips

Check out my printing tips if you're having problems printing to the right size
If you'd like to support this site and all the free things I post- please check out my Don't Eat the Paste Mandala collection coloring book for 9.99 at Amazon.
Showing posts with label crochet pattern. Show all posts

Sunday, July 9, 2017

Bubble Necklace

Bubble Necklace

Size 10 crochet cotton
Size 7 hook
Tapestry needle
scissors
one of those bubble things for weddings I bought a box of 50, but hopefully you know people who might have them or who you can share them with, or if you want, you could make them for craft shows and the like.

Ch 2 or magic ring start.
Rnd 1: sc 6 times in first ch or magic ring, sl st to join.
Rnd 2: ch 1 (doesn't count as first stitch) 2 sc in each st, sl st to join (12 sts)
Rnd 3-4: ch 1 (doesn't count as first stitch) sc in each st, sl st to join (12 sts)
Rnd 5: ch 1(doesn't count as first stitch) sc in same stitch, *ch 3, skip stitch, sc in next st* repeat ** 4 more times, on the last loop, ch 1, dc in first sc (6 loops)
Rnd 6-20: ch 1 (doesn't count as first stitch), sc in loop, *ch 3, sc in next loop*, repeat ** 4 more times, ch 1, dc in first sc (6 loops)
Rnd 21: ch 1 (doesn't count as first stitch), sc in loop, ch 1, *sc in next loop, ch 1* repeat ** around, sl st to first sc (6 ch 1 spaces)
Rnd 22-23: ch 1 (doesn't count as first st), sc in each stitch and space around. sl st to join. (12 sts)

Chain a length long enough to slip over your head (or a child's head) easily, slip stitch to join on the other side, sl st back up the ch, sl st in starting st, break off and weave in ends. Put the bubble tube in it.

Monday, June 27, 2016

Bulky Handspun Crochet Jar Cozy (fits pint sized jar)

Free crochet pattern for a jar cozy


This is going to be my 100th design on my Ravelry page! I feel like I should be celebrating.


This jar cozy was made using a skein of handspun yarn from a local spinner. It's 6 wpi so the pattern will work with bulky-super bulky yarns. Just check the gauge! The same technique will work for finer yarns, increasing stitches. I'll be doing a version in a worsted weight cotton soon.

I had this half finished and was trying to figure out how to cinch the top so it wouldn't just be a sleeve when I spotted my hair elastics. I put one around the top of the jar and it was perfect! So the last round is stitched around that.

Wool Jar Cozy Pattern

Pattern is in American terminology

Gauge- First 4 rounds=3.5 inches

Supplies needed:

  • 40-50 yards of  bulky yarn or hand spun that's 6 wpi
  • size K hook
  • yarn needle
  • no metal thin hair elastic OR strong cord elastic. 
  • scissors


Fits 1 pint Ball® canning jar- regular mouth

Crochet jar cozy- supplies and pattern


Abbreviations:
  • ch= chain
  • sc = single crochet
  • dc= double crochet
  • sl st= slip stitch
  • st or sts= stitch or stitches
Ch 2 or magic circle, chain 1

Round 1: sc 6 times in first stitch/ring, sl st to join (6 sts)
Round 2: ch 1 (does not count as first stitch), 2 sc in each st around, sl st to join (12 sts)
Round 3: ch 1 (does not count as first stitch), sc in first st, 2 sc in next st, *sc in next st, 2 sc in next st*, repeat ** around, sl st to join. (18 stitches)
Round 4: ch 1 (does not count as first stitch), sc in first st, sc in next st, 2 sc in next st, *sc in next st, sc in next st, 2 sc in next st,* repeat ** around, sl st to join (24 sts)
Round 5: ch 1 (does not count as first stitch), sc in each st around (24 sts)
Round 6: ch 3 (counts as first dc), dc in next st, dc in each st around, sl st in 3rd chain to join (24 stitches)
Round 7: ch 1 (does not count as first stitch), sc in each st around (24 sts)
Round 8: ch 1 (does not count as first stitch), sc in each st around (24 sts)
Round 9: ch 3 (counts as first dc), dc in next st, dc in each st around, sl st in 3rd chain to join (24 stitches)
Round 10: ch 1 (does not count as first stitch), sc in each st around (24 sts)
Round 11: ch 1 (does not count as first stitch), sc in each st around (24 sts)
Round 12: ch 3 (counts as first dc), dc in next st, dc in each st around, sl st in 3rd chain to join (24 stitches)
Round 13: Holding the elastic in place on top of the stitches- ch 1 (does not count as first stitch), sc in each stitch around working over the elastic, sl st to join. (24 sts)

Weave in ends and put on your jar. 

This will help keep cool drinks cool and hot drinks hot. 


Thursday, April 7, 2016

Pendleton Selvages Rag Rug

Pendleton Selvages Rag Rug crochet pattern


I love Pendleton blankets so much, and love recycled crafts- so recently I ordered 19 lbs of scrap and mill ends from their store in Portland. You can check out the list and prices here- Pendleton Woolen Mills Store. To order the scraps, you'll email or call the company and talk to someone very helpful (excellent customer service!) and in my case, they invoiced me with the shipping rate. I live in Alaska so probably paid a bit more for shipping than most people in the US will- but even with shipping, this heavy rug cost less than 15 dollars to make, and took about a day with frequent breaks to do other things.

I ordered the flannel weight and ordered 10 dollars worth- and it's all this color! So expect to see more projects in this fantastic "yarn"- it's like a very fancy novelty yarn to work with, and crochets up dense and soft.
Pendleton selvage rug- detail

This isn't really a pattern because it's super easy to make. It's a simple rectangle worked back and forth in single crochet. It's more of a tutorial on how to use Pendleton selvage edges for making simple rag rugs. 

This takes about 3 lbs of flannel weight selvages. The selvages come in a fairly large ball.
Photographed on a Pendleton saddle blanket. 
The ball is doubled strands of selvage, and what I did was unwind and cut off a few lengths- the lengths are 6 feet long with bare warp separating them, then split the two strands. 

You see all that amazing texture? It all has those frayed edges and the fraying is in different lengths. 

When you get to a section of plain warp, cut in the middle of the section, then securely tie the two ends of warp together and trim the ends. 
I put the trimmed ends into a thread and scrap bag to use for stuffing toys later. Use it up!! 

To make the rug:
You will need a size S hook (19 mm) 
Scissors
3 lbs of flannel weight selvages

Chain 21 loosely
Sc in 2nd chain from hook, single crochet across. 
Ch 1 to turn, sc in each stitch across. 
Repeat until you're out of selvages. 

The finished size of my rug is 25 inches wide on the 20 stitch side, and 35 inches long.

It's also incredibly plush and soft. My daughter thinks it's better as a lap rug than a stepping on rug because she loves the weight and softness of it. Because of the thickness of it, I like it for sitting on the stairs outside of my house- but what I made it for was the kitchen.

Sunday, September 20, 2015

Sunshine Shawl- crochet pattern

Sunshine Shawl

So this shawl has a bit of a story. When I finished my rainbow shawl- I had some yellows, oranges and reds leftover from the yarn sets I ordered for it. So I thought "Hey, I could make a sunshine shawl! and started it promptly with the idea it would be a simple half round with points!

It took a couple starts and restarts, but it did work out. However, I didn't keep notes, figuring I'd count it all up to write the pattern. But then within a day or two after showing it off and promising a pattern, I got a nasty virus and the idea of trying to work out the pattern was just more than I could handle.

This is one of my husband's favorite shawls on me. I'm not sure why, but he really likes this one!

You will need:
Darn Good Yarn Chiffon Ribbon 
2 skeins of orange
3 skeins of dark orange
2 skein of red
2 skein of yellow
There will be some leftover. I'm kind of guessing since some of it was leftover from the first shawl.

Size N hook
Scissors
Large needle or small hook to weave in ends
Because of the nature of the yarn, you can knot in color changes.
Pattern is in American terminology

sc= single crochet
ch=chain
dc=double crochet
sl st=slip stitch
Each odd number round begins ch 5, sc in first loop, and ends with ch 2, dc in first sc of previous round.
Each even number round is ch 1 to turn, sc in same stitch, ch 5, sc in next loop all the way across, then ends in ch 5, sc in 3rd chain from first ch 5 of the previous row. So the even number rounds have 1 less loop than the odd number round before it.

The odd number rounds have the increases, which are chain 5, sc in same loop.

Red
Chain 6- sl st to close

Round 1: Ch 5, sc in ring, ch 5, sc in ring, ch 5, sc in ring, ch 5, sc in ring, ch 2, dc in ring (5 loops)

Round 2: Ch 1 to turn, sc in dc, *ch 5, sc in next loop*, repeat ** 2 times, ch 5, sc in 3rd ch from first 5 from previous round. (4 loops)

Round 3: Ch 5, sc in first loop, ch 5, sc in next loop, ch 5, sc in same loop, ch 5, sc in next loop, ch 5, sc in same loop, ch 5, sc in next loop, ch 2, dc in first sc of previous round. (7 loops)

Round 4: Ch 1 to turn, sc in dc, ch 5, sc in next loop, repeat across round until the last loop, ch 5, sc in 3rd ch from first ch 5 on the previous row. (6 loops)

Round 5: Ch 5, sc in first loop, ch 5, sc in next loop, ch 5, sc in next loop, ch 5, sc in same loop, ch 5, sc in next loop, ch 5, sc in same loop, ch 5, sc in next loop, ch 5, sc in next loop, ch 2, dc in next loop. (9 loops)

Round 6: Ch 1 to turn, sc in dc, ch 5, sc in next loop, repeat across round until the last loop, ch 5, sc in 3rd ch from first ch 5 on the previous row. (8 loops)

Round 7: Ch 5, sc in first loop, ch 5, sc in next loop, ch 5, sc in next loop, ch 5, sc in same loop, ch 5 sc in next loop, ch 5, sc in next loop, ch 5, sc in next loop, ch 5, sc in same loop, ch 5, sc in next loop, ch 5, sc in next loop, ch 2, dc in first sc of previous round. (11 loops)

Round 8:  Ch 1 to turn, sc in dc, ch 5, sc in next loop, repeat across round until the last loop, ch 5, sc in 3rd ch from first ch 5 on the previous row. (10 loops)
Orange
Round 9:  Ch 5, sc in first loop, *ch 5, sc in next loop*, repeat ** 2 more times, ch 5, sc in same loop, ch 5, sc in next loop, ch 5, sc in next loop, ch 5, sc in next loop, ch 5, sc in same loop, *ch 5, sc in next loop*, repeat ** 2 more times, ch 2, dc in first sc of previous round. (13 loops)

Round 10: Ch 1 to turn, sc in dc, ch 5, sc in next loop, repeat across round until the last loop, ch 5, sc in 3rd ch from first ch 5 on the previous row. (12 loops)

Round 11: Ch 5, sc in first loop, ch 5, sc in next loop, ch 5, sc in same loop, ch 5, sc in next loop, ch 5, sc in next loop, ch 5, sc in same loop, *ch 5, sc in next loop*, repeat ** 4 more times, ch 5, sc in same loop, ch 5, sc in next loop, ch 5, sc in next loop, ch 5, sc in same loop, ch 5, sc in next loop, ch 2, dc in first sc of previous round. (17 loops)
Yellow
Round 12: Ch 1 to turn, sc in dc, ch 5, sc in next loop, repeat across round until the last loop, ch 5, sc in 3rd ch from first ch 5 on the previous row. (16 loops)

Round 13: Ch 5, sc in first loop, *ch 5, sc in next loop* repeat ** 2 more times, ch 5, sc in same loop, ch 5, sc in next loop, ch 5, sc in next loop, ch 5, sc in same loop, *ch 5, sc in next loop*, repeat ** 4 more times, ch 5, sc in same loop, ch 5, sc in next loop, ch 5, sc in next loop, ch 5, sc in same loop,*ch 5, sc in next loop* repeat ** 2 more times, ch 2, dc in first sc of previous round. (21 loops)
Dark Orange
Round 14: Ch 1 to turn, sc in dc, ch 5, sc in next loop, repeat across round until the last loop, ch 5, sc in 3rd ch from first ch 5 on the previous row. (20 loops)

Round 15: Ch 5, sc in first loop,*ch 5, sc in next loop*, repeat ** 2 more times,ch 5, sc in same loop, ch 5, sc in next loop, ch 5, sc in next loop, ch 5, sc in same loop, ch 5, sc in next loop, ch 5, sc in next loop, ch 5, sc in same loop, *ch 5, sc in next loop*, repeat ** 4 more times, ch 5, sc in same loop, ch 5, sc in next loop, ch 5, sc in next loop, ch 5, sc in same loop, ch 5, sc in next loop, ch 5, sc in next loop, ch 5, sc in same loop, *ch 5, sc in next loop*, repeat ** 2 more times, ch 2, dc in first sc of previous round. (27 loops)

Round 16: Ch 1 to turn, sc in dc, ch 5, sc in next loop, repeat across round until the last loop, ch 5, sc in 3rd ch from first ch 5 on the previous row. (26 loops)

Round 17: Ch 5, sc in first loop,*ch 5, sc in next loop*, repeat ** 2 more times,ch 5, sc in same loop, *ch 5, sc in next loop*, repeat ** 2 more times, ch 5, sc in same loop, *ch 5, sc in next loop*, repeat ** 2 more times, ch 5, sc in same loop, *ch 5, sc in next loop*, repeat ** 4 more times, ch 5, sc in same loop, *ch 5, sc in next loop*, repeat ** 2 more times, ch 5, sc in same loop, *ch 5, sc in next loop*, repeat ** 2 more times,ch 5, sc in same loop, *ch 5, sc in next loop*, repeat ** 2 more times, ch 2, dc in first sc of previous round. (31 loops)

Round 18: Ch 1 to turn, sc in dc, ch 5, sc in next loop, repeat across round until the last loop, ch 5, sc in 3rd ch from first ch 5 on the previous row. (30 loops)

Round 19: Ch 5, sc in first loop,*ch 5, sc in next loop*, repeat ** 3 more times,ch 5, sc in same loop, *ch 5, sc in next loop*, repeat ** 3 more times, ch 5, sc in same loop, *ch 5, sc in next loop*, repeat ** 2 more times, ch 5, sc in same loop, *ch 5, sc in next loop*, repeat ** 4 more times, ch 5, sc in same loop, *ch 5, sc in next loop*, repeat ** 2 more times, ch 5, sc in same loop, *ch 5, sc in next loop*, repeat ** 3 more times,ch 5, sc in same loop, *ch 5, sc in next loop*, repeat ** 3 more times, ch 2, dc in first sc of previous round. (35 loops)

Round 20: Ch 1 to turn, sc in dc, ch 5, sc in next loop, repeat across round until the last loop, ch 5, sc in 3rd ch from first ch 5 on the previous row. (34 loops)
Orange
Round 21: ch 5, sc in first loop,*ch 5, sc in next loop,* repeat ** 2 more times,ch 5, sc in same loop,*ch 5, sc in next loop,* repeat ** 2 more times,ch 5, sc in same loop,*ch 5, sc in next loop,* repeat ** 2 more times,ch 5, sc in same loop,*ch 5, sc in next loop,* repeat ** 2 more times,ch 5, sc in same loop,*ch 5, sc in next loop,* repeat ** 2 more times,ch 5, sc in same loop,*ch 5, sc in next loop,* repeat ** 2 more times,ch 5, sc in same loop,*ch 5, sc in next loop,* repeat ** 2 more times,ch 5, sc in same loop,*ch 5, sc in next loop,* repeat ** 2 more times,ch 5, sc in same loop,*ch 5, sc in next loop,* repeat ** 2 more times,ch 5, sc in same loop,*ch 5, sc in next loop,* repeat ** 2 more times,ch 5, sc in same loop,*ch 5, sc in next loop,* repeat ** 2 more times,ch 2, dc in first sc of previous round (45 loops)

Round 22: Ch 1 to turn, sc in dc, ch 5, sc in next loop, repeat across round until the last loop, ch 5, sc in 3rd ch from first ch 5 on the previous row. (44 loops)

Round 23: ch 5, sc in first loop,*ch 5, sc in next loop,* repeat ** 7 more times, ch 5, sc in same loop, *ch 5, sc in next loop,* repeat ** 6 more times, ch 5, sc in same loop, *ch 5, sc in next loop,* repeat ** 12 more times, ch 5, sc in same loop, *ch 5, sc in next loop,* repeat ** 6 more times, ch 5, sc in same loop, *ch 5, sc in next loop,* repeat ** 7 more times, ch 2, dc in first sc of previous round (49 loops)
Red
Round 24: Ch 1 to turn, sc in dc, ch 5, sc in next loop, repeat across round until the last loop, ch 5, sc in 3rd ch from first ch 5 on the previous row. (48 loops)
Dark Orange
Round 25:Ch 5, sc in first loop, *ch 5, sc in next loop*, repeat ** 15 more times, ch 5, sc in same loop, *ch 5, sc in next loop*, repeat ** 14 more times, ch 5, sc in same loop, *ch 5, sc in next loop*, repeat ** 15 more times, ch 2, dc in first sc of previous round (51 loops)

Round 26: Ch 1 to turn, sc in dc, ch 5, sc in next loop, repeat across round until the last loop, ch 5, sc in 3rd ch from first ch 5 on the previous row. (50 loops)

Start the points-
Attaching yarn from one tip:
Row 1:Sc in first sc, *ch 5, sc in next sc*, repeat ** 5 more times, ch 2, dc in next sc, (7 loops)
Row 2: ch 1,turn, sc in dc, *ch 5, sc in next loop*, repeat ** 4 more times, ch 2, dc in top of first loop of previous row. (6 loops)
Row 3: ch 1,turn, sc in dc, *ch 5, sc in next loop*, repeat ** 3 more times, ch 2, dc in top of first loop of previous row. (5 loops)
Row 4: ch 1,turn, sc in dc, *ch 5, sc in next loop*, repeat ** 2 more times, ch 2, dc in top of first loop of previous row. (4 loops)
Row 5: ch 1,turn, sc in dc, ch 5, sc in next loop, ch 5, sc in next loop,  ch 2, dc in top of first loop of previous row.  (3 loops)
Row 6: ch 1,turn, sc in dc, ch 5, sc in next loop, ch 2, dc in top of first loop of previous row. (2 loops)
Row 7: ch 1,turn, sc in dc, ch 6, sl in 4th chain from hook, ch 2, sc in top of first loop of previous row, break off. (1 loop with picot)

Start the next point in the same stitch as the end of the row 1 of the previous point.
7 points total. I used yellow for every other point, then used other colors in between the yellow. Adapt the points to the colors you have left after working the body of the shawl.
Weave in ends.


Sunday, September 13, 2015

Darn Good Apple Cozy

Darn Good Apple Cozy Crochet Pattern
I can't even tell you how much I love this yarn. I got a skein in a grab bag from Darn Good Yarn and balled it up and just pet it and stroked it until I had a plan for it. It's made from banana fibers! So yes, I wrapped my apple in bananas.

Darn Good Yarn Banana Fiber - they also have a gorgeous multicolor version- Kaleidoscope Banana Fiber

It's soft, fluffy, absolutely touchable. One ball will make an apple cozy with some leftover for making a bracelet or other accessory, 2 balls will make 3 apple cozies. The cozies fit the "school boy" sized small apples, but it would be easy to adjust the pattern for one of those huge apples if you're really apple crazy.

You will need:
Banana fiber yarn
Size K crochet hook
scissors
smaller hook to weave in ends OR a ribbon threaded through a tapestry needle to make a loop works too. The yarn does not go through needles easily.

Time- very short. These are quick, easy and make great gifts.
American terminology
Stitches:
chain=ch
sc= single crochet
dc= double crochet
sl st= slip stitch
st or sts=stitch or stitches
dec sc= insert hook in first st, yarn over, pull loop through, insert hook in next st, yarn over, pull loop through, yarn over, pull through all three loops on the hook.
Repeat ** means repeat the instructions between the asterisks.

Ch 2 or magic ring
Round 1: 6 sc in first ch or magic ring. Sl st to join (6 sts)
Round 2: ch 1 (does not count as first st) 2 sc in each st around, sl st to join (12 sts)
Round 3:  ch 1 (does not count as first st) sc in first st, 2 sc in next st, *sc in next st, 2 sc in next st*, repeat ** around, sl st to join. (18 sts)
Round 4: ch 1 (does not count as first st) sc in each st, sl st to join (18 sts)
Round 5: ch 1 (does not count as first st) sc in each st, sl st to join (18 sts)

Now we switch to back and forth rows.

Row 1: ch 1 (does not count as first st), sc in same st, sc in next 15 sts (16 sc)
Row 2: ch 1 (does not count as first st) dec sc over first two sts, sc in next 12 sts, dec sc in last 2 sts. (14 sc)
Row 3: ch 1 (does not count as first st) dec sc over first two sts, sc in next 10 sts, dec sc in last 2 sts. (12 sc)
Row 4: ch 1 (does not count as first st) sc in each st (12 sts)
Row 5: chain 15 at end of row 4. Sc in second chain from hook, dc in next 7 sts, sc in next st, sl st in next 5 ch, sc in next 12 sts, ch 15, turn, Sc in second chain from hook, dc in next 7 sts, sc in next st, sl st in next 5 ch, sl st to join. Break off and weave in ends.
Yay! Apple cozy done! In 5 rounds and 5 rows. Put in apple, tie the ties once.

Coming as soon! A pattern for my sunshine shawl.


Thursday, July 30, 2015

Rainbow Shawl

Rainbow shawl using Darn Good Yarn chiffon ribbon- crochet pattern
I love Darn Good Yarn so much, and while I was buying yarn for my purse, I saw the chiffon rainbow pack, which was unfortunately sold out. I knew right then that I wanted a rainbow shawl made from that yarn.

Darn Good Yarn is a pretty amazing company. Owned by a US veteran, selling fair trade yarn made from recycled goods, in incredibly bright, beautiful colors, a winner in every way.

To make this shawl, I ordered 2 rainbow packs of chiffon ribbon yarn from Darn Good Yarn. The ribbon packs come in different colors, so you don't have to make a rainbow shawl. Pick your favorite color packs. I just really like rainbows. The packs have 4 skeins each. The shawl works up very quickly. It took me 2 evenings to finish it.

In the end, I used 7 skeins, and had about half a skein left of the orange and yellow. Because of the nature of the ribbon packs, your colors may vary from mine, so you'll adapt the colors of the rows to fit the colors you get. Arrange your rainbow so color 6 is one you have two skeins.

UPDATE! 8-5-15 Darn Good Yarn has put together a kit of yarn to make this shawl! Available here- Rainbow Shawl Kit

My shawl used:
1 purple- color 1
1 red- color 2
1 orange- color 3
1 yellow- color 4
1 green- color 5
2 blue- color 6


A size N hook

Stitches used:
ch=chain
sl st= slip stitch
dc=double crochet

Some quick notes- because of the nature of the yarn, to change colors, I just tied square knots in the yarn and kept working, working the ends in as I went. That made it go fast, and it works because there are knots and loose ends from stitched together ends as well in the ribbon. It adds to the texture and makes it super easy.

When you're winding the center pull balls, make them loose and easy. Keep a pair of scissors handy to trim loose threads.

Pattern:
Using color 1= chain 6, sl st into ring
Row 1: Ch 4(counts as first dc and ch 1), dc in ring, ch 1, dc in ring, ch 1, dc in ring, ch 1, dc in ring (5 dcs 4 spaces)
Row 2: Ch 4 (counts as first dc and ch 1),dc in same stitch, ch 1, dc in next dc, ch 1, dc in next dc, ch 1, dc in same stitch, ch 1, dc in next dc, ch 1, dc in last dc, ch 1, dc in same dc

Now it's all the same pattern. All the rows start with Ch 4 (counts as first dc and ch 1), dc in same stitch, ch 1, dc in next stitch, until the center loop of the previous row, ch 1, dc in loop, ch 1, dc in loop, continue ch 1, dc in next stitch to the last stitch of the previous row, dc in stitch, ch 1, dc in stitch. So the increases are worked in the first and last stitch of the previous row and in the center.
stitches for Darn Good Yarn rainbow shawl


Rows 3-4 in color 2
Rows 5-6 in color 3
Rows 7-8 in color 4
Rows 9-10 in color 5
Rows 11-12 in color 6
Row 13-14 in color 1
Rows 15-16 in color 2
Row 17 in color 3
Row 18 in color 4
Row 19 in color 5
Row 20-21 in color 6

Fringe- Cut 43 pieces of ribbon 10 inches long. Pull loop of ribbon through first space, pull ends through loop and tighten, skip next space, put fringe in next space all the way around.

Tuesday, May 12, 2015

Festival Bun Cover- Photon Yarn

Recycled Silk Bun Cover Pattern

I'm so wild for this yarn, and the long bohemian fringe of it hanging from this bun cover.

The bun cover is actually made in 2 parts. The cover is one, and the fall is the other, so you can wear it without the fall. The yarn is Darn Good Yarn's Recycled Photon Rainbow Sport Weight Silk Yarn.
(check out this bracelet pattern in the same yarn)

To make this festive bun cover you will need:

  • 2 thick no metal hair elastics
  • Recycled Photon Rainbow Sportweight Silk Yarn
  • Size G hook
  • Yarn needle
  • Scissors

Stitches=

  • ch=chain
  • sc= single crochet
  • dc=double crochet
  • sl st= slip stitch
  • st or sts= stitch or stitches
  • repeat ** means repeat the instructions between the asterisks.


American terminology

Bun cover:
Ch 8, sl st to join
Round 1: Chain 1 loosely (counts as first stitch), 11 sc in ring, sl st to ch 1 to join (12 sts)
Round 2: Ch 5 (first dc and ch 2), *dc in next st, ch 2, * repeat ** 10 times, sl st to 3rd st in beginning ch 5 to join (12 spaces)
Round 3: ch 1 loosely, 2 sc in space, *sc in next st, 2 sc in space*, repeat ** 10 times, sl st to first chain to join (36 sts)
Round 4: Ch 5, skip 2 sts, *dc in next st, ch 2*, repeat ** 10 times, sl st to 3rd st in beginning ch 5 to join. (12 spaces)
Round 5: Repeat round 4
Round 6- Hold hair elastic against the last round, and single crochet over the hair elastic into the stitches on the last round to encase and attach the elastic. Sc in each stitch around, sl st to join. Break off, weave in ends.

Hair fall-
Cut 18 lengths of yarn twice as long + 2 inches as you want the fall to be. Working with 2 strands at a time, pull them through the other elastic and tie in overhand knot close to the elastic.


To wear it, you make your bun- I just twist a section of hair up and hold it in place while slipping the bun cover over, then hold the bun cover in place while putting the fall over it. Slip a nice hair stick through weaving it into your bun to lock it into position.


The bun cover above is made with Darn Good Yarn's Chiffon Ribbon, and I'm giving the pattern to them exclusively. Follow Darn Good Yarn and Shala's Beadwork and Printables on Facebook to find out when it's posted! (I'll also update this entry then) 


Tuesday, April 21, 2015

Recycled Chiffon Ribbon Purse

Darn Good Yarn - recycled chiffon sari ribbon purse
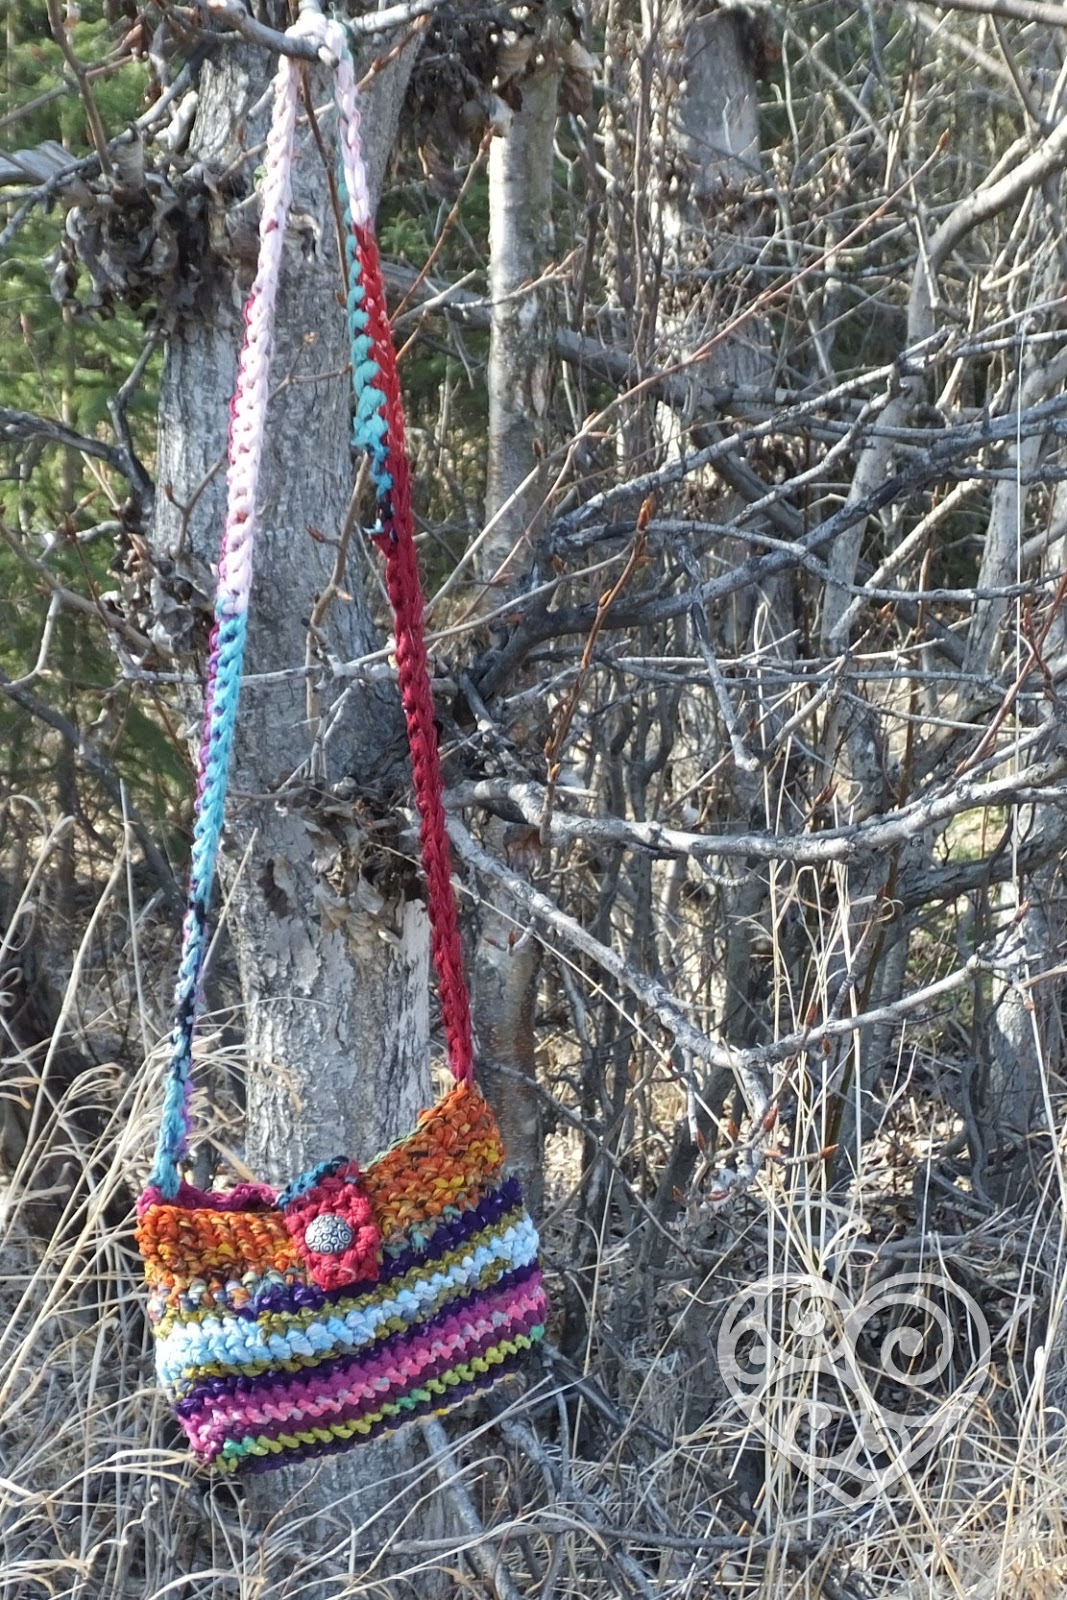
I'm wild for Darn Good Yarn's recycled yarn. This is actually the project that I originally ordered yarn for- a cross body hippie bohemian bag made in bright colors was just what I wanted. The bag is quite simple to make- it uses just chains, slip stitches and single crochets that show off the beauty and variations in the recycled yarn.

The purse takes just over 2 skeins of yarn- you can make it with 2 skeins if you do something simpler for the strap. You could make your own rag yarn, but the advantage to this yarn is that the thin chiffon makes a very workable yarn. The chiffon is sourced from saris and it's fair trade. I have this weird hangup about purses. Beyond preferring cross body and big enough for the stuff I carry daily, I also like recycled or upcycled. I buy my purses used, or handmade, or make them myself.

Click here for a discount on yarn! - the discount applies to your first purchase from Darn Good Yarn, and because of their amazing loyalty program, I'll get a credit to help pay for more pretty things from them! They have several assortments of the yarn used, it's more yarn than you'll need for this project, but that's good because I'll be posting a basket tutorial soon too and there are a lot of other things to do with the yarn. Check out the chiffon ribbon color packs. The color I used is Istanbul.

So first- some tips.


The yarn is going to have some natural variation. I noticed that some of the joins are stitched, and some are knotted. It also has raw edges that can unravel a bit. When you're balling it up, work a loose ball and don't use a ball winder. I wound center pull balls around my fist working nice and loose with a pair of scissors to trim long raveled edges as I wound. The skeins are easy to work with. One end is knotted, so you'll need to unknot it carefully when you reach the end. 

While you're crocheting, you may run across a join that's too bulky, just unknot it or clip it, taper the ends of the ribbons and tie a new overhand knot. Make sure you don't taper too narrow. It's so exciting watching the colors that are coming up next.  

The chiffon yarn is stronger than you'd think, it twists as you crochet into something like a ribbon rope.  You can use anything from a size K to a size Q hook easily with this- but since I wanted a purse that I may or may not line, I used a K for a nice tight stitch. 

Chiffon Ribbon Purse Pattern
American terminology

You will need: 
  • 2-3 skeins of Chiffon Ribbon Yarn
  • size K crochet hook
  • Yarn needle
  • Scissors
  • 1 inch button 

  • Ch=chain
  • sl st= slip stitch
  • st or sts= stitch or stitches
  • sc= single crochet


Chain 17 stitches, insert hook in second chain from hook and slip stitch to the end (this reinforces the bottom) 

Round 1: Ch 1 tightly (does not count as first sc) sc in first st, sc in next 14 sts, sc 4 times in end st, working down the other side, sc next 14 sts, 3 sc in end st, sl st to join (36 sts)
Round 2: Ch 1 tightly (does not count as first sc), 2 sc in same st, sc in next 14 sts, 2 sc in next st, sc in next 2 sts, 2 sc in next st, sc in next 14 sts, 2 sc in next st, sc in next 2 sts, sl st to join. (40 sts)
Round 3:   Ch 1 tightly (does not count as first sc), 2 sc in same st, sc in next 14 sts, 2 sc in next st, sc in next 4 sts, 2 sc in next st, sc in next 14 sts, 2 sc in next st, sc in next 4 sts, sl st to join (44 sts) 
Base formed
Rounds 4-17:  Ch 1 tightly (does not count as first sc), sc in same st, sc in each st around, sl st to join. Break off, weave in end. 

Strap: 
Chain 80-90 depending on the length you'd like. I like a longer strap so it hangs close to my hip. 
Sc in second chain from hook, sc in each st. 
Ch 1 to turn, sc in each st. Break off. 

Count back 2 sts from joining st on the bag, and stitch strap in place in next 2 sts. Count 20 sts from strap on one side, and join on the other side. 

Button hole tab- count 8 sts from strap on bag and join in yarn. Single crochet in that stitch and next 4 sts.
Rows 2-8: ch 1 to turn, sc in each st across
Row 9: ch 1 to turn, sc in first st, ch 2, sc in last st
Row 10-11: ch 1 to turn, sc in each st
Row 12: ch 1, skip first st, sc in next 2 sts, sl st in last st. Break off, weave in ends. 

Put the flap over the front and mark where to sew in button. Sew on button. I had a big shank on mine so I was able to use the chiffon ribbon. Otherwise just use strong thread or embroidery floss.

Darn Good Yarns Chiffon Ribbon Purse Pattern

I haven't decided if I'm lining it or not. If I do, I'll use one my husband's old, stained shirts to keep with the recycled theme, and possibly a salvaged zipper. My daughter saves zippers and buttons off the thrifted clothing she upcycles into costumes. 

Tuesday, March 10, 2015

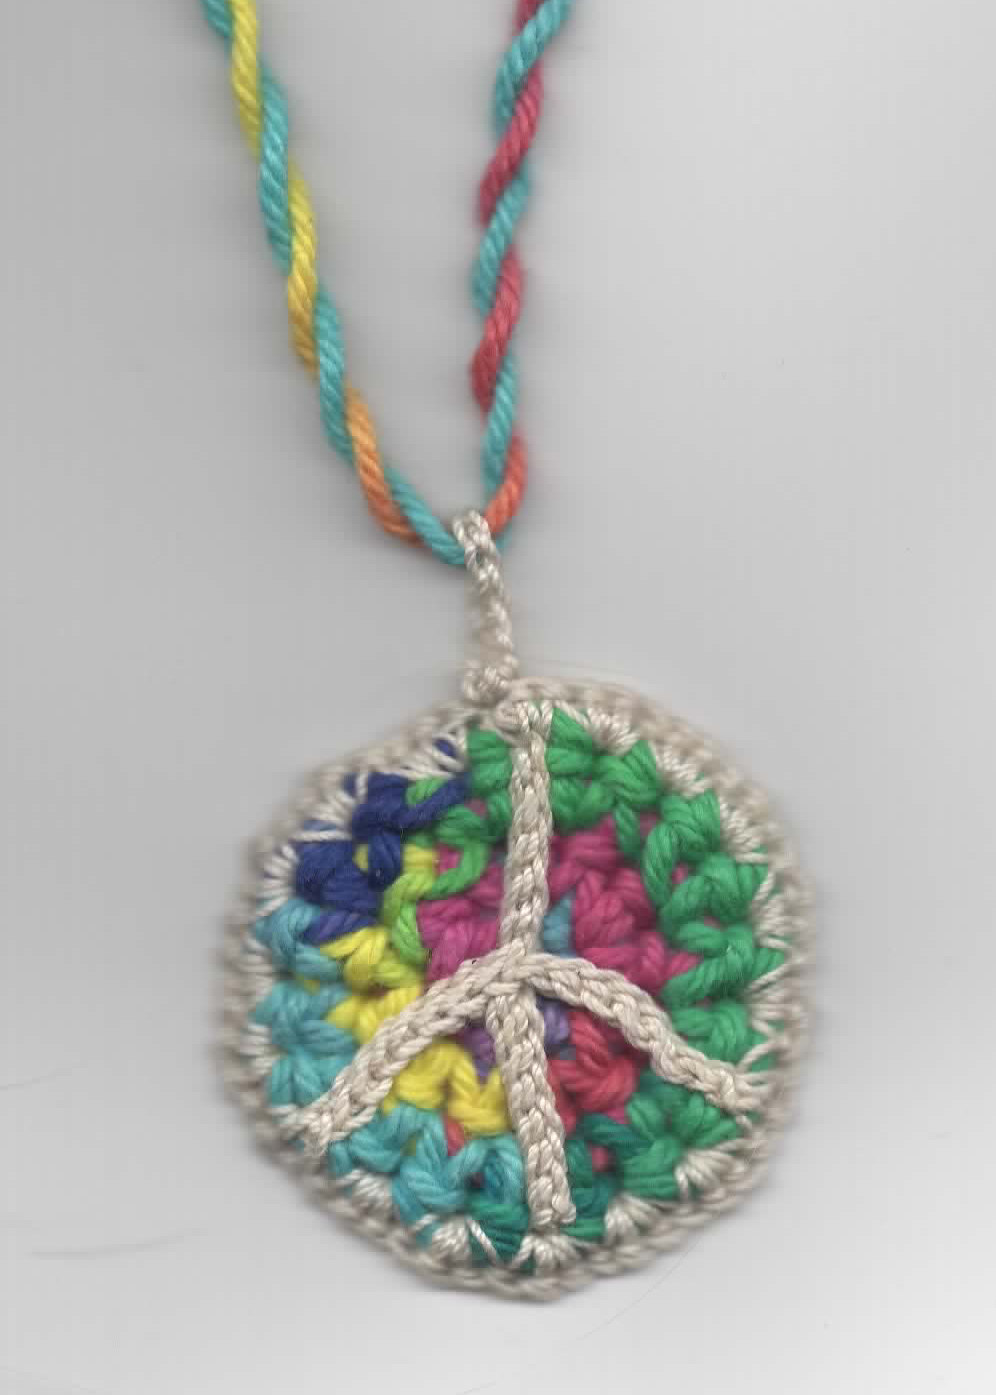
Crochet Peace Symbol Necklace

Crochet peace symbol pendant- with pattern!

I tease my daughter and tell her she's Hippie 3G. First generation was my mother, who was the right age, grew up in California, and was absolutely a hippie, political type. 
Second generation is me of course. After growing up in home full of sprouting jars, needle point, homemade yogurt and hummus way before it was trendy, I was either going to be a hippie or go totally the opposite direction right? (I still hate carob though. ICK!)
The Amazing Turnip Girl is pretty proud of being the 3rd generation of our family to wear tie dye, march for Equality, sprout, garden, make things and hug trees. 

One of my hangups is that I love peace symbol jewelry, but flat out refuse to wear a mass produced one. So I make my own, out of wire, wood and paper sometimes. This one, crocheted from American cotton is the newest one in my collection. 

Crochet Peace Symbol Pendant

It works up fast, and only needs a very small amount of yarn and thread. 

You will need:
  • Size G crochet hook
  • Size 7 steel hook
  • Worsted weight yarn- I used Lily Sugar 'n Cream in Psychedelic
  • Size 10 cotton thread- mine is from my stash and missing the label
  • scissors
  • needles to weave in ends
Stitch abbreviations:
  • ch= chain
  • sc= single crochet
  • sl st= slip stitch
  • st or sts= st or sts
American terminology used.


With yarn and size G hook-
Make a magic ring or ch:
Rnd 1: ch 1 (does not count as first st), sc 6 times in ring or first chain, sl st in first sc to join. (6 sts)
Rnd 2: ch 1 (does not count as first st), 2 sc in each stitch, sl st in first sc to join (12 sts)
Rnd 3: ch 1 (does not count as first st), sc in same st, 2 sc in next st, *sc in next st, 2 sc in next st*, repeat ** around, sl st in first sc to join. (18 sts) 
Break off, weave in ends.

With size 7 hook and thread-

First you'll make an X shape, then it's attached to the yarn circle to make the peace symbol.

Chain 16, in second ch from hook, sl st, sl st the next 7 sts (8 sl sts)
Chain 8, in second ch from hook, sl st back to the middle of initial ch, 
Sl st up remaining 7 stitches. Remove hook leaving a loop open.

Explaining this next part is going to look confusing. Refer to photo for help. 

Insert hook in top of yarn circle, pull thread loop through, ch 1 (does not count as first st) sc in same st of yarn circle AND top of thread X, sc in same stitch of yarn circle. 3 sc each in next 5 sts of yarn circle, 1 sc in next st of yarn circle, sc in same st of yarn circle AND end stitch of one side leg of the thread X, sc in same st of yarn circle, 3 sc in each of next 2 sts, Sc in next st of yarn circle, sc in same st of yarn circle AND the bottom st of the thread X, sc in same st of yarn of yarn circle, 3 sc each in next 2 sts, 1 sc in next st of yarn circle, sc in same st of yarn circle AND end stitch of second side leg of the thread X, sc in same st of yarn circle, 3 sc in each of next 5 sts on yarn circle, sc in next st, sl st to first sc to join. 

Chain 10, sl st to first chain to join. Bail made. Break off and weave in ends.

Make a cord to hang it. I did a simple twisted cord for this one, but a chain would work just as well. 


Do you like hippie, groovy things? Check out my coloring book! It's full of mandalas with things like peace symbols, lava lamps and doves!

Thursday, March 5, 2015

Crochet Pendant pattern

Crochet pendant pattern

I think I found a new favorite way to doodle with crochet while watching tv with my family, so if you like this crocheted yarn and thread pendant, let me know and I'll post more patterns later. The nice thing is they are quick to make, add a bit of color to an outfit and cost very little- they can be done with scraps of yarn and thread.

You will need:

  • small amount of worsted weight yarn 
  • small amount size 10 thread
  • size G crochet hook
  • steel size 7 crochet hook
  • needles to weave in ends
  • scissors

Stitch abbreviations:

  • Ch= chain
  • sc= single crochet
  • dc= double crochet
  • sl st= slip stitch
  • st or sts= stitch or stitches
  • repeat ** around means to repeat the instructions between the asterisks. 
With yarn and size G hook-
Make a magic ring or ch:
Rnd 1: ch 1 (does not count as first st), sc 6 times in ring or first chain, sl st in first sc to join. (6 sts)
Rnd 2: ch 1 (does not count as first st), 2 sc in each stitch, sl st in first sc to join (12 sts)
Rnd 3: ch 1 (does not count as first st), sc in same st, 2 sc in next st, *sc in next st, 2 sc in next st*, repeat ** around, sl st in first sc to join. (18 sts)

Break of yarn, weave in ends.
With thread and size 7 hook-

Magic ring or chain 6, join with slip stitch.
Rnd 1: ch 1 (does not count as first st), sc 12 times in ring, sl st in first sc to join. (12 sts)
Rnd 2: ch 3 (does count as first dc), dc in next st, ch 5, dc in next 2 sts, ch 5, dc in next 2 sts,ch 5, dc in next 2 sts, ch 5, dc in next 2 sts, ch 5, dc in next 2 sts, ch 3, dc in top of first ch 3 to join. (6 loops)
Rnd 3: ch 1 (does not count as first st), 3 sc in loop, skip next 2 sts, 3 sc in next loop, ch 3, 3 sc in same loop, *skip next 2 sts, 3 sc in loop, ch 3, 3 sc in same loop*, repeat ** 4 times, skip next 2 sts, 3 sc in loop, ch 1, dc in first sc of round to join. (6 ch 3 picots)

Rnd 4: Get the yarn circle, and hold it to the back of the of the thread flower. Remove hook from loop on flower, put it through one stitch on the outer rim of the yarn round, pull thread loop through the stitch. Chain 1, sc in st and the ch 3 picot on the flower together, sc in same stitch on the yarn round, 3 sc in next st on the yarn round, 3 in next st on the yarn round, sc in next stitch on the yarn round, sc in same st and the ch 3 picot on the flower together, sc in same st on the yarn round, *sc 3 times in next st on the yarn round, 3 sc in next stitch on the yarn round, sc in same st and the ch 3 picot on the flower together, sc in same st of the yarn round,*, repeat ** 2 times, 3 sc in next st of the yarn round, 3 sc in next st of the yarn round, sc in next st of the yarn round, join with sl st to first sc in round. 

Rnd 5: Ch 1 (does not count as first st), sc in same st, ch 3, skip next st, *sc in next st, ch 3, skip next st*, repeat ** around. Join final ch 3 with sl st to first sc to join. 

Chain 10, sl st in same sc to join. Break off thread, weave in ends.
Now you just need to make a cord for the necklace. I slip stitched a length for the cord shown, but you can also use monk's cord, a braided length, or even put it on a different kind of cord entirely. 

I hope you enjoyed the project! 


Thursday, August 21, 2014

Hand Sanitizer Backpack Clip crochet pattern

Hand Sanitizer Backpack Clip crochet pattern #backtoschool
Time for back to school, or you might be like me and find it sometimes helpful to have a small bottle of hand sanitizer available. This was designed for a store brand sanitizer- Kroger to be specific. This crochet pattern might need modification for other bottles to make it fit, but since the only shaping is in the neck area, it should be easy to adjust.

Hand Santizer Backpack Clip Crochet Pattern

You will need:

  • 2 colors of worsted weight yarn- I used Caron Simply Soft 
  • Size G or H hook
  • Carabiner clip with split ring
  • 5/8th inch button
  • Embroidery floss
  • yarn needle to weave in ends
  • tapestry needle to sew on button
  • hand sanitizer- mine is a Kroger brand 2 oz bottle


Stitches:

  • sc=single crochet
  • dc=double crochet
  • sl st=slip stitch
  • ch=chain
  • st or sts= stitch or stitches


Gauge- 3.5 single crochet stitches per inch, 4 rows per inch

Take the ring off your carabiner and slide it on to the main color yarn, push it up out of the way.

Chain 12 loosely, sl st to join being careful not to twist chain

Rnd 1: Ch 1 (does not count as first stitch), sc in same stitch, sc in each st around, sl st to join (12 sts)
Rnd 2: Ch 1 (does not count as first stitch), sc in same stitch,sc in next stitch, 2 dc in next st, 2 dc in next st, sc in next 4 sts, 2 dc in next st, 2 dc in next st, sc in next 2 sts, sl st to join (16 sts) - this round makes the increases and the shoulders of the bottle
Rnds 3-12: Ch 1 (does not count as first stitch), sc in same stitch, sc in each st around, sl st to join (16 sts)
Round 13: Ch 3 (counts as first stitch), dc in next stitch, slide the ring down and around the hook and stitches so it's hanging freely from the ch and dc, sc in next st, sc in each st around, sl st to top chain to join.
Round 14: Ch 1 (does not count as first stitch), sc in same stitch, sc in each st around, sl st to join (16 sts)
Break off yarn and weave in ends

Flap:
Join in accent color 2 stitches before the last stitch of the previous round.
Row 1: Ch 1 (does not count as first stitch), sc in same stitch,sc in next 5 stitches
Row 2-9: Ch 1 to turn (does not count as first stich),sc in same stitch, sc in each stitch across (6 sts)
Row 10:  Ch 1 to turn (does not count as first stich),sc in same stitch, sc in next st, ch 2 loosely, skip 2 sts, sc in next st, sc in next st.
Row 11-12:Ch 1 to turn (does not count as first stich),sc in same stitch, sc in each stitch across (6 sts)
Break off yarn, weave in ends.
Put the bottle in the pouch, and pull flap over the bottle, mark where the button will go, and stitch button into place.

Put carabiner on split ring and attach to backpack.

The nice thing about this is that it's easy to take the bottle out to refill or replace it, and you can make it in any colors. So you can match for school spirit, or you can use your favorite colors. Acrylic yarn makes it washable.

This is the bottle I used.

Monday, July 14, 2014

Cast Iron Skillet Box- crochet pattern


My daughter is a new cast iron enthusiast. It started with me getting her a skillet of her very own a few months ago, then I got a new grill pan for myself that she has been using regularly. So I decided to make her a little cast iron box for her rings. This box is very quick to make, but does take some piecing to attach the handles, and the disk on the lid so the lid sits right instead of just balancing on the pan.

You will need:
Black worsted weight cotton yarn- I used Lion Brand Kitchen Cotton
Size F or G hook (4.25 mm) - I work pretty tightly so a G hook worked for me.
large tapestry needle to sew pieces together and weave in ends
scissors

This box is made in 5 pieces.
Ch=chain
sc=single crochet
sl st= slip stitch
st or sts= stitch or stitches
repeat ** around means repeat what is between the asterisks all the way around.

Pan
Chain 2 or make magic ring
Round 1: 6 sc in first ch, sl st to join
Round 2: ch 1 (does not count as first sc), 2 sc in each st around, sl st to join (12 sts)
Round 3: ch 1 (does not count as first sc) sc in same st, 2 sc in next st, *sc in next st, 2 sc in next st*, repeat ** around, sl st to join (18 sts)
Round 4: ch 1 (does not count as first sc), sc in first st, 2 sc in next st, sc in next st,*sc in next st, 2 sc in next st, sc in next st*, repeat ** around, sl st to join (24 sts)
Round 5: Working in back loops only! ch 1 (does not count as first sc), sc in each st around, sl st to join.
Round 6-7: working in both loops, ch 1 (does not count as first sc), sc in each st around, sl st to join.
Round 8: Reinforce the top by slip stitching in each stitch around from last round. Break off and weave in ends.

Lid part one:
Chain 2 or make magic ring
Round 1: 6 sc in first ch, sl st to join
Round 2: ch 1 (does not count as first sc), 2 sc in each st around, sl st to join (12 sts)
Round 3: ch 1 (does not count as first sc) sc in same st, 2 sc in next st, *sc in next st, 2 sc in next st*, repeat ** around, sl st to join (18 sts)
Round 4: ch 1 (does not count as first sc), sc in first st, 2 sc in next st, sc in next st,*sc in next st, 2 sc in next st, sc in next st*, repeat ** around, sl st to join (24 sts)

Lid part two:
Chain 2 or make magic ring
Round 1: 6 sc in first ch, sl st to join
Round 2: ch 1 (does not count as first sc), 2 sc in each st around, sl st to join (12 sts)
Round 3: ch 1 (does not count as first sc) sc in same st, 2 sc in next st, *sc in next st, 2 sc in next st*, repeat ** around, sl st to join (18 sts)

Center the smaller piece on the bigger piece and sew together.

Handle for the pan:
Ch 9, skip 5 chs, and sl st in 6th ch, sl st back to first ch.
Round 1: ch 1 to turn, sc in next 3 sts, sc 6 times in loop, sc down the other side of next 3 sts. Break off leaving a tail to sew to pan.

Handle for lid:
chain 5, sk last chain, sl st all the rest of the stitches, break off leaving a tail to sew piece on.

Now it's time to sew it all together, the handle for the pan goes on the top row of the pan, the lid handle is centered on top of the larger circle and stitched into place.


Friday, June 6, 2014

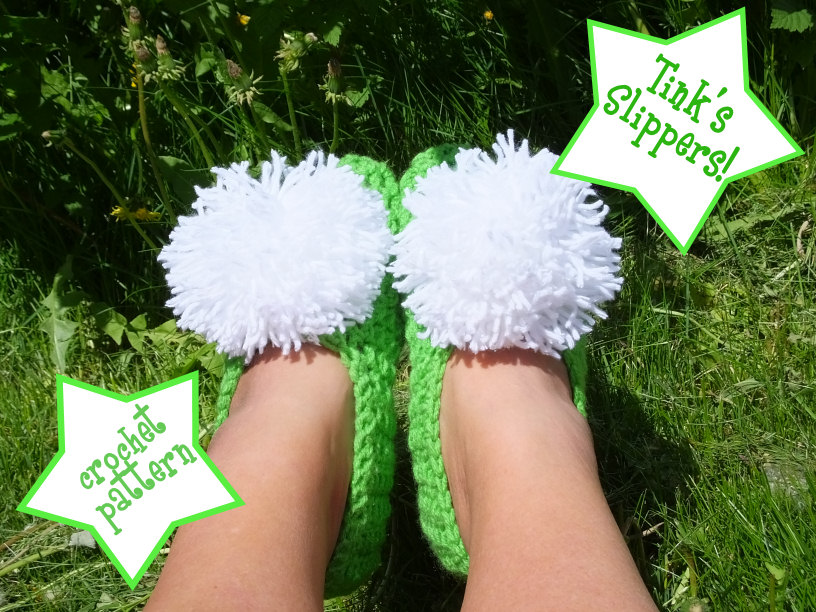
Tink Slippers- crochet pattern

Tinkerbell slippers- crocheted

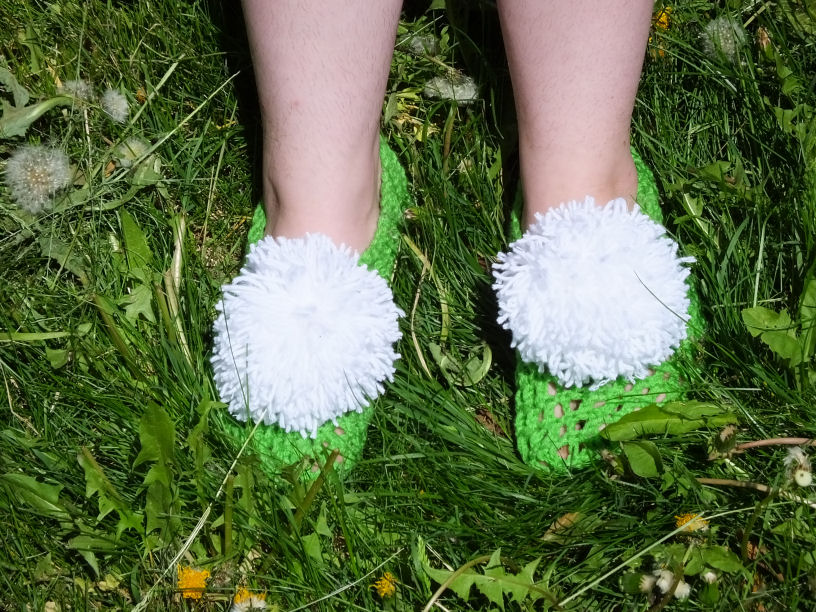
Inspired by that famous fairy! I hope you like this pattern. It was a lot of fun to make and now I have great big pom poms to wear on my feet. My feet are size 7.5-8. The same slippers are shown on my daughter's size 8.5-9 feet at the end.

These slippers are sized for medium sized women's feet, but the pattern can be adjusted easily. Adding a round in rounds 4-6 or a plain row will make them longer. Starting with 12 stitches instead of 10 will make it a little deeper, and adding a couple chains in round 1 will make it bigger around.
You can also start with less stitches to make them smaller. However for all those methods- you'll have to rework the decreases to space them evenly to get a custom fit to your foot.
For just a little off- say a size 10 rather than an 8 or 9- moving up a hook size will work, or for a size 6 or 7, move down a hook size.

Size G hook
Worsted weight yarn- I used Red Heart Super Saver in Spring Green and Red Heart Shimmer in Snow.
Yarn needle
Scissors

Ch=chain stitch
sc= single crochet
dc= double crochet
hdc= half double crochet
dec dc= decrease double crochet, yarn over, insert hook in stitch, yarn over, draw up loop (3 loops on hook), yarn over, pull through 2 loops, (2 loops on hook), insert hook in next stitch, yarn over, draw up loop, yarn over, pull through 2 loops, yarn over, pull through 3 loops.
st or sts= stitch or stitches

Slipper- Make 2
Using the green yarn-
Chain 11

Reinforce the chain- skip first st, sl st up 10 sts (10 sts)
First row is worked in the sides of the reinforced chain.
Row 1: Ch 1 to turn (does not count as first st), sc in first st, dc in next 8 sts, 6 dc in bottom st, working on the other side of the chain, dc in next 8 sts, sc in first st (24 sts)
Row 2: Ch 1 to turn (does not count as first st), sc in first st, dc in next 22 sts, sc in last st
Row 3: Ch 3 (counts as first st), dc in next st, dc in each st (24 sts)
Rows 4-8: Repeat Row 3

Round 1: Ch 3 (counts as first st), dc in next st, dc in next 22 sts,  when you reach the end, chain 6 loosely, being careful not to twist, sl st to join to 3rd st of starting ch
Round 2: Ch 3 (counts as first st), dc in next st, dc in next 22 sts, dc in first ch, hdc in next ch, sc in next 2 chs, hdc in next ch, dc in last ch, sl st to join to 3rd st of starting ch (30 sts)
Round 3: Ch 3 (counts as first st), dc in next st, dc in next 23 sts, hdc in next st, sc in next 2 sts, hdc in next st, dc in next st, sl st to join to 3rd st of starting ch
Round 4-5: Ch 3 (counts as first st), dc in next st, dc in next 28 sts, sl st to join to 3rd st of starting ch
Round 6: Ch 3 (counts as first st), dc in next 7 stitches, dec dc over next 2 sts, dc in next 8 sts, dec dc over next 2 sts, dc in next 8 sts, dc over next 2 sts,sl st to join (27 sts)
Round 7: Ch 3 (counts as first st), dc in next 6 stitches, dec dc over next 2 sts, dc in next 7 sts, dec dc over next 2 sts, dc in next 7 sts, dc over next 2 sts,sl st to join (24 sts)
Round 8: Ch 3 (counts as first st), dc in next 5 stitches, dec dc over next 2 sts, dc in next 6 sts, dec dc over next 2 sts, dc in next 6 sts, dc over next 2 sts,sl st to join (21 sts)
Round 9: Ch 3 (counts as first st), dc in next 4 stitches, dec dc over next 2 sts, dc in next 5 sts, dec dc over next 2 sts, dc in next 5 sts, dc over next 2 sts,sl st to join (18 sts)
Round 10: Ch 3 (counts as first st), dc in next 3 stitches, dec dc over next 2 sts, dc in next 4 sts, dec dc over next 2 sts, dc in next 4 sts, dc over next 2 sts,sl st to join (15 sts)
Round 11: Ch 3 (counts as first st), dec dc over next 2 sts, dc in next st, dc over next 2 sts, dc in next st, dec dc over next 2 sts, dc in next st, dec dc over next 2 sts, dc in next st, dec dc over next 2 sts (10 sts)

Break off yarn leaving a tail.

Weave the tail into the last 10 stitches, and cinch them down. Knot off the tail, weave it in and trim.

Join yarn at heel, sc around the top of the slipper, sl st to join, break off and weave in ends.
Pom poms= make 2
With white yarn-

To make the large pom poms, I held my fingers slightly apart and wrapped the glistening white yarn around 4 fingers 150 times. Then used a 12 inch piece of the same yarn and threaded it through my fingers, because my fingers were slightly apart it was easy to slide it through, and tied it off in the middle. Carefully slip the yarn off the fingers, adjust the tie if it needs it, and knot down firmly, then wrap the tie piece around it again and knot again, and repeat.
Flatten the bundle into a little round disk, and cut open all the loops. Trim into a circle while holding it flat. Fluff it out and trim to make round.
Stitch the pom poms in place with the tails on the 3rd row from the top opening and centered on the front of the slippers.
Tink's Slippers- crochet pattern


Sunday, May 11, 2014

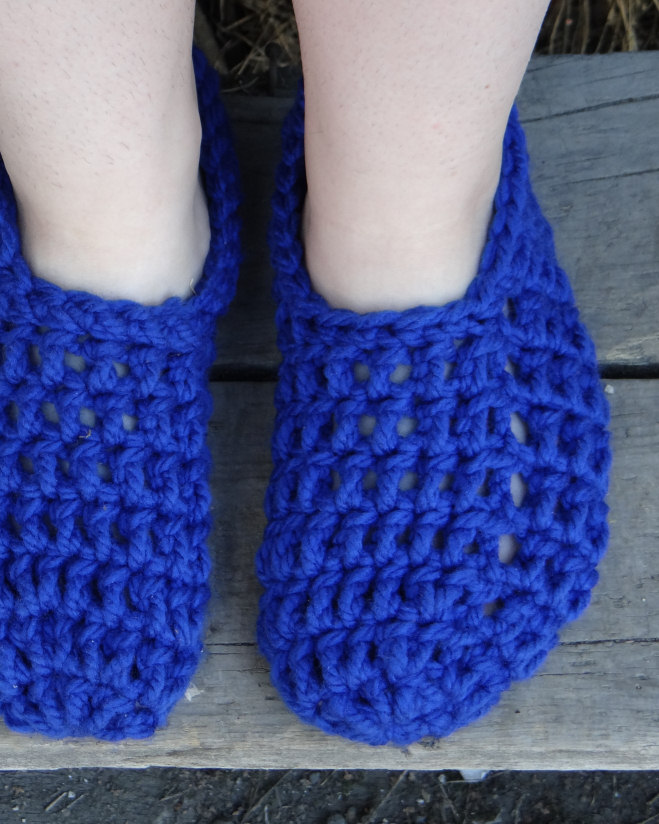
Easy crochet slippers pattern

Easy Crochet Slipper pattern

The story behind this pattern-
My grandmother had a friend who used to knit slippers. I think it was the only thing he knew how to knit, and he would knit hundreds of pairs over the course of a year. In different sizes and colors, everybody had a pair of slippers he made. He knit them long and narrow for grandma, short for kids like me, and large pairs for men. The secret is that it was a super simple slipper, knit in the round a bit over halfway, then knit flat the rest of the way in garter stitch. He'd use the tail from knitting the toe to cinch it up into a circle, then the tail from the end to stitch the back seam. All done.

Making a pair in crochet that was as easy to adapt has been a plan for a while, and one that I finally did this weekend. Using a bulky yarn, and a size K hook, they stitch up really fast. But you could easily adapt it for worsted or even thread. The trick is just getting the toe right, so you may experiment to get the right number of stitches and increases for that, then the rest of the slippers are a breeze. They can also be adapted in other ways. Make the vamp shorter and add a strap for Mary Jane style slippers, or a drawstring or bow for ballet type slippers. So as I work on adaptations for this patterns, I'll post those patterns. But feel free to play with it however you want. The heel on my slippers has some very slight shaping to make it more fitted than the hand knit originals.

Overview- Crochet in the round in double crochets, making increases until it fits around your foot, then continue crocheting in the round until it's close to long enough to reach your ankle. Crochet in rows after that for 3/4s (rounded up to an even number of stitches) of the total circumference until it's near to heel length. The heel has some small shaping- so crochet that with doubles, half doubles, singles in the middle, then work out the other way to mirror the first side. Seam the heel. Crochet single crochets in each stitch around. Weave in all ends.

So here's the actually pattern to make a pair of women's medium slippers-

dc= double crochet
ch= chain
hdc= half double crochet
sc= single crochet
sl st= slip stitch
st or sts= stitch or stitches
repeat ** means repeat what is between the asterisks.

Note: on the chain 3 starts for the rows, I do the first chain tight, then the other two chains with normal tension, it seems to be neater for me, but ymmv. So do it however your most comfortable.

You will need:

  • Chunky yarn- I used Bernat Softee Chunky in Royal Blue (it's really soft and cushy, and used less than one skein for a pair of slippers)
  • Size K (6.5 mm)
  • scissors or snips
  • yarn needle (big one!)
Make 2

Ch 2 or make a magic ring
Rnd 1: Ch 3 (counts as first dc here and throughout), dc 7 times in first st or ring, sl st to join (8 sts)
Rnd 2: Ch 3, dc in same stitch, 2 dc in each st around, sl st to join (16 sts)
Rnd 3: Ch 3, dc in next 2 sts, 2 dc in next st, *dc in next 3 sts, 2 dc in next st*, repeat ** 2 more times. Sl st to join (20 sts)
Round 4-7: Ch 3, dc in each st, sl st to join (20 sts)
Row 1: Ch 3, dc in next 15 sts (16 sts)
Row 2-5: Ch 3, turn, dc in next 15 sts (16 sts)
Row 6: Ch 3, turn, dc in next 4 sts, hdc in next st, sc in next 4 sts, hdc in next st, dc in next 5 sts (16 sts)

Break off yarn, and fold heel in half meeting up the mirrored stitches and stitch shut. Knot securely.

Edging- join in yarn, sc around the top of the slipper. I worked 2 sc in the bars, and a single crochet in each of the 4 stitches in the middle of the vamp. 

I gave the finished slippers to The Amazing Turnip Girl. She likes them a lot. I'm going to make myself a pair in pink. 

Tuesday, February 25, 2014

Cozy Jelly Jars Crochet Pattern

So lately I'm crocheting cozies for jelly jars- because they look so cute all dressed up. It would also be a nice way to share a spice mix, you could use it with a Cuppow for a small drinking jar.

These patterns are sized for the half pint quilted jelly jars with the regular mouth by Ball Canning.

Both jars use a size G hook and worsted weight yarn- I like Lily Sugar 'n Cream very much for these sorts of projects and you can see how the Batik color way created a spiral effect on the jar in back.
Gauge for both is 2.25 inches for the first 4 rounds

The Blue Jar-

This cozy has a simple front post stitch design that makes a diamond grid in textured stitches around the jar. If you haven't tried front post crochet- it's done by inserting the hook around the post of the stitch instead of in the top of the stitch. Front post means it's done on the front or outside of the piece.

Stitches used:
Single crochet= sc
Double crochet= dc
Front post double crochet= fpdc
Front post triple crochet= fptc
slip stitch= sl st
stitch or stitches= st or sts
Repeat ** means to repeat what is between the asterisks

Base-
Ch 2 or make magic ring
Round 1: sc 7 times in ring or first stitch, sl st to join.
Round 2:  Ch 1 (does not count as first stitch),2 sc in each stitch around, sl st to join (14 sts)
Round 3: Ch 1 (does not count as first stitch), sc in first stitch, 2 sc in next st, *sc in next st, 2 sc in next st*, repeat ** around, sl st to join (21 sts)
Round 4: Ch 1 (does not count as first stitch), sc in first st, sc in next st, 2 sc in next st, *sc in next st, sc in next st, 2 sc in next st*, repeat ** around, sl st to join (28 sts)
Round 5: ch 2 (counts as first stitch), dc in next st, dc in each stitch around. Sl st in 2nd st of starting chain to join.
Round 6: Ch 1 (does not count as first stitch), sc in same st, fpdc in next dc, *sc in next st, fpdc in next dc*, repeat ** around, sl st to join (14 fpdc stitches)
This is where it gets tricksy. You'll be working backwards and forwards to create the Xs.
Round 7: Ch 1 (does not count as first stitch), sc in same stitch, skip next stitch, fptc in next dc, sc in st after skipped stitch, fptc in skipped dc (X formed),*sc in next st, skip next stitch, fptc in next dc, sc in st after skipped stitch, fptc in skipped dc (X formed),* around, sl st to join (7 crossings)
Round 8: Ch 1 (does not count as first stitch) sc in same stitch, fpdc in next st, *sc in next st, fpdc in next st*, repeat ** around (14 fpdc)
Round 9: Ch 1 (does not count as first stitch), sc in same st, fptc in last dc of previous round, skip stitch, sc in next st, skip stitch, fptc in next dc, *sc in next st, skip stitch, fptc in skipped dc, sc in next stitch,  skip stitch, fptc in next dc*, repeat ** around- the last fptc will be going into the first skipped dc. sl st to join.
Round 10: Repeat round 8.
Round 11: Repeat round 7
Round 11: Repeat round 8
Round 12: Repeat round 9
Round 13: Repeat round 8.
Round 14: Ch 1 ( does not count as first stitch), sc in each stitch around, sl st to join, break off yarn and weave in ends.

Spiral Colored Cozy:
Ch 2 or make magic ring
Round 1: sc 7 times in ring or first stitch, sl st to join.
Round 2:  Ch 1 (does not count as first stitch),2 sc in each stitch around, sl st to join (14 sts)
Round 3: Ch 1 (does not count as first stitch), sc in first stitch, 2 sc in next st, *sc in next st, 2 sc in next st*, repeat ** around, sl st to join (21 sts)
Round 4: Ch 1 (does not count as first stitch), sc in first st, sc in next st, 2 sc in next st, *sc in next st, sc in next st, 2 sc in next st*, repeat ** around, sl st to join (28 sts)
Round 5-16: Ch 1 (does not count as first stitch), sc in first stitch, sc in each st around, sl st to join.
Round 17: Ch 1 (does not count as first stitch), sc in same stitch, sc in next stitch, ch 1, skip stitch, sc in next st, *sc in next st, sc in next st, ch 1, skip stitch, sc in next st*, repeat ** around, sl st to join (7 ch 1 spaces)
Round 18: Ch 1 (does not count as first stitch), sc in same stitch, skip stitch, 5 dc in chain 1 sp, *sc in next st,skip stitch, 5 dc in chain 1 sp,* repeat ** around, sl st to join. (7 shells)- break off yarn and weave in ends.

Hope you enjoy dressing your jelly jars!

Monday, January 20, 2014

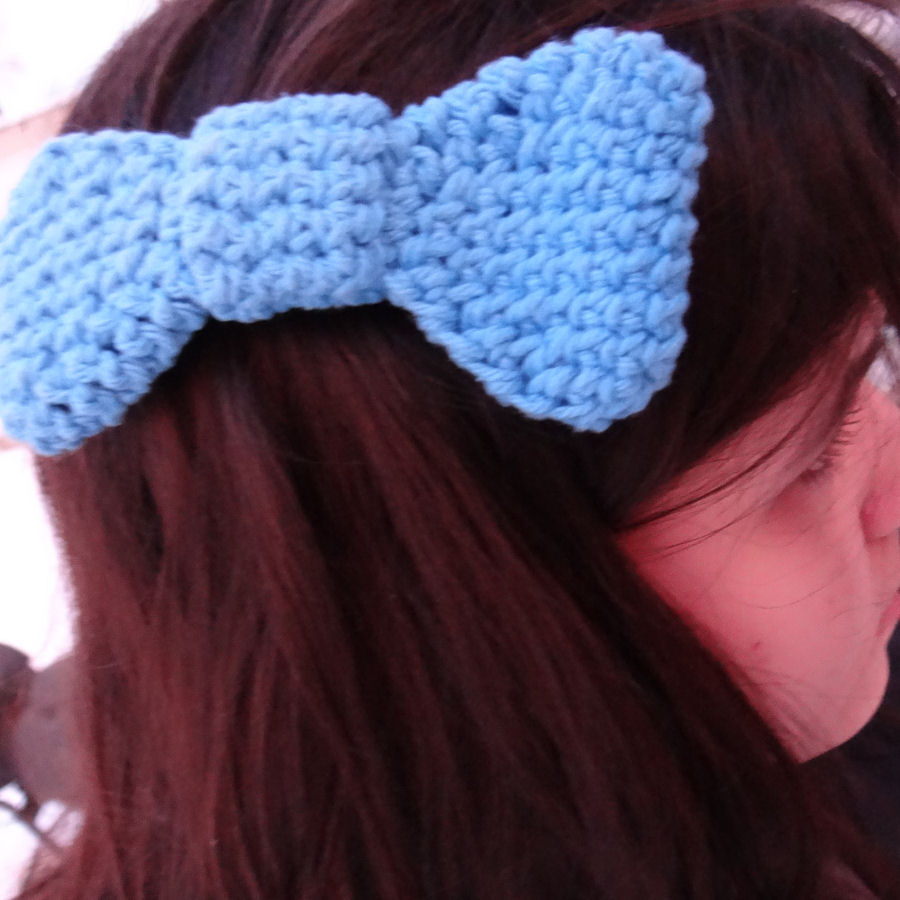
Crochet bow pattern

Make this easy crochet bow for your own hair!

This hair bow is crocheted to lay flat by using chains on the edges instead of working single crochets all the way around. I was trying for a rounded Hello Kitty effect. It's made in 3 parts which are stitched together then stitched to a hair clip.

You will need:
Worsted weight yarn- I used Lily Sugar 'N Cream in  Light Blue
Size F hook
Yarn needle

American terminology
Ch=chain
Sc=single crochet
dec sc= decrease over 2 stitches in single crochet
sl st= slip stitch
st or sts= stitch or stitches

Make 2:
Ch 8 (ch 7 plus 1 to turn)
Round 1: Sc in front loop of each stitch of the starting chain, ch 2, turn chain and sc in opposite loop of starting chain, ch 2, sl st to starting sc to join (7 sts on each side, 2 ch 2 spaces)
Round 2: Ch 1 to turn, (does not count as first stitch), 2 sc in first stitch, sc in next 5 sts, 2 sc next st, ch 2, skip ch 2 space, 2 sc in next st, sc in next 5 sts, 2 sc in next st, ch 2, skip ch 2 space, sl st to starting chain to join. (9 sts on each side, 2 ch 2 spaces)
Round 3: Ch 1 to turn, (does not count as first stitch), sc in first stitch, sc in next 8 stitches, ch 2, skip ch 2 space, sc in next 9 stitches, ch 2, skip ch 2 space, sl st to starting sc to join (9 sts on each side, 2 ch 2 spaces)
Round 4: Ch 1 to turn, (does not count as first stitch), dec sc , sc in next 5 stitches, dec sc, ch 2, skip ch 2 space,  dec sc , sc in next 5 stitches, dec sc, ch 2, sl st to first sc to join (7 sts on each side, 2 ch 2 spaces)
Round 5: Ch 1 to turn, (does not count as first stitch), sc in first stitch, sc in next 6 stitches, ch 2, skip ch 2 space, sc in next 7 stitches, ch 2, skip ch 2 space, sl st to starting sc to join (7 sts on each side, 2 ch 2 spaces)
Round 6: Ch 1 to turn, (does not count as first stitch), dec sc , sc in next 3 stitches, dec sc, ch 2, skip ch 2 space,  dec sc , sc in next 3 stitches, dec sc, ch 2, sl st to first sc to join (5 sts on each side, 2 ch 2 spaces)
Round 7:  Ch 1 to turn, (does not count as first stitch), sc in first stitch, sc in next 4 stitches, ch 2, skip ch 2 space, sc in next 5 stitches, ch 2, skip ch 2 space, sl st to starting sc to join (5 sts on each side, 2 ch 2 spaces)
Round 8: Ch 1 to turn, (does not count as first stitch), dec sc , sc in next stitch, dec sc, ch 2, skip ch 2 space,  dec sc , sc in next stitch, dec sc, ch 2, sl st to first sc to join (3 sts on each side, 2 ch 2 spaces)
Round 9-10:  Ch 1 to turn, (does not count as first stitch), sc in first stitch, sc in next 2 stitches, ch 2, skip ch 2 space, sc in next  3stitches, ch 2, skip ch 2 space, sl st to starting sc to join (3 sts on each side, 2 ch 2 spaces)

Break off end. Sew the two pieces together on the narrow ends.

Middle:
Ch 11 loosely
Row 1: Sc in second ch from hook, sc in each stitch across ch 1 to turn.
Row 2-4: sc in each stitch across, ch 1 to turn

Break off ends, wrap it around the narrow section of the bow and stitch ends together and secure to bow. Then stitch the bow on to a barrette, comb or hair slide!

You can also start with a chain 5, increase to 7 stitches and decrease from there to make a smaller bow. But I like this size!

Check out the gorgeous sunrise we had this morning!

Sunday, December 22, 2013

Chunky Soft Bobble Bangles- Crochet


I love making soft bangles! This pattern was supposed to be posted yesterday because the one on the far left was done day before yesterday. But then I decided it would look good with 2 colors of yarn and my geeky daughter picked the yarn. She decided on Portal blue and orange

So after I finished one, she also decided she needed one with the opposite colorway. Fortunately they are very quick but that's why the pattern is being posted today instead of yesterday. My examples are in Lily Sugar 'n Cream yarn. The bottom is Psychedelic Ombre, the top two (Portal!) are in Hot Orange and Hot Blue.

You will need:

  • Worsted weight yarn in one or two colors- a small amount will do.
  • Size H hook (5mm)
  • Scissors
  • yarn needle
Stitches used: 
ch=chain
sc=single crochet
bobble= 3dc bobble

To make the bobbles- yarn over, insert hook into stitch, yarn over, pull loop through stitch, yarn over, pull through 2 loops (2 loops on hook), yarn over, insert hook in same stitch, yarn over, pull through stitch, yarn over, pull through 2 loops (3 loops on hook), yarn over, inset hook in same stitch, yarn over, pull though stitch, yarn over, pull through 2 loops, yarn over, pull through all loops. 

To work with 2 colors- the contrast color is carried along the main color after the first chain. Pull out some of the contrast color and lay it over the chain with a tail to weave in- crochet over it as you work the first row of single crochets. Then for the next row, the last yarn over of each stitch is done with the color you will use for the next stitch. This is an easy color change here since the color changes with each stitch, so for the single crochets, you'll insert the hook, yarn over, pull through stitch, yarn over with the other color and pull through the 2 loops on the hook. For the bobbles, you'll work in that color until the last yarn over then switch and pull through all loops. Then the final round, work in the main color working over the contrast color across the top of the stitches.

Chain 28 loosely, slip stitch to join, being careful not to twist the ring.
Rnd 1: ch 1 tightly (does not count as first stitch) single crochet in each stitch around. Slip stitch to join.
Rnd 2: ch 1 tightly (does not count as first stitch) single crochet in first stitch, bobble in next stitch, work that way around alternating single crochets and bobbles. Slip stitch to join (14 bobbles)
Rnd 3: ch 1 tightly (does not count as first stitch), single crochet in each stitch around, slip stitch to join. 

Break off, and weave in the ends!

If 28 is too small or too big, you can increase or decrease the size by working any even number of stitches.

These are so fast! Hope you enjoy them as much as I do.