Printing Tips

Check out my printing tips if you're having problems printing to the right size
If you'd like to support this site and all the free things I post- please check out my Don't Eat the Paste Mandala collection coloring book for 9.99 at Amazon.
Showing posts with label recycling. Show all posts

Saturday, May 4, 2019

SEED Lab- Repairing a very special box that was damaged in the earthquake

Anchorage SEED Lab

Anchorage Museum won a competition for a Public Art Challenge from Bloomberg Philanthropies. 5 cities got 1 million dollars each for the challenge. Ours is the SEED Lab.

"SEED Lab, a center to bring artists, designers, engineers and community members together to propose solutions to climate change and related challenges." 
Today, as part of their opening ceremonies, they had a community workshop for repairing things. There was a lot going on. Screen printing, rubber boot repair, repairing poetry,  and the thing that caught my eye- repairing pottery.

In the earthquake, one of my mom's favorite boxes got it's lid broken. I saved the pieces, unsure what to do with them.

I was so happy to be repairing the piece that I didn't get the name of the woman who helped me. Whoops. Bad blogger!

But!! Also good blogger, because I'm going to explain how it was repaired!

This is what was there. They had a few pieces from thrift stores for people to break and learn how to repair using a method inspired by kintsugi- the Japanese art of repairing with gold.

This is the lid to my mom's box. 5 pieces, all there! Isn't that pretty and happy?

If you're going to try this- you'll need:

  • 5 minute epoxy- double syringe type (available in any hardware department) 
  • Mica or Pearl Ex Powder Pigments (affiliate link - like these Jacquard Pearl Ex Powder Pigments 32 color set ) 
  • something to mix the epoxy on- scrap of cardboard, disposable plate, etc
  • craft sticks
  • soft brush
  • deep bowl or pan with uncooked rice to hold pieces
  • rubbing alcohol
  • cotton swabs
  • craft knife
Now the disadvantage to this method is it's decorative only. Don't use it for anything that comes in contact with food. If you're using it for a fruit or candy bowl- line the bowl or use only wrapped candies. 

Advantage- it will work with glass, color availability and it's very affordable and easy. You can also practice with thrifted pieces. 

Figure out which edges you're going to put together first. Clean them with the alcohol and cotton swab to make sure no skin oils or dirt are on them. 


Put a small amount of the epoxy on your mixing surface- about the size of a nickle. You'll only do a little bit at a time because of the short open working time of the epoxy when mixed.Mix in a very small amount of the pearl powder or mica- about 1/8th of a teaspoon. 

Use the craft stick to spread a small amount on both edges you're connecting. Then line them up and press them together. A bit of the epoxy will ooze out. it's supposed to. Hold until they are tacky enough to hold together, put them into the rice to hold it. Make sure your glued seam isn't in the rice! 


After a few minutes, about 3 or 4 on a warm day or about 6 on a cold day like today, use the brush to sweep some of the powder over the oozed seam of epoxy. Let it set a few more minutes.

In a couple hours, use the craft knife to clean up any blobs. I had to cut off a few blobs on the bottom so the lid would fit properly on the box. 

Now with this piece, I did 2 sections of 2 pieces each. Also while I was working on it, we got a visitor to the table who was watching and asking questions! I told him the  history of the piece. That my mom had brought it with her when she came up to Alaska as a VISTA volunteer. It's Anchorage's Mayor Ethan Berkowitz!! (see my lid in the rice behind him?) 


The job I did wasn't perfectly neat, but it was, for me, perfectly right. When I showed it to William and TG (who were at a comic book convention and that's another post)- they were both very happy. They both said they want me to teach them this method to repair things. I'm glad they are happy with how it turned out. It's their history too. 


They were also upcycling shirts with fantastic silkscreens by local artists. I had one put on the back of the jacket I was wearing that says "Seeding Change" (I'll get a photo later) and did this shirt that I know TG is going to "borrow" at some point with a gorgeous salmon print. 


It was a very fun day. 

Sunday, August 2, 2015

An idea for leftover bits of DGY ribbons


So I'm watching this video- and thinking "Hey, awesome use for leftover scraps of Darn Good Yarn chiffon or silk ribbons."
But a couple things- the yarn is recycled- use recycled plastic too. If you don't mind the shape, I'm wild for milk jug plastic. It's generally white or translucent and I use it for barrette backings, building disks, stencils, planters, scoops, I literally have a kitchen drawer full of milk jug plastic cut into sheets from gallon jugs to use for all sorts of things.
Otherwise- yogurt containers, whipped top containers, esp the ones with labels that can be peeled off easily- plus most plastics can be painted if you can't get printing off of them and don't want it showing through the ribbon.
Now, everyone has that friend who keeps every container that comes into their kitchen, the give you seed starts in plastic yogurt containers, they pack lunches in sour cream or margarine tubs and that person is awesome. Except for using margarine (vegans excepted) , but you probably have friends who don't do that. (I'm not that friend, don't even ask. But I do pack my husband's lunches in Lock & Locks because of a nasty accident a while back. If you absolutely don't want it to spill, Lock & Lock) Those friends? If you point out that it's good to want to save the environment and the best kind of recycling is re-purposing? They will sometimes save you things. Then you'll be the one with a big bucket of soda pop tabs waiting to be turned into armor as soon as you feel like working on something really boring for hours. Oh, wait- anyway, ask. You'll wind up with containers.
Secondly-
The only folds bias tape should have in a project are the nice ones down the length. The card wrap folds are easy to get rid of- use a hair straightening iron.

----
So the above was written as a FB update and wound up getting a little longer than expected. I'll be honest- at 3:am, when my sleeping schedule is all inside out, and given the really amazing week I had last week (more on that later) - I tend to get a little enthused, run on, and have very little control over my stream of consciousness. It's good though, because that's also the time that I get the most inspired. 

Friday, June 21, 2013

Cute Little Zip Case- hand sewing project


This little zipper case may seem a little complicated, but it's really, really not. Best part of it is that it's made from scraps and recycled materials, and it's good hand sewing practice. Unfortunately, I didn't take photos while making it because I made it a few months ago after getting proofs of some of my Spoonflower fabrics. I didn't really plan to post the project, but TG asked "Why not? It's cute!" This case is inspired by Japanese macaron purses, but instead of using a domed plastic shape for the sides, it uses milk jug plastic with felt to soften the top.

So you will need:

  • fabric- 4 pieces, they can be different patterns, but at least 6x6 inches if you are using a 7 inch zipper. 
  • zipper- this can be recycled if you pick out the stitches from the tape carefully and the tape is intact
  • clean empty plastic milk jug- I love milk jug plastic
  • ribbon- a 1/4- 3/8th inch satin ribbon is a good choice, just a few inches
  • needle
  • thread to match the zipper
  • a 6 inch piece of craft felt (if you are using a 7 inch zipper)
  • glue- tacky glue works well.
  • scissors- one pair for plastic, one pair to cut fabric. Please don't use your fabric scissors on plastic.
To start, overlap the ends of the closed zipper, and stitch them together. Stitch across the top bar of the zipper where it separates to close it securely at the top. Knot off thread on the right side of the zipper. It's going to get covered with ribbon so the knot doesn't show.


Make a small loop with part of the ribbon and sew it on so it goes the same direction as the zipper pull.

Now take another piece of ribbon and wrap the overlap with and sew it into place keeping the zipper flat. Don't let it gather or bunch up!

See how it's sewn? Also the open photo will hopefully help make the following instructions clearer.
So now that you've got your zipper loop, cut out 2 pieces of plastic in a circle that's about 1/2 inch smaller than the zipper loop. Which would be about a 1/4 inch all the way around.

Set the plastic pieces aside for a minute. Now it's time to gather up the zipper. Close to the edge, make basting stitches on one side and leave ends to pull. Repeat on the other side. Then pull to gather.
Now you'll make the inside. For that, cut 2 circles of fabric that are twice as big as the plastic. Stitch a running basting stitch all the way around, put the plastic in the middle on the wrong side of the fabric. Pull stitches tight around the plastic and knot off.
So now the insides are ready to be stitched to the inside of the case. Since the whole thing is going to be covered, you do want your stitches to be strong, but don't worry about how the knots look. Open the zipper, which should have a clamshell look with the gathering. Set one fabric covered plastic piece inside one side of the "clam shell" with the gathered sides together. Stitch it into place. Repeat on the other side.

Now it's time to make the top. For this side, you want it just the same size as the zipper loop. Cut 2 circles from the milk jug plastic the same size as the zipper loop, then 2 pieces of felt that are 1/4 inch bigger all the way around. Glue the felt to the plastic pieces. 
Cut 2 pieces of fabric in circles twice the diameter of the plastic circle. Do a basting stitch all the way around, then set the plastic circles on the wrong side of the fabric with the felt sandwiched between the fabric and plastic. Pull to gather the stitches. Knot securely.

Now all you have to do is stitch the outsides to the rest of the case, and it's done! 

These are so easy to make, and are super cute. Because the inside is very flat, it won't hold a lot of change, but it will hold a couple small treasures or keepsakes. 

Friday, February 8, 2013

Book Review- Jeaneology


Jeaneology by Nancy Flynn is written for teens and has projects for recycling torn or old jeans into new things. Since my teenage daughter is a big fan of upcycling and sewing, it seemed like something she would enjoy.

I was right. It's written at a close to beginners level. The author does assume at least basic hand sewing skills, and that was my first very pleasant surprise about this book. We have a lot of sewing books, but most modern books focus strongly on machine sewing. They never seem to take into account young sewers like my daughter who can use a sewing machine but honestly prefers to sew by hand. The instructions are written so they can be used by both hand sewers and machine sewers. The beginning section includes useful information like explaining about bias tape and other tools you may need and how to pick the right hand sewing or machine sewing needles for working with denim.

The layout is image heavy with clear illustrations, and spiral bound with a heavy paper cover so it can lie flat. There is a full color photo of every project, and interspersed throughout the book are trivia, facts and tips about jeans. This was one of my daughter's favorite parts of the book.

The projects are well organized, starting with clothing in a chapter called Rocking Rags. Converting jeans into a maxi skirt or a mini skirt, making shorts and a great set of tips for distressing or customizing an existing pair of jeans. I absolutely loved the photo of the star stenciled jeans that were discharged using a bleach pen.

Mean Jean Accessories has headbands, gadget pockets and the nice big purse that's pictured on the cover as well as some great casual jewelry projects for making the most of even small scraps. This was my favorite chapter because it's a good way to use jeans your family gives you that are torn or stained.

Blues You Can Use has gift ideas and projects that are functional. This chapter had my daughter's favorite project, an oven mitt. It also has projects like coasters, place mats and a cute little key fob.

As a crafter, I love the ideas in this book for upcycling and using jeans. My daughter loved it just as much. The projects are a good mix of things to do with whole intact pairs of jeans and pairs that have seen better days. 25 projects total, all very well illustrated with good text instructions.

Published by Zest Books - Teen Reads with a Twist.


I received a complimentary copy of this book to review, I received no other compensation, and my review is my honest opinion of the book. You can read more about my review policy here.

Monday, August 6, 2012

A couple household quick tips


Recently, and I have no idea how, about half of the pierced holes on my shower curtain tore out. My husband just said "We need to replace the shower curtain." 

Instead, I grabbed a role of duct tape, the shower curtain and a 1/4 inch hole punch and covered each hole with a strip of duct tape folded over the top. Then I use the hole punch to punch holes in the duct tape to use for the rings for the shower curtain rod. It's not a permanent fix, but it looks okay, and it works.

If you are using a hole punch or even a craft punch with duct tape or other tape items, spray the punch with a little bit of cooking spray. It helps keep it from getting gummed up and the adhesive comes off easily if does get gummed up.

Another use for bicycle inner tubes? We keep a strip about 8 inches long, cut open and washed in the kitchen. It makes a great grip for opening jars. To make it super convenient, I put a grommet in one end, and thread a length of ball chain through it to hang it from a cabinet door. It's easy to find and works great.

If you have a habit of spending too much time focused on the computer or on detailed handwork, use a kitchen timer to remind yourself to take breaks, stretch, walk around and lift your eyes from the tight focus.

------
Microcosm Publishing has split into two companies. The new company, Microcosm Distribution has a big 50% off sale happening. I'm a big fan of the Raleigh Briggs' illustrated guides. They have charming illustrations and a lot of information. If you're unfamiliar with zines, they are micro-published books and booklets. 

Friday, July 13, 2012

9 Bottom of the Jar Ideas

Bottom of the Jar recipes
Since we are on such a tight budget, like so many other people, I'm remembering some of the ways I economized when I was on a ramen budget, and techniques my mother and grandmother used as well. Here's a list of some of my favorite "Bottom of the Jar" recipes ideas. They use what's left in the bottom of a jar. A lot of them use instant powdered milk, my mom always kept it on hand for baking and cooking, and I do the same. It's less expensive per gallon, especially when you buy it in bulk, keeps well, and is always ready to use.


  • Orange marmalade, lemon curd and other citrus spreads are wonderful as a chicken glaze- Put in a half cup of very hot water and cover, shake well. You can also add a half cup of orange juice. Season your chicken and pour the glaze over it.
  • Berry jam ice pops using jams and jellies- This was one of my favorite thrifty treats as a kid. Put a 1/4 cup of instant dry milk powder in the jar and add a cup of very hot water, cover,shake well and pour into ice pop molds or ice cube trays. If you're using ice cube trays, cover with plastic wrap and poke toothpicks through the plastic wrap for sticks. 
  • Make a cup of beef or chicken boullion, pour into a sour cream container, cover and shake well. Pour over noodles.
  • Mix 1 tsp. sugar, 1 tsp. Worcestershire and 1/4 cup vinegar. pour into ketchup bottle and shake well. Serve over leftover rice and meatballs for a quick lunch.
  • Cherry jellies, jams and preserves, apple butter and apple sauce work great on pork chops as a glaze. Mix with hot water or hot water and vinegar if you like a vinegar tang.
  • 1/2 cup hot water and 2 Tbs of instant dry milk in a peanut butter jar to make a peanut sauce to add to strawberry smoothies- one of my daughter's ideas! 
  • Pumpkin butter OR Nutella plus 1/2 cup-1 cup hot water and a 1/4 cup instant dry milk, cover and shake well to make a great ice cream sauce.
  • Spaghetti sauce jar and a cup of water- add to ramen for cooking! Top with cheese.
  • 1/4-1/2 cup hot water or a mix of hot water and vinegar with salad dressings, serve over hot vegetables or use as a marinade for grilling.

Feel free to add your own bottom of the jar tricks in comments!


Tuesday, June 12, 2012

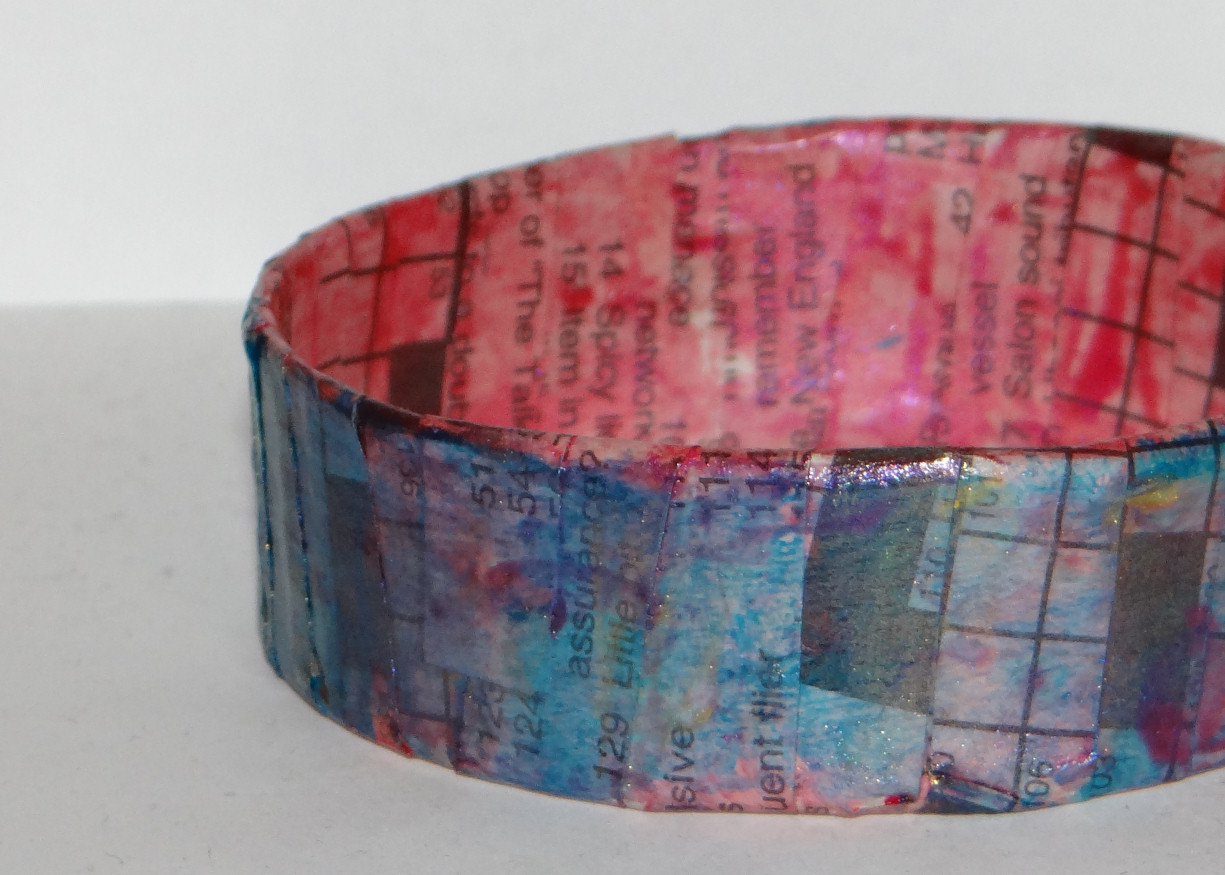
Paper Bangle Bracelets- Tutorial


I'm really excited about these super easy upcycled paper bangles because there are so many possibilities for them, using a strip of paper for the outside I could put images or type a quote using one of my typewriters on it. They are made very easily using things would normally be thrown into the recycling bin and a new kind of paint which I won from the weekly drawing at Craft Test Dummies.

Luminarte's Silks Acrylic Glazes makes the perfect paint for these because they are sheer but well pigmented. You can use them wet on wet or wet on dry. I thought of doing stripes or something more ordered, but I really like the look of the layered random effect of the paints.

You will need:

  • Thin cardboard
  • strips of paper- I used newspaper for the one above.
  • White PVA glue- I used Aleene's Tacky Glue 
  • Silks Acrylic Glazes- I used Sky Blue, Watermelon Mist and Solar Gold
  • Acrylic Spray Sealer
  • Scissors
  • Paint Brushes
  • foam brush
This made much like paper mache, but using straight PVA glue instead of a paper mache mix. 
The base of the bracelet is a strip of cardboard from a cereal box or something similar. The easy way to size it is to cut a strip and wrap it around your hand at the widest part, then add an inch for the overlap.
For a quick reference though-
8 inches for a small bracelet (7 inches in circumference, 2.22 inches in diameter)
8.5 inches for a medium bracelet (7.5 inches in circumference, 2.38 inches in diameter)
9 inches for a large bracelet (8 inches in circumference, 2.54 inches in diameter)

Cut the cardboard the width you want the finished bracelet to be, and measure a 1/2 inch in from both ends. Cut slits on both ends to overlap them together on opposite edges.

Glue the overlapping pieces down. Cut lots of 1/4 inch wide strips of your paper. Put a thin layer of glue on the base, an inch at a time, and wrap on a slight diagonal, overlapping the edges. Apply more glue, and keep wrapping. Do at least 3 layers of paper, and set it aside to dry.

After it's dried, decide what you want the outer layer to be, and apply that. You can either cut a strip that's the same width and circumference around, or you can do what I did and cut more 1/4 inch strips to wrap around it. Apply with a thin layer of glue. Let dry.

Then the fun part, painting! The glazes are gorgeously pigmented, and work on a lot of different mediums. I wish I could properly photograph how they look on black rubber! They are very sheer and add a nice sheen of color to the rubber. On paper, they look a lot more like they do in the jar, but in sheer layers. Just paint, have fun layering colors. I put on the pink first, then put the blue on the outside. Let that dry, and added more pink and gold in spots. The end result is a lot of subtle shades of purple and green on the blue.

Let the glaze dry, and spray with an acrylic sealer. The end result is a lightweight, inexpensive bangle bracelet.


Tuesday, May 1, 2012

Recycled Bicycle Inner Tube Earrings

It's summer! Which means if you call your local bicycle shop, you can probably get lots of one of my favorite craft materials for free. Bicycle tire inner tubes.

My favorite use is making bracelets. This tends to leave some pieces too small to use. These earrings use small scraps, and are very lightweight.

To prepare your inner tube, you cut it open and use dish soap and a sponge to clean the rubber. The inside has a powder coating you'll want to clean off. Let it dry.

The tubes can be cut using hand punches, scissors or a craft knife.

You will need:

  • 2 6mm jump rings
  • 2 3 mm jump rings
  • a couple of inches of a bicycle inner tube
  • earring findings
  • pliers
  • 1/16 inch hole punch


For these earrings you'll need 2 sets of 2 strips. The shorter ones should be at least a half inch shorter than the long ones. Mine were about 3.5 inches long and 2.5 inches long.

My jump rings were made using 18 gauge round wire. For the bigger ones, I used a size 10 knitting needle as a mandrel, for the smaller ones, I use my round nose pliers.

Use a 1/16th hole punch to punch holes centered on each end of each strip.

Open the 6 mm jump ring, and thread on the long strip and the short strip, then the other side of the short strip and the other side of the long strip. Close the ring. Open the 3 mm ring and put it through the large jump ring and the earring finding. Close. Repeat the same steps to make the matching earring.

These are so fast and easy to make. They would make a fun gift for cyclists in your life, and hopefully inspire lots more ideas!


Saturday, April 28, 2012

Book Review- Reinvention


Reinvention : Sewing with Recycled Materials by Maya Donenfeld is a collection of sewing projects that use thrifted and otherwise scavenged materials and turning them into something new.
If you love sewing, and recycled projects, this is a wonderful book. The author writes engagingly about her experiences and life, and gives tips for finding the materials for the projects. The techniques include patchwork, stamping and printing. The sewing is all fairly simple, no fancy or fussy seam techniques or anything like that.
The chapters are separated by fabric type. Each chapter explains the fabric, a bit about the history, how to take care of it, and where the best places are to find it. She also explains the environmental impact of re-using that particular fabric. The chapters have a few projects each and there is good variety between home decorating projects, clothing, and accessories.
Linen- my favorite projects in this chapter are the Story Scarf ,which is a fashion scarf made in patchwork, and the big handy, Reversible Summer Sling purse. My daughter is wild for the Story Scarf, and the Envelope Portfolio which can be customized easily using fabric paint and stencils.
Burlap- I get burlap bags every few months from one of the local coffee roasters. We use them for all sorts of things, and this chapter inspires more uses. The Onion and Garlic Sacks are my favorite. My daughter likes the Inspiration Board project.
Jersey (tee shirt cotton knit)- My daughter likes the Pillow Pals. My favorite project is a toss up between the simple hand sewn Blossom Band with it's two type of flowers, and the Little Forager Skirt. The reason I love the skirt so much is that even now, it's ideal for my daughter. She's always been a forager, with a sharp eye for anything from washers on a street to use in projects to pretty rocks when we are out on hikes in the summer.
Wool - blankets, suits and coats deconstructed to take advantage of the wonderful properties of wool. Great projects in this section. It's my favorite chapter in the book. The Poufs can be filled with scraps from other sewing projects, the insulated lunch bag is something you could use every day, and the Toadstool Cottage is a whimsical alternative to dollhouses.
Denim- My favorite project is the Double Duty Oven Mitt , simple seams, and it's a great housewarming gift. I also love the roomy Indi-Go Bag for shopping. My daughter's favorite is the hammock project.
Mailers, which uses Tyvek envelopes, is my daughter's favorite chapter. She's been a fan of re-using these for years, and is always really happy when I get mail in them. The insides are canvases ready to be colored, and they can be sewn, glued and taped. I like the Notebook project best as a way to make small memory books. Her favorite is the Banner project.
Vintage uses all sorts of vintage textiles, bed sheets, aprons, kitchen towels and table cloths are all used in this chapter. my favorite project is the Traveling Hamper, my daughter loves the Summer Bolster.
Spiral bound with a hard outer cover and gorgeously photographed, this is a lovely and inspirational collection of things to make using recycled fabrics.

Published by Wiley Books, you can get the book from your local bookstore, or by clicking the Amazon.com affiliate link below.


I received a complimentary copy of this book to review, my reviews are always my personal and honest opinion. You can read more about my review policy here.

Sunday, April 22, 2012

Happy Earth Day!

One of the best things about being crafty is the ideas for re-using things instead of throwing them away.

Some of my favorite things are:
Old torn jeans for potholders, purses and other tough sewn projects

Plastic milk jugs as structural inserts in embroidered beadwork and other kinds of embroidery

Plastic bags= PLARN!

Old deli containers work well as mini-greenhouses to start seedlings, a lot of them are #6 plastic which is shrinkable as well. Check the recycling number.

My son reuses plastic sushi trays as paint palettes and for small parts.

Cardboard packaging is used for lots of things in my house. It works for small templates for sewing projects, as structure for a purse, or as the armature for a sculpture. Combines with paper mache very well.

Newspapers can be woven to make situpons and baskets. Also one of the best things for paper mache. Gardening uses include seed tape or little seedling pots.

Shampoo bottles can be repurposed to make small watering cans, the tops can be cut off to hold brushes and other craft supplies, or they can be turned into little cases.

Wire coathangers can be used for book ends, blanket pins and all sorts of other things. DON'T use them for toasting marshmallows.

Right now I'm loving aluminum spangles made using punches from soda cans. A lot of hand punches work great with aluminum soda cans.

Popped bicycle innertubes work well cut open and in shorter lengths to help open jars. They also make a wonderful material for things like these rubber bracelets.


Wednesday, April 11, 2012

Book Review- Mend It Better with bonus patch templates


Mend It Better: Creative Patching, Darning and Stitching by Kristen Roach is a wonderful resource for mending clothing to keep it wearable, or for buying clothing from thrift stores and garage sales and being able to mend it into something for your wardrobe. Mending is one of the most ecologically sound choices you can make.

It's well thought out, and the instructions are clear enough for beginners. Even experienced sewers may find new things in this volume. There are instructions for doing mending that's meant not to be noticeable, but also ideas for turning your mending into a way to decorate your clothing and make it uniquely your own.

She starts by offering suggestions for when you should mend and when something should just become scrap fabric or rags. Then explains the basic tools you'll want in your mending kit. Then she gets into instruction.

A lot of the mending techniques she suggests are things that can be done by hand. As someone who likes sewing by hand in the evening while watching television with my family, I love her stitch suggestions and mending instructions for doing it by hand. She also talks about machine mending and hemming as well. She explains different stitches well.

The photographs for the mended projects show the new stitches in contrasting colors so it's easy to see how things are done.

The chapters are laid out by types of mending, patches, surface fixes (like snagged threads), seam fixes, straight hems, fixing waist bands of different types including the kind with sewn in place elastic, how to darn a patch and more intriguingly, how to crochet a patch for socks and other knits, fasteners and closures, zippers and the final chapter is decorative accents.

There are some sewing projects in the book, like how to make a mending tool kit, and how to make a mini clutch kit to keep in your office or car.

My favorite mending techniques in the book use shapes and decorative fabrics, colors and stitches to turn a hole into a design feature. With that in mind, here are some templates for patches in star and heart shapes. 100 dpi jpg format.


My daughter is wild for this book. She does all her own mending, as well as a lot of the mending for her older brother. 
Solid techniques and instruction make this a wonderful book for people who are interested in extending the life of their clothes, and a good gift for people just starting out on their own. 

I received a complimentary copy of this book to review, my reviews are always my personal and honest opinion. You can read more about my review policy here.

Saturday, October 29, 2011

Book Review - 101 Tees

101 Tees ; Recycle + Refashion + Revamp by Cathie Filian is a collection of ways to personalize and style tee shirts into fashion statements that reflect who you are.

Unlike other teeshirt revamping books, this one isn't about how to deconstruct or slice up a shirt. The emphasis is instead on ways to decorate and embellish a tee shirt. The results are colorful, unique and fun. Just as importantly, the results are modest and wearable by young ladies.

The techniques include applique, embroidery, printing, painting, stenciling, using iron ons and beads. While there are no illustrations, they are well explained. There are patterns and stencils in the back.

The examples are trendy looking with a DIY vibe. One of my favorites is the hand stamped Giggles shirt. The same technique could be used to set up a shirt with a favorite quote. Other favorites are the two toned dyed shirts. One of the most energizing and lovely ideas through out the book is untypical design placements and elements. Instead of centering motifs and embellishments, they are placed at angles on shoulders, off to the side, or in other places. It's a great design element that's very appealing.

Scattered flowers go up the side of one shirt. Ruffles are used to create both fashion looks in sharp pleats and very girly looks in soft form. The bleach discharged robot shirt is one my son wants to make, but instead of the negative stencil robot, he plans to use gears and bolts. A butterfly design combines painted and appliqued shapes in different sizes. Some shirts show as an example how you can take a shirt already printed with a pattern or design and embellish it in different ways. Screen printing on top of a patterned tee shirt for example, or embroidering details on a shirt with a motif.

A lot of the tee shirts in the book aren't plain tee shirts. They have shaping and details that you might not find in your closet. However, the ideas are workable on a variety of shirts, and it's a great book for ideas to create your style from thrift store shirts. Since most of the techniques don't require expensive or specialty equipment, it's an inspiring collection of ideas for teens. My teen daughter really likes the book, it's one both of us will use and keep in mind when we are at thrift stores. We both have our own style. Mine tends more to the feminine, her's is more funky. The ideas in this book appeal to both of our styles.

You can get this book directly from the publisher, Lark Crafts
My reviews are always my personal and honest opinion. You can read more about my review policy here.

Wednesday, April 20, 2011

Tuna Can Baskets


These are so very easy to make. If you're doing them with small children, you'll need to drill or punch the holes in the cans and bend the wire. Lots of ornamentation possible. Get out the button box, plastic beads and stickers! These are plain. 
To make them you'll need empty tuna cans that have been washed well. Hopefully you're already using a safety can opener for all your cans. I love mine so much. The kind that breaks the seal instead of cutting the can so there are no sharp edges?
This will also work with wood brie boxes to make more shallow boxes.

To punch the holes in mine, I used a two hole metal punch, but I also tested with my hand operated craft drill and that went through just fine. A motorized rotary tool will work as well, but as much as possible, I prefer using human powered things. 

You will need:
Tuna can
punch, drill or nails to put holes in the can
paper, fabric, ornaments, braid, anything you want to decorate your can with
scissors
1/8 inch hole punch for paper
glue of some sort- heavier fabrics like the pink paisley do best with hot glue, which my daughter also used as a design detail. A bit of glitter makes it shiny, with the paper version I used PVA glue which adhered fairly well. More on the flowered version in just a bit.
12 inch piece of wire- the kind I used is aluminum 17 gauge wire. (see note at bottom)
wire cutters
pliers
cylinder form of some sort, I used a salt container.

If you're using fabric, you'll wrap it around the can and cut it to fit. 
To put the seam in the back and the wire handle in the middle between the front and the back, you'll fold your fabric to find the right spots. Fold it in half, then fold each side down to meet the fold in the middle. Those second folds are where you want the holes for handles. Mark them, and pierce holes. If you're using a two hole metal punch like I did, make sure the holes aren't too far down for the throat of the punch.

If you're using paper, just print my template. It's 300 dpi and 10.5 inches long, so you need to print it at exactly 300 dpi with 1/4 inch margins. Punch the holes and use it as a guide for your scrapbook or hand stamped papers.

Glue the fabric or paper around the can, then use the holes you punched as guides for where to pierce the can using the drill or metal punch. If you're using a nail to punch the holes, you'll want to punch them before you glue the paper or fabric into place. To do that, wrap the fabric or paper around the can and use a permanent marker to mark where the holes are. Punch the holes then very carefully line up the holes on the paper or the fabric and glue it into place.

To make the handle, curve the middle of the wire around your cylinder form, and turn up the ends of the wire at 90 degree angles about 2 inches from the ends. If you want to add beads, now is the time. Don't bead the whole wire though, you'll need about an inch of bare wire on either side.
Now put the handle into the can, and put the ends of the wire through the holes to the outside. Use the pliers to wrap the wire ends around the wire.

Add whatever decorations you'd like, and I used tulle circles leftover from another project to line the baskets when they were done.
Click the images for the full sized versions. I printed out my example on card stock because it's not as sheer as paper. The first image is the template.

Printable! I could fit 4 on one page easily, so I did. And a black and white version for Liberty, or for anyone who likes the scrolly swirly design but wants to color it themselves.

Notes: The flowered version was the easiest. I used Japanese self adhesive cloth for that one that Abigail from Abigail's Crafts How To sent me a few months ago. I've been hoarding it. The fabric punches easily with hand punches and there are some people on Etsy who sell it. Really awesome stuff. The back is marked with a grid in centimeters which makes it easy to cut very straight, then you peel up the back to apply it.

The wire comes on a 250 foot spool. If that's too much for you, you can usually find smaller spools of different kinds of wire at the hardware store, ask the clerk. However, you may find you use it as much as I do. The stuff is perfect for quick wire crowns or to make bubble wands with. It's also made quick sword holders for costumes, and gets used as armatures in dolls. Plus my husband has a habit of asking me every so often if I have wire he can use for something and aluminum costs a lot less than copper. 


Wednesday, October 27, 2010

Book Review- Little Green Dresses

Little Green Dresses: 50 Original Patterns for Repurposed Dresses, Tops, Skirts and More by Tina Sparkles is themed around the very popular idea of making new clothes out of old clothes. There are lots of books covering this subject but this one takes a very different take on the concept.
Instead of being another how to turn jeans into skirts or teeshirts into shrugs type of book, this one is about actually drafting new patterns and creating very polished finished pieces of clothing. It's very in depth about how to make patterns to fit you perfectly.
For that reason, it may not be good for re-vamping an existing wardrobe of clothes that already fit you well, but it's a great use for thrift store and garage sale clothes and linens that will have the yardage necessary to completely remake them into something very wearable.
Most of the patterns are geared towards a younger audience, stylish 20 somethings, but the skirts and dresses are easily lengthened for people who more comfortable in more modest clothing.
The other thing I like about this book is that the pattern drafting information can also help someone fit their existing wardrobe better.
There is a lot of information in here and a lot of very nice clothing designs. Skirts, tops and dresses that have classic lines and are well tailored and fitted. The patterns you draft for yourself can be used and worn for years. In someways it reminds me of my Mom's old Vogue sewing book, but with designs that are a lot more current and suggesting use of  salvaged table linens and curtains instead of buying new fabric. Although new fabric is completely usable as well.A wonderful addition to a sewing library, and a great resource for people who want to learn how to make clothes to fit them perfectly.
You can get this book directly from Taunton Press or below from Amazon.com (affiliate link)