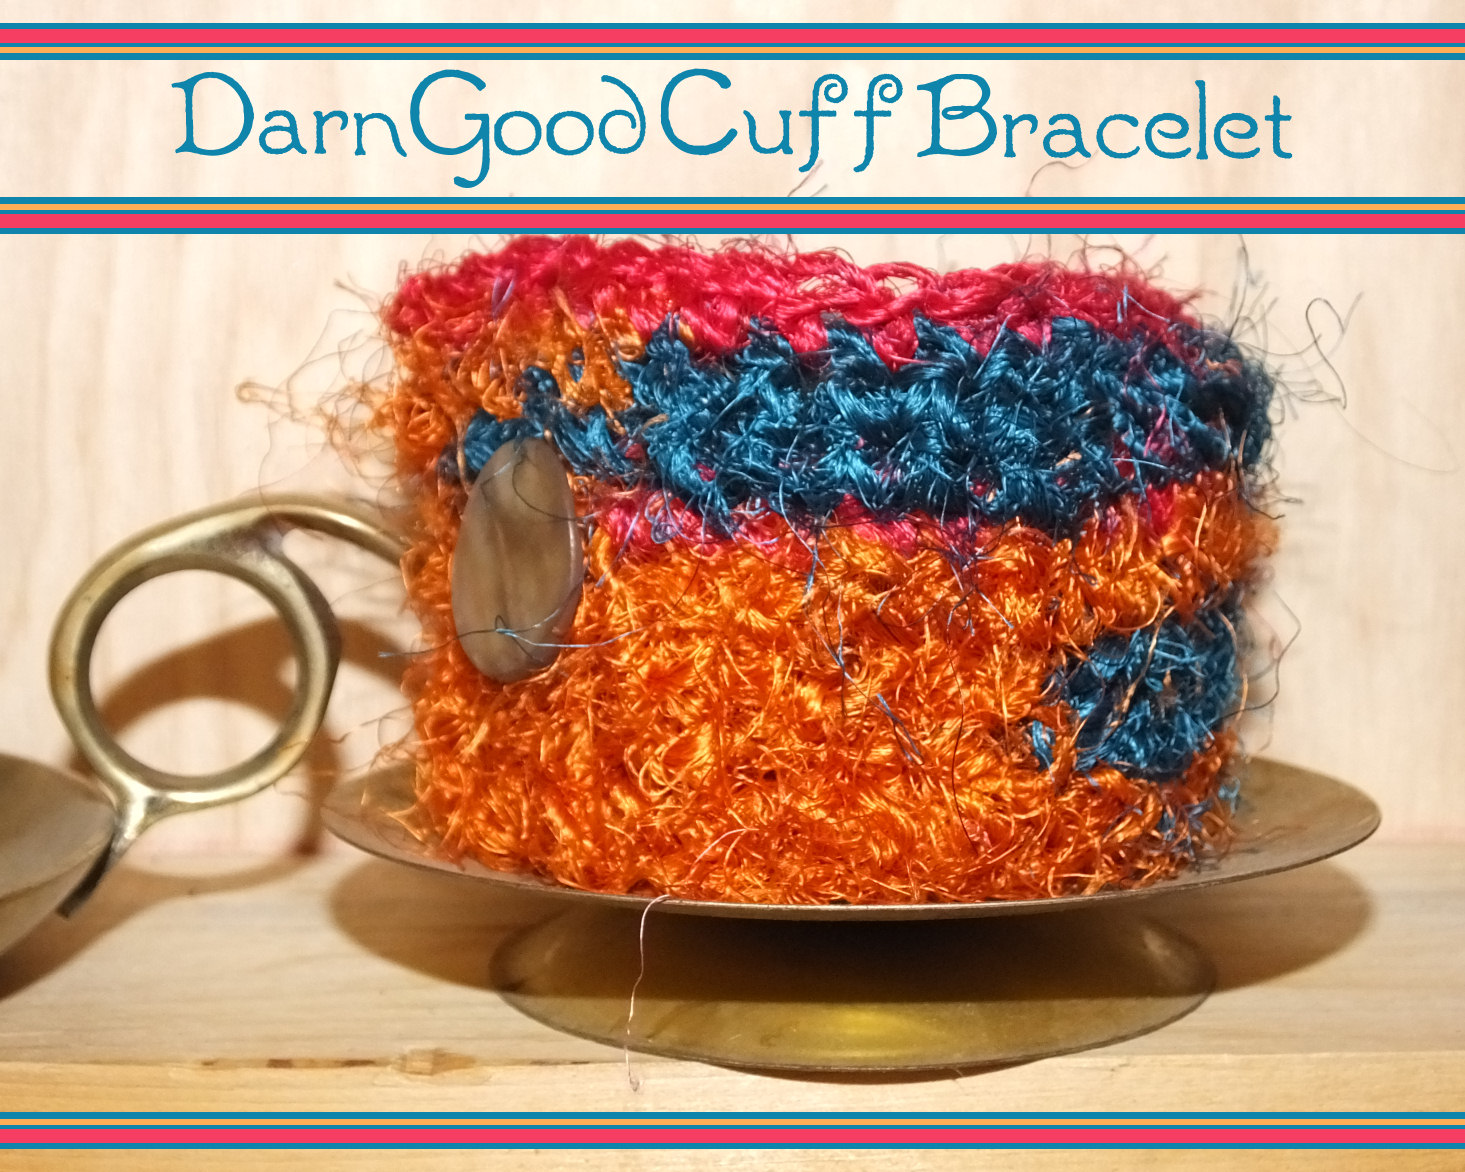
Printing Tips

If you'd like to support this site and all the free things I post- please check out my Don't Eat the Paste Mandala collection coloring book for 9.99 at Amazon.
Showing posts with label crochet. Show all posts
Friday, February 10, 2017
Little Kitty Charm- crochet pattern
Right now I'm working on a knitted scarf for my husband. He wears scarves throughout the winter then they get misplaced in the summer. I had to take a short break and hooked up a bunch of these little charms last night.
You will need:
A small amount of size 10 thread in your choice of colors
size 6 steel hook (1.8 mm)
tapestry needle
scissors
stiffener (optional, I didn't use it)
Terminology is American
sc= single crochet
ch= chain
dc=double crochet
sl st= slip stitch
Chain 6
Rnd 1: Ch 6, dc in first ch, ch 16, dc in 6th ch from hook, ch 2, sl st to join
Rnd 2: ch 1 (does not count as first stitch), sc 3 times in "ear", ch 3, sl st in first ch (picot made), sc 3 times in ear, sc 16 times in big loop, sc 3 times in "ear", ch 3, sl st in first ch (picot made), sc 3 times in ear, 2 sc in top of "head". Sl st to join.
If you want to add a loop, sl st back one stitch, chain 5, sl st in next sc in top of the head. If you're going to put it on a safety pin like I did, you might want to break off the yarn to pull the chain through the bottom loop before the final slip stitch.
Weave in ends. Block and stiffen if desired.
They are so quick. I'm going to try one later with beaded single crochets!
Wednesday, September 28, 2016
Fun Hood Pattern (crochet)
A fun hat. It was before our day cruise and I wanted a fun and warm hat to wear on the cruise.
Once I had that figured out, it just flew off the hook- even with keeping notes for writing up the pattern.
The yarn is stunning. As good as the colors look, the spin is lovely, very regular and the texture is so very soft. When I pulled it out of the the envelope, I told my husband that he had to touch my yarn.
Here it is! I hope you enjoy this too.
3 skeins of Super Soft and Chunky Reclaimed Silk Yarn
Size K hook
Scrap of cardboard to make pom poms or tassel
Scissors
large yarn needle for weaving in ends.
American terminology
ch=chain
sc= single crochet
dc= double crochet
sl st= slip stitch
st or sts= stitches
rsc= reverse single crochet- you can use a single crochet, it will look a little different.
repeat ** means repeat the steps between the asterisks.
Ch 1
Round 1: Ch 3 (counts as first dc), 7 dc in first ch, sl st to top of ch 3 to join. (8 sts)
Rnd 2: Ch 3 (counts as first dc),dc in next 7 sts, sl st to join (8 sts)
Rnd 3: Ch 3 (counts as first dc), 2 dc in next st, *dc in next st, 2 dc in next st*, repeat ** 2 more times, sl st to join (12 sts)
Rnd 4: Ch 3 (counts as first dc), dc in next st and each st around. Sl st to join (12 sts)
Rnd 5: Ch 3 (counts as first dc), dc in next st, 2 dc in next st, *dc in next 2 sts, 2 dc in next st*, repeat ** 2 times, sl st to join (16 sts)
Rnd 6: Ch 3 (counts as first dc), dc in next st and each st around. Sl st to join (16 sts)
Rnd 7: Ch 3 (counts as first dc),dc in next 2 sts, 2 dc in next st, *dc in next 3 sts, 2 dc in next st*, repeat ** 2 times, sl st to join (20 sts)
Rnd 8: Ch 3 (counts as first dc),dc in next st and each st around. Sl st to join (20 sts)
Rnd 9: Ch 3 (counts as first dc),dc in next 3 sts, 2 dc in next st, *dc in next 4 sts, 2 dc in next st*, repeat ** 2 times, sl st to join (24 sts)
Rnd 10: Ch 3 (counts as first dc),dc in next st and each st around. Sl st to join (24 sts)
Rnd 11: Ch 3 (counts as first dc),dc in next 4 sts, 2 dc in next st,*dc in next 5 sts, 2 dc in next st*, repeat ** 2 times, sl st to join (28 sts)
Rnd 12: Ch 3 (counts as first dc),dc in next st and each st around. Sl st to join (28 sts)
Rnd 13: Ch 3 (counts as first dc),dc in next 5 sts, 2 dc in next st,*dc in next 6 sts, 2 dc in next st*, repeat ** 2 times, sl st to join (32 sts)
Rnd 14: Ch 3 (counts as first dc),dc in next st and each st around. Sl st to join (32 sts)
Rnd 15: Ch 3 (counts as first dc),dc in next 6 sts, 2 dc in next st,*dc in next 7 sts, 2 dc in next st*, repeat ** 2 times, sl st to join (36 sts)
Rnd 16: Ch 3 (counts as first dc),dc in next st and each st around. Sl st to join (36 sts)
Rnd 17: Ch 3 (counts as first dc),dc in next 7 sts, 2 dc in next st,*dc in next 8 sts, 2 dc in next st*, repeat ** 2 times, sl st to join (40 sts)
Rnd 18: Ch 3 (counts as first dc),dc in next st and each st around. Sl st to join (40 sts)
Rnd 19: Ch 3 (counts as first dc),dc in next 8 sts, 2 dc in next st,*dc in next 9 sts, 2 dc in next st*, repeat ** 2 times, sl st to join (44 sts)
Rnd 20: Ch 3 (counts as first dc),dc in next st and each st around. Sl st to join (44 sts)
Break off yarn.
Count 5 stitches from break off and join in new skein
Row 1: Ch 1 (does not count as first sc), sc in same stitch, sc in next 32 sts
Row 2: Ch 1 (does not count as first sc), rsc in each st across.
Row 3: Ch 1 (does not count as first sc), 2 sc in first st, sc in each st until last st, 2 sc in last st (35 sts)
Row 4: Ch 1 (does not count as first sc), rsc in each st across.
Row 5: Ch 1 (does not count as first sc), 2 sc in first st, sc in each st until last st, 2 sc in last st (37 sts)
Row 6: Ch 1 (does not count as first sc), rsc in each st across.
Row 7: Ch 1 (does not count as first sc), 2 sc in first st, sc in each st until last st, 2 sc in last st (39 sts)
Row 8: Ch 1 (does not count as first sc), rsc in each st across.
Row 9: Ch 1 (does not count as first sc), 2 sc in first st, sc in each st until last st, 2 sc in last st (41 sts)
Row 10: Ch 1 (does not count as first sc), rsc in each st across.
Row 11: Ch 1 (does not count as first sc), 2 sc in first st, sc in each st until last st, 2 sc in last st (43 sts)
Row 12: Ch 1 (does not count as first sc), rsc in each st across.
Row 13: Ch 1 (does not count as first sc), 2 sc in first st, sc in each st until last st, 2 sc in last st (45 sts)
Row 14: Ch 1 (does not count as first sc), rsc in each st across.
Row 15: Ch 1 (does not count as first sc), 2 sc in first st, sc in each st until last st, 2 sc in last st (47 sts)
Row 16: Ch 1 (does not count as first sc), rsc in each st across.
Break off.
Rejoin yarn in the back, and single crochet around the base of the hood, at the tips of the ear flaps, put in 3 single crochets to work around the corner. sl st to join.
Ch 1, single crochet around, at the center of the 3 sc at the tip of the ear flaps, sc, ch 50, sl st back up ch, sc in same st, continue sc around to tip of the second ear flap, repeat.
Make 3 pom poms or tassels, one large, 2 small. Attach the large one to the pointy top of the hat and the other 2 to the cords for the hood.
Get a discount at Darn Good Yarn using the link below!
Use code NEWSUBSCRIBER at checkout for 10% off! (affiliate link)
Tuesday, June 7, 2016
Tasseled Crochet Amulet Bag pattern- with tassel tutorial
Tasseled Crochet Amulet Bag Pattern:
Materials:
- Red Heart Fashion Crochet Thread- size 3 (less than one ball)
- Size C hook
- Scissors
- Tapestry needle
- Piece of cardboard about 5 inches long
U.S. crochet terms used.
Abbreviations:
- ch = chain
- sc =single crochet
- dc= double crochet
- sl st= slip stitch
- st or sts= stitch or stitches
- repeat ** means to repeat the instructions between the asterisks.
Ch 2
Round 1: 8 sc in ch 1, sl st to join (8 stitches)
Round 2: ch 1 (does not count as first st), 2 sc in each st around, sl st to join (16 stitches)
Round 3: ch 1 (does not count as first st), sc in each st around, sl st to join (16 stitches)
Round 4: ch 1 (does not count as first st) sc in first st, 2 sc in next st, *sc in next st, 2 sc in next st*, repeat ** around, sl st to join (24 sts)
Rounds 5-17:ch 1 (does not count as first st), sc in each st around, sl st to join
Round 18: ch 3, dc in next st, ch 2, skip 2 stitches, *dc in next st, dc in next st, ch 2, sk 2 stitches*, repeat ** around, sl st to join (6 spaces)
Round 19: ch 1 (does not count as first st), sc in each st around, sl st to join (24 sts)
Round 20: ch 1 (does not count as first st), sc in first st, sc in next st, ch 3, skip next st,*sc in next 3 sts, ch 3, skip next st*, repeat ** around, in last st, sc, sl st to join. (6 loops made)
Round 21: ch 1 (does not count as first st), sc in first st, skip next stitch, 5 sc in loop, *skip next st, sc in next st, skip next st, 5 sc in loop*, sl st to join.
To make the tassel:
Photo examples use embroidery floss because it was handy and I could use contrasting colors. I didn't wrap it around a template. Please excuse the dirty table. I was in a rush to get photos so I could get back outside- and I went outside to put this together. GORGEOUS weather!
Find something a half inch longer than you want the tassel to be or cut a piece of cardboard that's long enough.
Double a length of thread 20 inches long and lay it down across the top of your template.
Wrap it, I did 50 wraps for a full tassel.
Pull the doubled length around the top and tie it firmly. I used a square knot, then tied another overhand knot over that.
Cut a piece of thread 20 inches long and a piece 8 inches long.
Fold the short thread and lay it length wise on the tassel body with the loop end pointing to the bottom (fringe) of the tassel.
Tie the long thread near the top of the tassel with a short tail length going down the tassel in a simple half knot around both the tassel and the short thread. I made it the same length as the rest of the tassel.
Wrap evenly and tightly for as long as you want the wrap to be. Tie another half knot.
Put the tail through the loop of the short strand.
Pull the free ends of the short piece sharply and quickly to pull the end under the wraps. Trim the top thread neatly.
With the doubled ends on the top of the tassel, pull them through the bottom of the bag using a crochet hook, I spaced them between the stitches on the first round. Tie in a secure knot- I used a square knot then doubled it. Trim ends.
Crochet a cord or make a twist cord and weave into the double crochet spaces. Weave in all ends.
Saturday, January 2, 2016
2 Glove Edgings - crochet
Both of these patterns are from my old blog- pictures and text from 2006 (wow! Was it really that long ago??)
Easy Lacy Scalloped Edging
Working into the top of the glove, or sock, or whatever you are adding your edging too..
Rnd 1= Attach thread to glove, chain 4, first chain counts as sc, sc just a bit away. chain 3, sc into glove, ch 3, sc into glove, repeat for a multiple of 5 loops counting the first one. In my example, I used 35 loops. For last loop, ch 3, slipstitch to join in first ch, slipstitch to top of chain 3.
Round 2= ch 1, *sc in loop, ch 3, sc in next loop, ch 3, sc in next loop, ch 3, sc in next loop, 5 dc in next loop*, repeat from ** around. On last 5 dc shell, slipstitch to join to the first sc, slipstitch to top of chain 3.
Round 3= ch 1 *sc in loop, ch 3, sc in next loop, ch 3, sc in next loop, ch 1, dc in first dc, ch 1, dc in next dc, ch 1, dc in next dc, ch 1, dc in next dc, ch 1, dc in next dc, ch 1* repeat ** on last ch 1, slipstitch to join with first sc, slipstitch to top of ch 3. (5 dc per scallop)
Round 4= ch 1, *sc in loop, ch 3, sc in next loop, ch 2, dc in first dc, ch 2, dc in next dc, ch 2, dc in next dc, ch 2, dc in next dc, ch 2, dc in next dc, ch 2* repeat around, slipstitch to join to first sc, slipstitch to top of ch 3. (5 dc per scallop)
Round 5= ch 1, *sc in loop, ch 1 dc in ch 2 sp, ch 1, dc in dc, ch 1 dc in ch 2 sp, ch 1, dc in dc, ch 1 dc in ch 2 sp, ch 1, dc in dc, ch 1 dc in ch 2 sp, ch 1, dc in dc, ch 1 dc in ch 2 sp, ch 1, dc in dc, ch 2* repeat around. Slipstitch to join last ch 2 to first sc, slipstitch into chain 1 space. (11 dc per scallop)
Round 6= ch 1, sc in ch 1 space, ch 3, *sc in next ch 1 space, ch 3* repeat around, slipstitch to join, break off thread, weave in ends.
Another Easy Glove Edging
Easy Lacy Scalloped Edging
- Size 10 crochet cotton
- Size 9 hook- gauge isn't really important, so if you're more comfortable with a larger hook size use that.
- scissors
- a pair of "magic stretch gloves" - also works on socks.
Rnd 1= Attach thread to glove, chain 4, first chain counts as sc, sc just a bit away. chain 3, sc into glove, ch 3, sc into glove, repeat for a multiple of 5 loops counting the first one. In my example, I used 35 loops. For last loop, ch 3, slipstitch to join in first ch, slipstitch to top of chain 3.
Round 2= ch 1, *sc in loop, ch 3, sc in next loop, ch 3, sc in next loop, ch 3, sc in next loop, 5 dc in next loop*, repeat from ** around. On last 5 dc shell, slipstitch to join to the first sc, slipstitch to top of chain 3.
Round 3= ch 1 *sc in loop, ch 3, sc in next loop, ch 3, sc in next loop, ch 1, dc in first dc, ch 1, dc in next dc, ch 1, dc in next dc, ch 1, dc in next dc, ch 1, dc in next dc, ch 1* repeat ** on last ch 1, slipstitch to join with first sc, slipstitch to top of ch 3. (5 dc per scallop)
Round 4= ch 1, *sc in loop, ch 3, sc in next loop, ch 2, dc in first dc, ch 2, dc in next dc, ch 2, dc in next dc, ch 2, dc in next dc, ch 2, dc in next dc, ch 2* repeat around, slipstitch to join to first sc, slipstitch to top of ch 3. (5 dc per scallop)
Round 5= ch 1, *sc in loop, ch 1 dc in ch 2 sp, ch 1, dc in dc, ch 1 dc in ch 2 sp, ch 1, dc in dc, ch 1 dc in ch 2 sp, ch 1, dc in dc, ch 1 dc in ch 2 sp, ch 1, dc in dc, ch 1 dc in ch 2 sp, ch 1, dc in dc, ch 2* repeat around. Slipstitch to join last ch 2 to first sc, slipstitch into chain 1 space. (11 dc per scallop)
Round 6= ch 1, sc in ch 1 space, ch 3, *sc in next ch 1 space, ch 3* repeat around, slipstitch to join, break off thread, weave in ends.
Another Easy Glove Edging
- size 10 cotton
- size 9 hook or whatever your most comfortable with.
- 2 buttons
- tapestry needle that will fit the size 10 cotton and still go through the button holes. I've got no clue what size I used.
When you get to the last ch 3 , instead of chain 3, ch 1, dc in first ch.
Rnd 2-Now you are on top of the last loop you made, ch 1,(does not count as first sc) sc in that loop, ch 3, *sc in next loop, ch 3* repeat around until you reach the last loop, ch 1, dc in first sc.
Rnd 3- ch 1,(does not count as first sc) sc in the last loop of the previous row, ch 3, sc in the same loop, *ch 3, sc in next loop, ch 3, sc in same loop* repeat around. End by ch 1, dc in first sc (double the number of loops for the first round)
Rnd 4- ch 1,(does not count as first sc) sc, ch 3, *sc in next loop, ch 3* repeat around. This round you do end with a chain 3, slipstitch it to the first sc. Weave in ends.
That's the ruffle.
Now make the flowers. Oh so easy!
Rnd 1- Ch 6 tightly, slipstitch to form a ring.
Rnd 2- working into the ring, ch 1,(does not count as first sc) sc, ch 3, sc, ch 3, sc, ch 3, sc, ch 3, sc, ch 3, sc, ch 3, slipstitch to join to first sc. (6 ch 3 loops)
Rnd 3, ch 1(does not count as first sc), *sc in sc. Ch 2, 5 dc in ch 3 loop, ch 2,* repeat on each ch 3 loop, slipstitch to join. Weave in ends.
Thread the needle with a bit of the cotton, and attach the flower to the glove with the buttons.
Of course, like the first one, it would work with socks too, only you'd put the ruffle on the top of the sock and the flower a bit below it on the inside so when you folded down the cuff it would show.
Thursday, October 1, 2015
Super Speedy Sari Silk Shawl (crochet)
I couldn't resist the alliteration, but if I were going to give it another name, it would be Rainbow Crow shawl, because the soft effect of the frayed edges of the recycled sari silk ribbon and all the colors reminds me of the story of Rainbow Crow.
By super speedy- you can make a small version of this shawl in an evening with 4 skeins of Darn Good Yarn's Tibet Jewels. The full sized version in my photos is made using 7 skeins and took 2 evenings of tv watching. Probably 6 hours? Maybe less.
Tibet Jewels is the easiest of the sari ribbons I've found to wind into balls, and it has so much texture and color it's just amazing.
The 4 ball version- the finished size without the fringe is 52 inches along the hypotenuse and 26 inches deep.
You will need:
- 7 (or 4) balls of Tibet Jewels
- Size S crochet hook
- Scissors
- Size P crochet hook for putting on the fringe
So this is a bottom up shawl, and once you start, it just flies off your hook.
American terminology
Stitches used:
ch=chain
sc=single crochet
tr= treble crochet
sl st= slip stitch
st or sts= stitch or stitches
Chain 7, sl st to join in a ring
Row 1: Chain 5, sc in ring, ch 2, tr in ring (2 loops)
Row 2: Ch 5, sc in same loop, ch 3, sc in next loop, ch 2, tr in 3rd st of ch 5 from previous row (3 loops)
Row 3: Ch 5, sc in same loop, ch 3, sc in next loop,ch 3, sc in next loop, ch 2, tr in 3rd st of ch 5 from previous row (4 loops)
Row 4: Ch 5, sc in same loop, ch 3, sc in next loop, work across the same way- at the last loop, ch 2, tr in ch 3 of beginning ch 5 of previous row.
Keep repeating Row 4. Each row will be one loop wider than the row before it.
For the 4 skein variation- when you get close to the end of the 3rd ball of yarn, finish that row and if you need to add in the 4th skein to finish, do that. Then break off leaving the tail long enough to be one of the fringe, and cut your fringe. Put a fringe at the base of each row along the short sides, and one in the center of the beginning chain 7.
For the 7 skein variation- complete 26 rows, and break off leaving a 13 inch tail. Cut 53 fringe pieces 26 inches long (if you want it like mine, shorter fringe is fine) and put one fringe at the base stitch of each row. (where the rows join)
Attach the fringe by inserting your P hook into the stitch at the base of each row- where they join up, and fold the fringe in half, pull a loop though, then pull the ends through the loop.
This is 3 balls crocheted up-
Sunday, September 13, 2015
Darn Good Apple Cozy
I can't even tell you how much I love this yarn. I got a skein in a grab bag from Darn Good Yarn and balled it up and just pet it and stroked it until I had a plan for it. It's made from banana fibers! So yes, I wrapped my apple in bananas.
Darn Good Yarn Banana Fiber - they also have a gorgeous multicolor version- Kaleidoscope Banana Fiber
It's soft, fluffy, absolutely touchable. One ball will make an apple cozy with some leftover for making a bracelet or other accessory, 2 balls will make 3 apple cozies. The cozies fit the "school boy" sized small apples, but it would be easy to adjust the pattern for one of those huge apples if you're really apple crazy.
You will need:
Banana fiber yarn
Size K crochet hook
scissors
smaller hook to weave in ends OR a ribbon threaded through a tapestry needle to make a loop works too. The yarn does not go through needles easily.
Time- very short. These are quick, easy and make great gifts.
American terminology
Stitches:
chain=ch
sc= single crochet
dc= double crochet
sl st= slip stitch
st or sts=stitch or stitches
dec sc= insert hook in first st, yarn over, pull loop through, insert hook in next st, yarn over, pull loop through, yarn over, pull through all three loops on the hook.
Repeat ** means repeat the instructions between the asterisks.
Ch 2 or magic ring
Round 1: 6 sc in first ch or magic ring. Sl st to join (6 sts)
Round 2: ch 1 (does not count as first st) 2 sc in each st around, sl st to join (12 sts)
Round 3: ch 1 (does not count as first st) sc in first st, 2 sc in next st, *sc in next st, 2 sc in next st*, repeat ** around, sl st to join. (18 sts)
Round 4: ch 1 (does not count as first st) sc in each st, sl st to join (18 sts)
Round 5: ch 1 (does not count as first st) sc in each st, sl st to join (18 sts)
Now we switch to back and forth rows.
Row 1: ch 1 (does not count as first st), sc in same st, sc in next 15 sts (16 sc)
Row 2: ch 1 (does not count as first st) dec sc over first two sts, sc in next 12 sts, dec sc in last 2 sts. (14 sc)
Row 3: ch 1 (does not count as first st) dec sc over first two sts, sc in next 10 sts, dec sc in last 2 sts. (12 sc)
Row 4: ch 1 (does not count as first st) sc in each st (12 sts)
Row 5: chain 15 at end of row 4. Sc in second chain from hook, dc in next 7 sts, sc in next st, sl st in next 5 ch, sc in next 12 sts, ch 15, turn, Sc in second chain from hook, dc in next 7 sts, sc in next st, sl st in next 5 ch, sl st to join. Break off and weave in ends.
Yay! Apple cozy done! In 5 rounds and 5 rows. Put in apple, tie the ties once.
Coming as soon! A pattern for my sunshine shawl.
Sunday, August 9, 2015
Sunflower and bee photo box
I think that I should start doing more boxes from photographs. This is from a photo that I took last week. I love the bright, summer colors of the sunflower and bee.
Click the box below for a larger version to print on card stock, cut out, score folds, fold and glue!
I'm using the same colors in a shawl I'm working on now.
Tuesday, April 21, 2015
Recycled Chiffon Ribbon Purse
I'm wild for Darn Good Yarn's recycled yarn. This is actually the project that I originally ordered yarn for- a cross body hippie bohemian bag made in bright colors was just what I wanted. The bag is quite simple to make- it uses just chains, slip stitches and single crochets that show off the beauty and variations in the recycled yarn.
The purse takes just over 2 skeins of yarn- you can make it with 2 skeins if you do something simpler for the strap. You could make your own rag yarn, but the advantage to this yarn is that the thin chiffon makes a very workable yarn. The chiffon is sourced from saris and it's fair trade. I have this weird hangup about purses. Beyond preferring cross body and big enough for the stuff I carry daily, I also like recycled or upcycled. I buy my purses used, or handmade, or make them myself.
Click here for a discount on yarn! - the discount applies to your first purchase from Darn Good Yarn, and because of their amazing loyalty program, I'll get a credit to help pay for more pretty things from them! They have several assortments of the yarn used, it's more yarn than you'll need for this project, but that's good because I'll be posting a basket tutorial soon too and there are a lot of other things to do with the yarn. Check out the chiffon ribbon color packs. The color I used is Istanbul.
So first- some tips.
Put the flap over the front and mark where to sew in button. Sew on button. I had a big shank on mine so I was able to use the chiffon ribbon. Otherwise just use strong thread or embroidery floss.
The purse takes just over 2 skeins of yarn- you can make it with 2 skeins if you do something simpler for the strap. You could make your own rag yarn, but the advantage to this yarn is that the thin chiffon makes a very workable yarn. The chiffon is sourced from saris and it's fair trade. I have this weird hangup about purses. Beyond preferring cross body and big enough for the stuff I carry daily, I also like recycled or upcycled. I buy my purses used, or handmade, or make them myself.
Click here for a discount on yarn! - the discount applies to your first purchase from Darn Good Yarn, and because of their amazing loyalty program, I'll get a credit to help pay for more pretty things from them! They have several assortments of the yarn used, it's more yarn than you'll need for this project, but that's good because I'll be posting a basket tutorial soon too and there are a lot of other things to do with the yarn. Check out the chiffon ribbon color packs. The color I used is Istanbul.
So first- some tips.
The yarn is going to have some natural variation. I noticed that some of the joins are stitched, and some are knotted. It also has raw edges that can unravel a bit. When you're balling it up, work a loose ball and don't use a ball winder. I wound center pull balls around my fist working nice and loose with a pair of scissors to trim long raveled edges as I wound. The skeins are easy to work with. One end is knotted, so you'll need to unknot it carefully when you reach the end.
While you're crocheting, you may run across a join that's too bulky, just unknot it or clip it, taper the ends of the ribbons and tie a new overhand knot. Make sure you don't taper too narrow. It's so exciting watching the colors that are coming up next.
The chiffon yarn is stronger than you'd think, it twists as you crochet into something like a ribbon rope. You can use anything from a size K to a size Q hook easily with this- but since I wanted a purse that I may or may not line, I used a K for a nice tight stitch.
Chiffon Ribbon Purse Pattern
American terminology
You will need:
- 2-3 skeins of Chiffon Ribbon Yarn
- size K crochet hook
- Yarn needle
- Scissors
- 1 inch button
- Ch=chain
- sl st= slip stitch
- st or sts= stitch or stitches
- sc= single crochet
Chain 17 stitches, insert hook in second chain from hook and slip stitch to the end (this reinforces the bottom)
Round 1: Ch 1 tightly (does not count as first sc) sc in first st, sc in next 14 sts, sc 4 times in end st, working down the other side, sc next 14 sts, 3 sc in end st, sl st to join (36 sts)
Round 2: Ch 1 tightly (does not count as first sc), 2 sc in same st, sc in next 14 sts, 2 sc in next st, sc in next 2 sts, 2 sc in next st, sc in next 14 sts, 2 sc in next st, sc in next 2 sts, sl st to join. (40 sts)
Round 3: Ch 1 tightly (does not count as first sc), 2 sc in same st, sc in next 14 sts, 2 sc in next st, sc in next 4 sts, 2 sc in next st, sc in next 14 sts, 2 sc in next st, sc in next 4 sts, sl st to join (44 sts)
Base formed
Rounds 4-17: Ch 1 tightly (does not count as first sc), sc in same st, sc in each st around, sl st to join. Break off, weave in end.
Strap:
Chain 80-90 depending on the length you'd like. I like a longer strap so it hangs close to my hip.
Sc in second chain from hook, sc in each st.
Ch 1 to turn, sc in each st. Break off.
Count back 2 sts from joining st on the bag, and stitch strap in place in next 2 sts. Count 20 sts from strap on one side, and join on the other side.
Button hole tab- count 8 sts from strap on bag and join in yarn. Single crochet in that stitch and next 4 sts.
Rows 2-8: ch 1 to turn, sc in each st across
Row 9: ch 1 to turn, sc in first st, ch 2, sc in last st
Row 10-11: ch 1 to turn, sc in each st
Row 12: ch 1, skip first st, sc in next 2 sts, sl st in last st. Break off, weave in ends.
Put the flap over the front and mark where to sew in button. Sew on button. I had a big shank on mine so I was able to use the chiffon ribbon. Otherwise just use strong thread or embroidery floss.
I haven't decided if I'm lining it or not. If I do, I'll use one my husband's old, stained shirts to keep with the recycled theme, and possibly a salvaged zipper. My daughter saves zippers and buttons off the thrifted clothing she upcycles into costumes.
Saturday, April 11, 2015
Darn Good Cuff Bracelet Tutorial (crochet)
I love recycled sari yarn. It has all the things my little hippie heart adores. It's recycled from saris, it's silk!, it's got all sorts of colors and fun texture things going on. A lot of people like it but then don't know what to do with it. It's almost too much goodness. I didn't have that problem with this skein because I ordered it knowing it was going to be bracelets and accessories.
The company that sells it is Darn Good Yarn- and if you use my link, you'll get a coupon for a good savings and I'll get a credit on my next order. Win win right? Then you can refer your friends and they can get a coupon and you can get credit. Awesome loyalty program.
This is the yarn I bought from them in my first order and what I plan to do with it. The 4 skeins on the right hand side are a chiffon ribbon yarn that I'll be using to make a purse. The one in the forefront is the Recycled Photon Rainbow Sport Weight Recycled Silk Yarn that I used to make the bracelet above.
So the bracelet is simple enough to make. It's single crochets, chains and a pretty button. The yarn has so much going on that I wanted to simply show off the yarn. The problem is, because of the length of color changes, simply crocheting back and forth didn't work. It just made stripes instead of the sort of organic shape color changes I wanted. You can see my bracelet on top in this picture- and what it looks like working back and forth in the bottom picture.
So to get the color changes, I worked in 2 directions.
Darn Good Cuff Pattern:
You'll need a size D or E hook
- 1 skein of sport weight recycled sari silk yarn
- Large needle for weaving in ends
- attractive/8ths to 7/8th inch button
Chain 4
Row 1: sc in second chain from hook, sc in next 2 chains
Row 2-32: Ch 1 to turn, sc in each st (3 sts)
(adjust rows as needed for size. You want it to fit with an inch of overlap for the button)
Switch direction!
Row 34: Ch 1, working down the long side, sc in next 2 sts, ch 3, skip 3 sts, sc in the rest of the sts
Row 35-37: ch 1, sc in each st down the length
Round 1: ch 1, sc in st, sc down length, 3 sc in corner, sc across end, 3 sc in corner, sc down length, 3 sc in corn, sc across end, 2 sc in last st, sl st to first sc of round to join. Break off
Weave in all ends. Stitch button on opposite side of button hole. I just used some of the yarn.
The yarn is very strong, and very crisp feeling. It looks kind of like jute twine, but it's very soft to the touch with a nice amount of structure. You can gently handwash finished pieces, lay flat to dry. If you want your finished item softer, putting it in a dryer on delicate/low heat for a few minutes will soften the yarn. One skein will make a lot of small projects like this with 147 yards per skein.
Tuesday, March 10, 2015
Crochet Peace Symbol Necklace
I tease my daughter and tell her she's Hippie 3G. First generation was my mother, who was the right age, grew up in California, and was absolutely a hippie, political type.
Second generation is me of course. After growing up in home full of sprouting jars, needle point, homemade yogurt and hummus way before it was trendy, I was either going to be a hippie or go totally the opposite direction right? (I still hate carob though. ICK!)
The Amazing Turnip Girl is pretty proud of being the 3rd generation of our family to wear tie dye, march for Equality, sprout, garden, make things and hug trees.
One of my hangups is that I love peace symbol jewelry, but flat out refuse to wear a mass produced one. So I make my own, out of wire, wood and paper sometimes. This one, crocheted from American cotton is the newest one in my collection.
Crochet Peace Symbol Pendant
It works up fast, and only needs a very small amount of yarn and thread.
You will need:
- Size G crochet hook
- Size 7 steel hook
- Worsted weight yarn- I used Lily Sugar 'n Cream in Psychedelic
- Size 10 cotton thread- mine is from my stash and missing the label
- scissors
- needles to weave in ends
Stitch abbreviations:
- ch= chain
- sc= single crochet
- sl st= slip stitch
- st or sts= st or sts
American terminology used.
With yarn and size G hook-
Make a magic ring or ch:
Rnd 1: ch 1 (does not count as first st), sc 6 times in ring or first chain, sl st in first sc to join. (6 sts)
Rnd 2: ch 1 (does not count as first st), 2 sc in each stitch, sl st in first sc to join (12 sts)
Rnd 3: ch 1 (does not count as first st), sc in same st, 2 sc in next st, *sc in next st, 2 sc in next st*, repeat ** around, sl st in first sc to join. (18 sts)
Break off, weave in ends.
With size 7 hook and thread-
First you'll make an X shape, then it's attached to the yarn circle to make the peace symbol.
Chain 16, in second ch from hook, sl st, sl st the next 7 sts (8 sl sts)
Chain 8, in second ch from hook, sl st back to the middle of initial ch,
Sl st up remaining 7 stitches. Remove hook leaving a loop open.
Explaining this next part is going to look confusing. Refer to photo for help.
Insert hook in top of yarn circle, pull thread loop through, ch 1 (does not count as first st) sc in same st of yarn circle AND top of thread X, sc in same stitch of yarn circle. 3 sc each in next 5 sts of yarn circle, 1 sc in next st of yarn circle, sc in same st of yarn circle AND end stitch of one side leg of the thread X, sc in same st of yarn circle, 3 sc in each of next 2 sts, Sc in next st of yarn circle, sc in same st of yarn circle AND the bottom st of the thread X, sc in same st of yarn of yarn circle, 3 sc each in next 2 sts, 1 sc in next st of yarn circle, sc in same st of yarn circle AND end stitch of second side leg of the thread X, sc in same st of yarn circle, 3 sc in each of next 5 sts on yarn circle, sc in next st, sl st to first sc to join.
Chain 10, sl st to first chain to join. Bail made. Break off and weave in ends.
Make a cord to hang it. I did a simple twisted cord for this one, but a chain would work just as well.
Do you like hippie, groovy things? Check out my coloring book! It's full of mandalas with things like peace symbols, lava lamps and doves!
Thursday, March 5, 2015
Crochet Pendant pattern
I think I found a new favorite way to doodle with crochet while watching tv with my family, so if you like this crocheted yarn and thread pendant, let me know and I'll post more patterns later. The nice thing is they are quick to make, add a bit of color to an outfit and cost very little- they can be done with scraps of yarn and thread.
You will need:
- small amount of worsted weight yarn
- small amount size 10 thread
- size G crochet hook
- steel size 7 crochet hook
- needles to weave in ends
- scissors
Stitch abbreviations:
- Ch= chain
- sc= single crochet
- dc= double crochet
- sl st= slip stitch
- st or sts= stitch or stitches
- repeat ** around means to repeat the instructions between the asterisks.
With yarn and size G hook-
Make a magic ring or ch:
Rnd 1: ch 1 (does not count as first st), sc 6 times in ring or first chain, sl st in first sc to join. (6 sts)
Rnd 2: ch 1 (does not count as first st), 2 sc in each stitch, sl st in first sc to join (12 sts)
Rnd 3: ch 1 (does not count as first st), sc in same st, 2 sc in next st, *sc in next st, 2 sc in next st*, repeat ** around, sl st in first sc to join. (18 sts)
Break of yarn, weave in ends.
With thread and size 7 hook-
Magic ring or chain 6, join with slip stitch.
Rnd 1: ch 1 (does not count as first st), sc 12 times in ring, sl st in first sc to join. (12 sts)
Rnd 2: ch 3 (does count as first dc), dc in next st, ch 5, dc in next 2 sts, ch 5, dc in next 2 sts,ch 5, dc in next 2 sts, ch 5, dc in next 2 sts, ch 5, dc in next 2 sts, ch 3, dc in top of first ch 3 to join. (6 loops)
Rnd 3: ch 1 (does not count as first st), 3 sc in loop, skip next 2 sts, 3 sc in next loop, ch 3, 3 sc in same loop, *skip next 2 sts, 3 sc in loop, ch 3, 3 sc in same loop*, repeat ** 4 times, skip next 2 sts, 3 sc in loop, ch 1, dc in first sc of round to join. (6 ch 3 picots)
Rnd 4: Get the yarn circle, and hold it to the back of the of the thread flower. Remove hook from loop on flower, put it through one stitch on the outer rim of the yarn round, pull thread loop through the stitch. Chain 1, sc in st and the ch 3 picot on the flower together, sc in same stitch on the yarn round, 3 sc in next st on the yarn round, 3 in next st on the yarn round, sc in next stitch on the yarn round, sc in same st and the ch 3 picot on the flower together, sc in same st on the yarn round, *sc 3 times in next st on the yarn round, 3 sc in next stitch on the yarn round, sc in same st and the ch 3 picot on the flower together, sc in same st of the yarn round,*, repeat ** 2 times, 3 sc in next st of the yarn round, 3 sc in next st of the yarn round, sc in next st of the yarn round, join with sl st to first sc in round.
Rnd 5: Ch 1 (does not count as first st), sc in same st, ch 3, skip next st, *sc in next st, ch 3, skip next st*, repeat ** around. Join final ch 3 with sl st to first sc to join.
Chain 10, sl st in same sc to join. Break off thread, weave in ends.
Now you just need to make a cord for the necklace. I slip stitched a length for the cord shown, but you can also use monk's cord, a braided length, or even put it on a different kind of cord entirely.
I hope you enjoyed the project!
Thursday, February 12, 2015
Book Review- Crocheter's Skill-Building Workshop
The Crocheter's Skill-Building Workshop is a fairly comprehensive book aimed at beginners, advanced beginners and intermediate crocheters, as well as crocheters that have worked off written patterns and are ready to start designing or adapting patterns to fit their own style.
Full color photos with step by step instructions that are well written make it easy to follow, and the stitch patterns are in both international crochet graphs and American style text patterns.
It starts with a review of the absolute basics, but also shows variations on those basics. For example, most beginning crochet books don't cover using a long chain instead of a turning chain to start a row for example. This one does, and shows how it works and explains the pros and cons of each method for starting a row. It also covers extended stitches and how to join in colors.
Then it gets into various stitches, including specialty stitches like loop and knot stitches. Again the photographs and instructions are very clear. I've always had an issue with knot stitches, and these instructions taught me how to do them.
A chapter on shaping and construction shows how stitches build and how to increase and decrease neatly. It also covers how to check gauge and why that's so important. Another chapter covers crocheting in the round using finished rounds, spirals and how to taper a spiral done with taller stitches.
Advanced shaping covers all those edges- to create sharp darts, smooth sleeves and other details found in well-crafted clothing. It explains how to shape with textured or openwork stitch patterns. It covers internal shaping as well in pattern.
Textured stitches are where crochet gets really awesome for me. It's the difference between boring and interesting for projects I make for my monochrome loving husband. A full chapter covers things like popcorn, cables, crocodile stitch and crocheted ribbing.
Color crochet has the standards like stranded crochet and color checks, but it also has some pretty spike stitch techniques and an easy 2-color diamond that's a lot of fun to stitch.
Finishing techniques is seams, blocking and everything you need to do to put it all together and finish it.
After that, there are a few projects so you can practice the skills learned. Textured stitches, internal shaping and ribbing are used in projects like a slouchy hat or a star stitch cowl.
Like Storey Publishing on Facebook!
Like Shala's Beadwork and Printables on Facebook while you're at it.
(psst! Right now this book is a fantastic deal in Kindle format!)
Amazon.com affiliate links don't affect your cost, and provide extra income to me personally, which helps support this site.
I received a complimentary copy of this book to review, I received no other compensation, and my review is my honest opinion of the book. You can read more about my review policy here.
Monday, June 23, 2014
Spork Sweater tutorial
Because of all the plastic spoons that restaurants, fro-yo places etc have, and how much I don't want to be using them- my family considered various solutions for a while before settling on SPORKS! So now we all have our sporks. TG and her dad carry small stainless steel multi-tool ones on their key rings, William and I have Snow Peak Titanium Sporks. They got a great reviews because they have deep tines that are polished smooth and nice deep bowls.
But even with polished tines it needed protection so it wouldn't snag things in my purse. The other thing that I needed for a spork holder in my purse was no buttons or ties to snag on other things. So I designed this spork sweater! It's worked from the bottom of the spork up, then has a flap like an old fashioned sandwich bag that flips over to close.
Because sporks come in different sizes, and because I use Boye steel hooks which are sized differently from the other major hook brands- this is a tutorial instead of a pattern. Because it's a tutorial rather than a step by step pattern, just use whatever hook size works for you and the thread you choose.
I used size 5 thread- Bernat Handicrafter Crochet Thread in Iris, it's a very soft, easy care acrylic fashion thread.
sc= single crochet
sl st= slip stitch
st or sts= stitch or stitchs
ch= chain
Start by chaining a length as long as the width of the handle of your spork. Chain 1 extra to turn, and slip stitch down the length to reinforce the chain.
Rnd 1:Ch 1 tightly to turn, and single crochet in each stitch on one side of the slip stitched chain, at the end, 3 sc in that stitch, sc in the other side of each stitch, 2 sc in last st, slip stitch to join.
Rnd 2: Ch 1, sc in each st around, sl st to join to first sc.
Repeat Rnd 2 until it's long enough for the handle of your spork.
The next part is a little trickier, you'll be widening the cosy to fit the bowl of your spork.
Single crochet until you reach the stitch that's on one side of your round, 3 sc in that stitch, put a piece of a contrasting color thread or a small stitch marker in second stitch of the 3 sc, go down the other side, and do the same on the other side. slip stitch to join.
Ch 1, single crochet in each stitch. Slip stitch to join.
Now it's all up to your judgement, for my spork, I did another plain row, then increased on the next row. Each increase will be 3 stitches centered in the side stitches, so marking the middle stitch makes it easy to find where the next increase goes. Mine was mostly 2 or 3 plain rows, then an increase until each side was 12 stitches, with the 1 stitch on each side for 26 stitches around total.
When it's wide enough for the bowl of your spoon, keep crocheting plain rounds until it's long enough to cover the bowl, and one extra round past that.
Break off thread.
Join in thread in the edge stitch on one side, leaving a long tail to sew down the flap. Single crochet to the edge stitch on the other side,
Chain 1 to turn, and single crochet across. I used reverse single crochet every other row to keep it from developing the ridges in single crochet, but single crochet works too.
You want to do 8 or 10 rows of single crochet. Break off thread, leaving a long tail for sewing.
Fold the flap over the top of the cosy, and sew down the flap along the sides using the tails of the thread, Knot off securely and weave in ends.
Sunday, May 11, 2014
Easy crochet slippers pattern
The story behind this pattern-
My grandmother had a friend who used to knit slippers. I think it was the only thing he knew how to knit, and he would knit hundreds of pairs over the course of a year. In different sizes and colors, everybody had a pair of slippers he made. He knit them long and narrow for grandma, short for kids like me, and large pairs for men. The secret is that it was a super simple slipper, knit in the round a bit over halfway, then knit flat the rest of the way in garter stitch. He'd use the tail from knitting the toe to cinch it up into a circle, then the tail from the end to stitch the back seam. All done.
Making a pair in crochet that was as easy to adapt has been a plan for a while, and one that I finally did this weekend. Using a bulky yarn, and a size K hook, they stitch up really fast. But you could easily adapt it for worsted or even thread. The trick is just getting the toe right, so you may experiment to get the right number of stitches and increases for that, then the rest of the slippers are a breeze. They can also be adapted in other ways. Make the vamp shorter and add a strap for Mary Jane style slippers, or a drawstring or bow for ballet type slippers. So as I work on adaptations for this patterns, I'll post those patterns. But feel free to play with it however you want. The heel on my slippers has some very slight shaping to make it more fitted than the hand knit originals.
Overview- Crochet in the round in double crochets, making increases until it fits around your foot, then continue crocheting in the round until it's close to long enough to reach your ankle. Crochet in rows after that for 3/4s (rounded up to an even number of stitches) of the total circumference until it's near to heel length. The heel has some small shaping- so crochet that with doubles, half doubles, singles in the middle, then work out the other way to mirror the first side. Seam the heel. Crochet single crochets in each stitch around. Weave in all ends.
So here's the actually pattern to make a pair of women's medium slippers-
dc= double crochet
ch= chain
hdc= half double crochet
sc= single crochet
sl st= slip stitch
st or sts= stitch or stitches
repeat ** means repeat what is between the asterisks.
Note: on the chain 3 starts for the rows, I do the first chain tight, then the other two chains with normal tension, it seems to be neater for me, but ymmv. So do it however your most comfortable.
You will need:
- Chunky yarn- I used Bernat Softee Chunky in Royal Blue (it's really soft and cushy, and used less than one skein for a pair of slippers)
- Size K (6.5 mm)
- scissors or snips
- yarn needle (big one!)
Make 2
Ch 2 or make a magic ring
Rnd 1: Ch 3 (counts as first dc here and throughout), dc 7 times in first st or ring, sl st to join (8 sts)
Rnd 2: Ch 3, dc in same stitch, 2 dc in each st around, sl st to join (16 sts)
Rnd 3: Ch 3, dc in next 2 sts, 2 dc in next st, *dc in next 3 sts, 2 dc in next st*, repeat ** 2 more times. Sl st to join (20 sts)
Round 4-7: Ch 3, dc in each st, sl st to join (20 sts)
Row 1: Ch 3, dc in next 15 sts (16 sts)
Row 2-5: Ch 3, turn, dc in next 15 sts (16 sts)
Row 6: Ch 3, turn, dc in next 4 sts, hdc in next st, sc in next 4 sts, hdc in next st, dc in next 5 sts (16 sts)
Break off yarn, and fold heel in half meeting up the mirrored stitches and stitch shut. Knot securely.
Edging- join in yarn, sc around the top of the slipper. I worked 2 sc in the bars, and a single crochet in each of the 4 stitches in the middle of the vamp.
I gave the finished slippers to The Amazing Turnip Girl. She likes them a lot. I'm going to make myself a pair in pink.
Sunday, December 22, 2013
Chunky Soft Bobble Bangles- Crochet
I love making soft bangles! This pattern was supposed to be posted yesterday because the one on the far left was done day before yesterday. But then I decided it would look good with 2 colors of yarn and my geeky daughter picked the yarn. She decided on Portal blue and orange
So after I finished one, she also decided she needed one with the opposite colorway. Fortunately they are very quick but that's why the pattern is being posted today instead of yesterday. My examples are in Lily Sugar 'n Cream yarn. The bottom is Psychedelic Ombre, the top two (Portal!) are in Hot Orange and Hot Blue.
You will need:
- Worsted weight yarn in one or two colors- a small amount will do.
- Size H hook (5mm)
- Scissors
- yarn needle
Stitches used:
ch=chain
sc=single crochet
bobble= 3dc bobble
To make the bobbles- yarn over, insert hook into stitch, yarn over, pull loop through stitch, yarn over, pull through 2 loops (2 loops on hook), yarn over, insert hook in same stitch, yarn over, pull through stitch, yarn over, pull through 2 loops (3 loops on hook), yarn over, inset hook in same stitch, yarn over, pull though stitch, yarn over, pull through 2 loops, yarn over, pull through all loops.
To work with 2 colors- the contrast color is carried along the main color after the first chain. Pull out some of the contrast color and lay it over the chain with a tail to weave in- crochet over it as you work the first row of single crochets. Then for the next row, the last yarn over of each stitch is done with the color you will use for the next stitch. This is an easy color change here since the color changes with each stitch, so for the single crochets, you'll insert the hook, yarn over, pull through stitch, yarn over with the other color and pull through the 2 loops on the hook. For the bobbles, you'll work in that color until the last yarn over then switch and pull through all loops. Then the final round, work in the main color working over the contrast color across the top of the stitches.
Chain 28 loosely, slip stitch to join, being careful not to twist the ring.
Rnd 1: ch 1 tightly (does not count as first stitch) single crochet in each stitch around. Slip stitch to join.
Rnd 2: ch 1 tightly (does not count as first stitch) single crochet in first stitch, bobble in next stitch, work that way around alternating single crochets and bobbles. Slip stitch to join (14 bobbles)
Rnd 3: ch 1 tightly (does not count as first stitch), single crochet in each stitch around, slip stitch to join.
Break off, and weave in the ends!
If 28 is too small or too big, you can increase or decrease the size by working any even number of stitches.
These are so fast! Hope you enjoy them as much as I do.
Sunday, December 15, 2013
Crocheted Pendant Pouch
This pouch is super easy and fairly fast to make. It uses single crochet, chain and double crochet stitches.
The small pouch can be used to hold rocks and crystals, or with a smaller chain- used as a gift bag for a ring or piece of jewelry.
You will need:
American terminology used throughout.
Chain a length long enough to slip over your neck, or 6 inches long if you are using it for a gift bag instead, sl st back down the length of the chain. Break off leaving ends long enough to weave in. Weave strap through the chain 3 spaces on Round 15, then tie off ends and weave them in.
The small pouch can be used to hold rocks and crystals, or with a smaller chain- used as a gift bag for a ring or piece of jewelry.
You will need:
- size 10 thread
- size 7 or 1.5 mm crochet hook (size 8 if you use Boye hooks)
- tapestry needle big enough to fit the thread
- scissors
sc= single crochet
sl st= slip stich
dc=double crochet
ch= chain
st or sts= stitch or stitches
repeat ** = repeat the instructions between the asterisks
American terminology used throughout.
Chain 2 or magic ring
Rnd 1: 6 sc in first ch or ring- sl st to join (6 stitches)
Rnd 2: Ch 1 tightly (does not count as first sc), 2 sc in each st around, sl st to join (12 sts)
Rnd 3: Ch 1 tightly (does not count as first sc), 2 sc in first st, sc in next st, *2 sc in next st, sc in next st*, repeat ** around, sl st to join (18 sts)
Rnd 4: Ch 1 tightly (does not count as first sc), 2 sc in first st, sc in next 2 sts, *2 sc in next st, sc in next 2 sts*, repeat ** around, sl st to join (24 sts)
Rnd 5: Ch 1 tightly (does not count as first sc), 2 sc in first st, sc in next 3 sts, *2 sc in next st, sc in next 3 sts*, repeat ** around, sl st to join (30 sts)
Rnd 6: Ch 1 tightly (does not count as first sc), 2 sc in first st, sc in next 4 sts, *2 sc in next st, sc in next 4 sts*, repeat ** around, sl st to join (36 sts)
Rnd 7-9: Ch 1 tightly (does not count as first sc), sc in each st around, sl st to join.
Rnd 10: Ch 1 tightly (does not count as first sc), sc in first st,*ch 3, skip 1 stitch, sc in next st,* repeat ** 16 times (17 loops made), ch 1, dc in first sc (18 loops total)
Rnd 11: Ch 1 tightly (does not count as first sc), sc in top of loop, *ch 3, sc in next loop*, repeat ** 16 times, ch 1, dc in first sc.
Rnd 12: repeat Rnd 11
Rnd 13: Ch 1 tightly (does not count as first sc), sc in top of loop, ch 1,* sc in next loop, ch 1*, repeat ** around, sl st to first sc to join.
Rnd 14: Ch 1 tightly (does not count as first sc), sc in each st and space around, sl st to join.
Rnd 15-16: Ch 1 tightly (does not count as first sc), sc in each st around, sl st to join
Repeat Rnds 10-14
Rnd 15: Ch 2, dc in next 2 sts, ch 3, skip 3 stitches, *dc in next 3 sts, ch 3*, repeat ** around, sl st to join in 2nd ch of ch 2 (6 spaces made)
Rnd 16: Ch 1 tightly (does not count as first sc), sc in each st around.
Break off, weave in ends
Chain a length long enough to slip over your neck, or 6 inches long if you are using it for a gift bag instead, sl st back down the length of the chain. Break off leaving ends long enough to weave in. Weave strap through the chain 3 spaces on Round 15, then tie off ends and weave them in.
More pendant bag projects-
Saturday, October 12, 2013
Chunky quick lip balm cozy -Crochet
This lip balm cozy works up super fast to be a nice gift and features a 1 inch button and a carabiner clip to attach it to a bag or keyring.
You will need:
Chunky yarn- I used Lion Brand Baby's First Yarn in Sea Sprite, it's thick and super soft with a nice loft which makes the cozy almost cuddly
Size L (8 mm) aluminum crochet hook
Scissors
large yarn needle
carabiner- this one is an inexpensive aluminum clip rated for 150 lbs and not to be used for climbing.
1 inch button- the one used is actually a 1 inch wood disk that was drilled with 2 holes to make it a button
embroidery floss
large tapestry needle
I love single crochet! This is done in single crochet except for 2 stitches which are trebles to create a loop for the carabiner clip.
US terminology
ch= chain
sc= single crochet
sl st= slip stitch
tr= treble crochet
dec sc= decrease single crochet; insert hook in first stitch, yo, pull loop through, leave on hook,(2 loops on hook) insert hook in next stitch, yarn over, pull loop through, yo, pull through the 3 loops on hook.
Body:
Chain 1 or make magic ring
Round 1: ch 1 (does not count as first stitch)- 8 sc in ring, sl st to join.
Rounds 2-6: ch 1 (does not count as first stitch) sc in each stitch, sl st to join.
Round 7: ch 1 (does not count as first stitch), sc in first stitch, tr in next 2 stitches, sc in next 5 stitches, sl st to join.
Flap:
Row 1: ch 1 (does not count as first st)- sc in same st, sc in next 3 stitches
Row 2-3: ch 1 to turn (does not count as first st), sc in each stitch
Row 4: ch 1 to turn (does not count as first st) dec sc in first 2 stitches, dec sc in next 2 stitches (2 stitches)
Row 5: ch 1 (does not count as first st) dec sc across both stitches (1 stitch)
Row 6: ch 8, sl st to join on row 5 stitch.
Break off yarn and weave in ends. Use the embroidery floss to stitch the button in place to the front of the cozy so the loop fits over it. Slip carabiner clip under the two treble stitches.
A note on the lip balm in the photo-
This is my husband's FAVORITE lip balm. The one he uses throughout the winter here in Alaska and that kept his lips from chapping last year when he was walking a half mile from his parking spot to his job last winter in the cold cold early hours. He likes a fair amount of tingle, and this peppermint/vanilla is just right. Not sweet, moisturizes well and full of good oils. You can find Silverbear Sundries HERE on Facebook.
Thursday, September 19, 2013
William's Basketweave Scarf Pattern (crochet)
This is the scarf I made for my son last week. Now, my son is just a hair over 6 feet tall or if you count his hair, 6'3" and most of his height seems to be in his long waist. Which means that for him, this scarf had to be at least 6 feet long or it would look miniaturized and very short.
If you're a beginning crocheter, basketweave uses some techniques you may not have tried yet. It looks like it's all switched and turned to crochet, but it isn't, it's crocheted back and forth using front and back post crochets to create the effect.
Front post double crochet (abbreviated fpc)- yarn over, insert the hook from the FRONT of the fabric behind the post of the stitch and back through the other side of the post. Yarn over, pull loop through, yarn over, pull through 2 loops, yarn over, pull through 2 loops.
Back post double crochet (abbreviated bpdc)- yarn over, insert hook from the BACK of the fabric behind the post of the stitch and back through the other side of the post, yarn over, pull loop through, yarn over, pull through 2 loops, yarn over, pull through final 2 loops.
Because this is worked flat, to make the squares you'll be working fpdc in bpdcs and vice versa.
single crochet- sc
double crochet- dc
chain- ch
stitches- sts
To make the scarf you will need:
- worsted weight yarn- about 522 yards at a guesstimate. I used just under 1 and half skeins of Lion Brand Fisherman's Wool in Birch Tweed for the scarf shown above.
- Size H (5mm) hook
- scissors
- yarn needle (to weave in ends)
Chain 20 loosely
Row 1: ch 1 to turn, sc in each stitch across
Row 2: ch 2 (counts as first stitch), dc in each stitch across.
Row 3: ch 2 (counts as first stitch), fpdc in next 4 sts, bpdc in next 5 sts, fpdc in next 5 sts, bpdc in last 5 sts
Row 4: ch 2 (counts as first stitch), bpdc in next 4 sts, fpdc in next 5 sts, bpdc in next 5 sts, fpdc in last 5 sts
Row 5: ch 2 (counts as first stitch), fpdc in next 4 sts, bpdc in next 5 sts, fpdc in next 5 sts, bpdc in last 5 sts
The switches to the next set of "blocks" are every 4 rows.
Row 6: ch 2 (counts as first stitch), fpdc in next 4 sts, bpdc in next 5 sts, fpdc in next 5 sts, bpdc in last 5 sts
Row 7: ch 2 (counts as first stitch), bpdc in next 4 sts, fpdc in next 5 sts, bpdc in next 5 sts, fpdc in last 5 sts
Row 8: ch 2 (counts as first stitch), fpdc in next 4 sts, bpdc in next 5 sts, fpdc in next 5 sts, bpdc in last 5 sts
Row 9: ch 2 (counts as first stitch), bpdc in next 4 sts, fpdc in next 5 sts, bpdc in next 5 sts, fpdc in last 5 sts
Row 10: ch 2 (counts as first stitch), bpdc in next 4 sts, fpdc in next 5 sts, bpdc in next 5 sts, fpdc in last 5 sts
Row 11: ch 2 (counts as first stitch), fpdc in next 4 sts, bpdc in next 5 sts, fpdc in next 5 sts, bpdc in last 5 sts
Row 12: ch 2 (counts as first stitch), bpdc in next 4 sts, fpdc in next 5 sts, bpdc in next 5 sts, fpdc in last 5 sts
Row 13: ch 2 (counts as first stitch), fpdc in next 4 sts, bpdc in next 5 sts, fpdc in next 5 sts, bpdc in last 5 sts
Repeat rows 6-13 25 more times for a scarf that's just about 6 feet long. You can make it longer or shorter, just end it at the end of one of the 4 row block sections.
End it with a row of single crochet. Break off yarn. Weave in ends.
My son LOVES this scarf so much. He tried to take it before I got photos or did my final count to see how many repeats it took to make it long enough.
Thursday, August 22, 2013
Chinese replica coin soft bangle- crochet pattern
I love making soft bangles, and have a few patterns for them available.
This one is done in a single crochet strip with the coins worked into the crochet fabric, then seamed up one side.
You will need:
- 8 17 mm Chinese replica coins- available from Fire Mountain Gems
- Size 3 crochet cotton thread- I used Aunt Lydia's Warm Teal
- Size D (3.25 mm) hook
- Tapestry needle- large enough for the thread to weave in ends
- scissors
Pattern in American terminology
Abbreviations:
- sc= single crochet
- ch= chain
Start by stringing on 8 coins. If you have larger hands/wrists, do 9 coins, for smaller hands/wrists- 7 coins.
Ch 5
Row 1: Ch 1 to turn, sc in each stitch (5 stitches)
Row 2: Ch 1 to turn, sc in first 2 stitches, insert hook in the next stitch, and yarn over, pull through stitch (2 loops on hook) push 1 coin up, yarn over around the coin, and pull through both loops, sc in next 2 stitches,
Row 3-5: ch 1 to turn, sc in each stitch across
Row 6: Ch 1 to turn, sc in first 2 stitches, insert hook in next stitch and through the middle of the coin, yarn over, pull through the coin and the stitch from the previous row (2 loops on hook), yarn over, pull through both loops, sc in next 2 stitches.
Repeat rows 1-6 until you've used up all the coins. Break off thread, and sew edges of strip together, then weave in the ends.
This will work with other doughnut shaped pieces but you'll have to adjust for the size. Just remember that it needs to be an odd number of rows between the coins, and behind the coins. In this case, it's one row between each coin, and 3 rows behind the coins.
Tuesday, July 16, 2013
Quick to stitch kerchief crochet pattern
I love bottom up techniques for kerchiefs and shawls because everyone likes a different size. Some people like them tiny, just a scrap of a triangle. TG and I like them wide enough to trap back the side of our hair behind our ears. This one is one of my favorite techniques because it works with nearly any yarn or thread for shawls or kerchiefs.
You will need:
- size H hook (5 mm)
- size I hook (5.5mm)
- worsted weight yarn- my example is done in Bernat Mosaic in the Psychedelic colorway
- scissors
- yarn needle
Pattern is in American terminology.
Stitches and abbreviations used:
- chain = ch
- single crochet = sc
- double crochet = dc
- slip stitch = sl st
Repeat ** means to repeat what is between the asterisks.
Chain 9, sl st to join
Row 1: ch 5, sc in ch 9 ring, ch 3, dc in 5th ch from sl st in in ch 9 ring. (2 loops)
Row 2: ch 5, sc in ch 3 from previous row, ch 3, sc in ch 5 from previous row, ch 3, dc in 3rd ch on the ch 5 from the previous row. (3 loops)
Row 3: ch 5, sc in first loop of previous row, ch 3, sc in next loop, ch 3, sc in last loop, ch 3, dc in 3rd ch on the last loop of previous row. (4 loops)
Each row works the same way, starting with a chain 5 loop that is joined with a single crochet in the first loop, and ch 3 loops all the way across to the last loop which is ch 3, double crochet in the 3rd chain of the ch 5 from the last row. Each row increases the loops by one.
So when you get your triangle big enough for your kerchief- for the one above, it was 22 rows, then you put on the final row.
Last row: ch 1, sc in same stitch, *ch 3, sc in next loop*, repeat ** across, on the last ch 3, sc in 3rd stitch from ch 5 loop on previous row.
Single crochet border and ties-
Switch to I hook- Ch 1 to turn. working down the sides of the kerchief, sc in last sc of previous row, work 2 sc in each space until the bottom corner. Do 5 chains in bottom corner, then 2 sc in each space up the other side. When you get to the first sc in the last row, sc in that.
Chain 50 or 60 (depending on how long you want your ties, I did 60) then slip stitch back up the chain. Do another sc in the last sc of previous row. Sc in each stitch across the top of the kerchief. When you reach the last sc, chain 50 or 60, sl st back up the chain, then sl st to join to the first sc on the round.
Weave in all ends.
This is what it looks like from the back-
And this is what a shawl looks like worked using the same technique. This is one of my favorite shawls! Sorry, can't help you with that pattern because so far, I've been completely unwilling to count stitches to figure out how I made it!
Subscribe to:
Posts (Atom)