Printing Tips

Check out my printing tips if you're having problems printing to the right size
If you'd like to support this site and all the free things I post- please check out my Don't Eat the Paste Mandala collection coloring book for 9.99 at Amazon.
Showing posts with label bangle bracelet. Show all posts

Wednesday, August 6, 2014

Designing a quote bracelet with Cricut Explore

We're made of star-stuff bangle bracelet made using Cricut Explore #Cricut #papercrafts #jewelryproject

Recently I got a Cricut Explore to review and wow- I love this machine. What I like about it is how easy it is to use with my own graphics. I'm not limited by cartridges, and you don't have to use a vector program to design your own projects. Work in whatever program you're most comfortable in then create your project in the cloud based Design Space application.

The Cricut Explore will make very fine cuts easily. There is a huge library of shapes so if you don't want to draw your own, you can create projects using the shapes available. An inexpensive monthly membership gives you access to a lot of it, but I haven't really looked yet because yay! It cuts my own art easily.

So to make a bracelet using the Cricut, you will need a few things-

  • the inner diameter measurement of a bangle bracelet that you like the fit of- in my case, I prefer larger, looser bangles that slide partway down my hand. 
  • graphics program
  • 3 sheets of 12x12 card stock with at least 1 in high contrast
  • cutting mat
  • glue
  • Mod Podge
  • Cricut Explore!
  • Internet connection to use Design Space
So if you have those things, you'll open your graphics program and start putting together your quote bracelet.

Start by drawing a circle that's the same size as you want the inner diameter of your bangle, then decide how thick you want your bracelet to be. Double that number and add it to the inner diameter to figure out the outer diameter. 

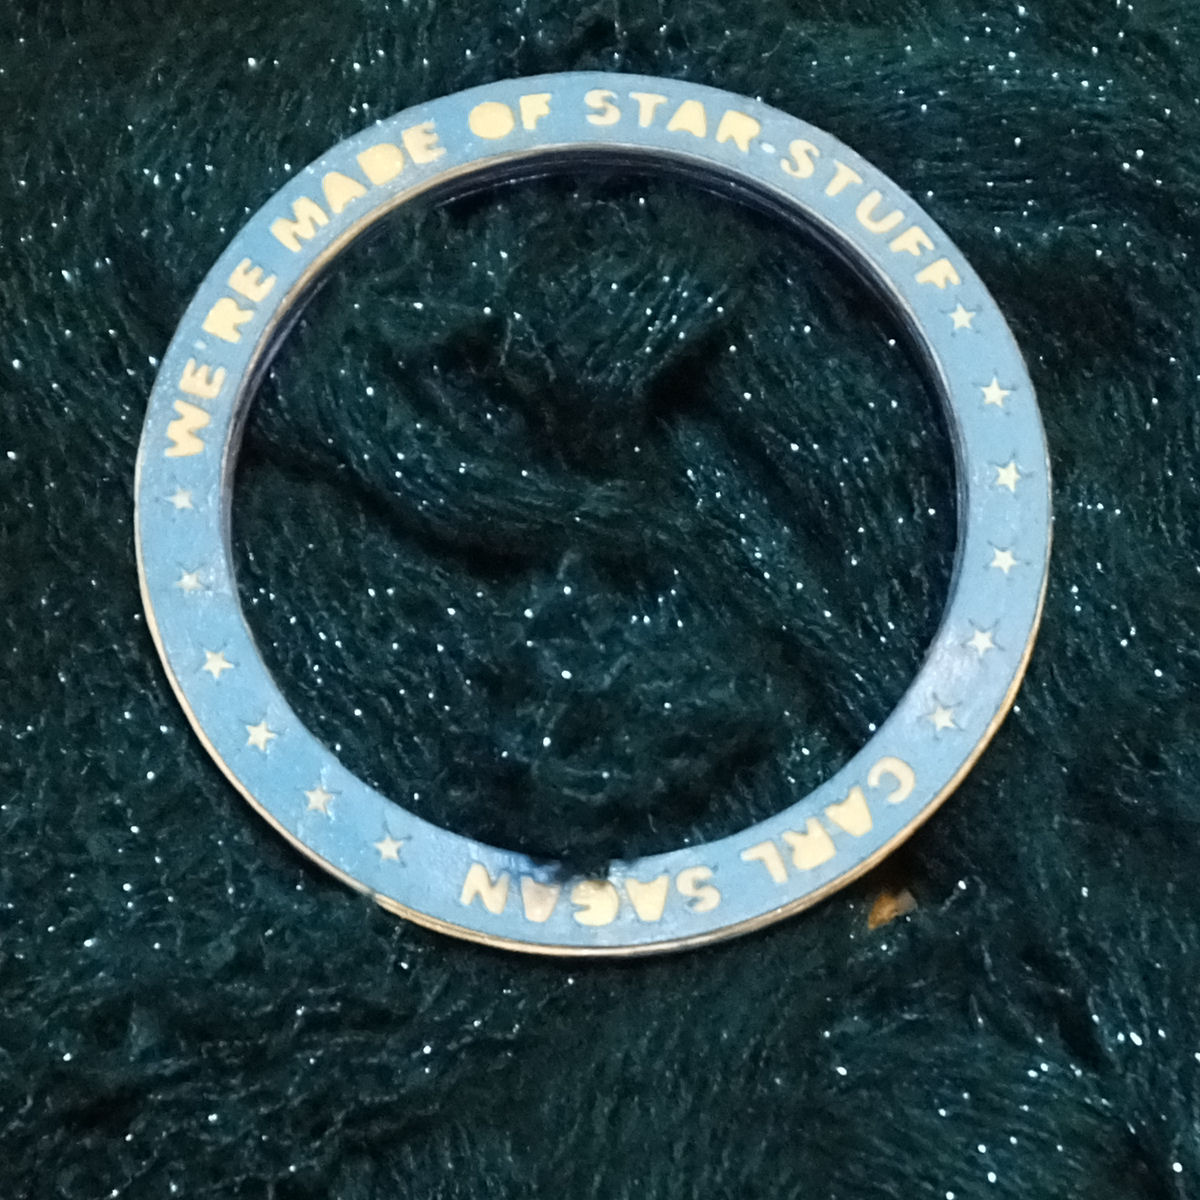
Then you're going to start placing your letters for the bracelet. I chose a short quote " We're made of star-stuff" with Carl Sagan's name at the bottom edge. You'll notice my guide lines in blue for centering the letters. 

The little islands are going to be eliminated because it just adds to the cutting time and they won't be in the final project. I also added some stars. 
So now it's time to create the rest of the pieces. The outside pieces are the ones with the quote, the rest are solid. So this is what my final layout looks like. It's a transparent PNG with pixel clean lines. 

So then you upload it to Design Space, get it sized on the canvas, and cut it out of 3 sheets of card stock (and wind up with lots of circles that can be used in other projects)- Cricut has a bunch of YouTube videos that show exactly how to use Design Space. 

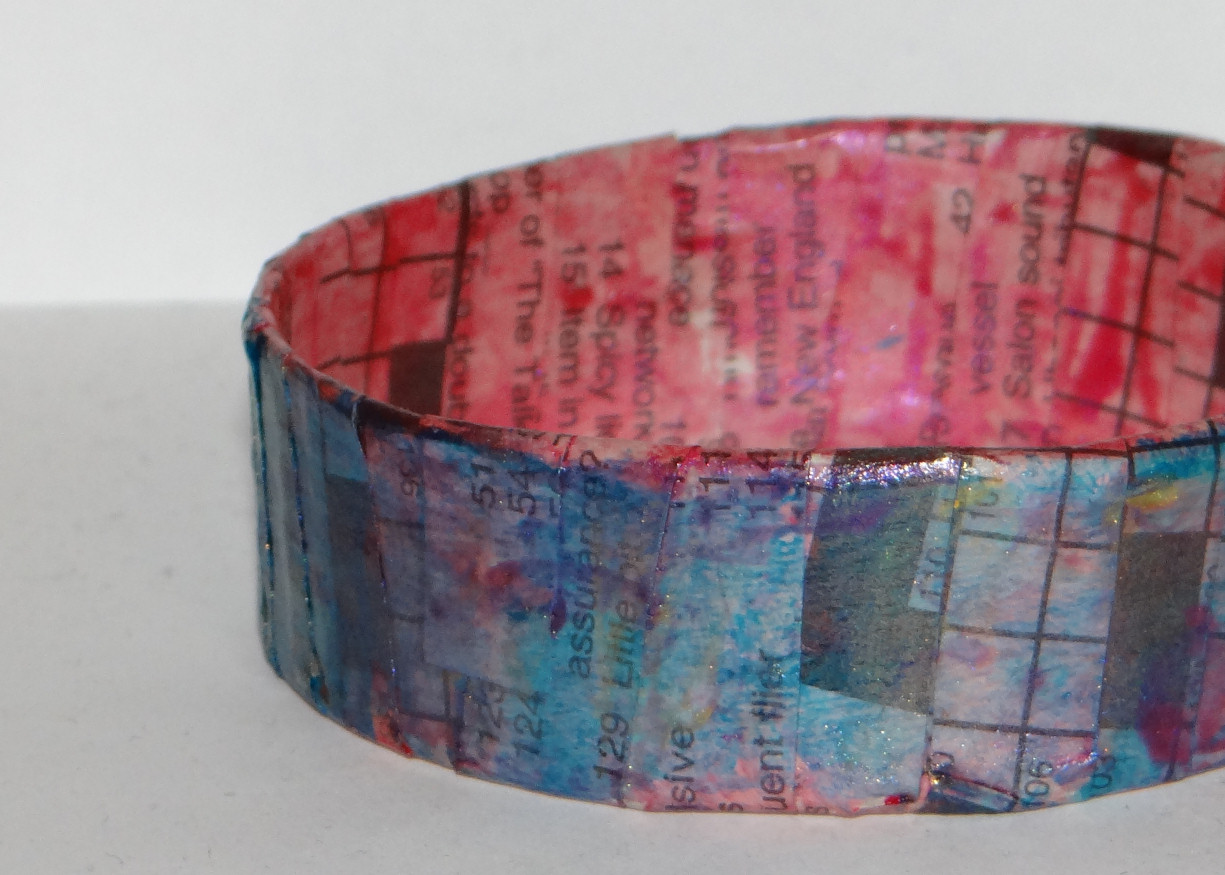
After it's all cut out, you start gluing it together. This is what my final edge looks like with all the stacked layers. Use thin layers of glue to prevent warping!

After the glue is dry, cover it in Mod Podge and let the Mod Podge dry completely. 

I'm having entirely too much fun with my Cricut Explore. Remember that wand and wizard hat mandala that I posted the other day? I used the components to make a decal for my husband's laptop.


Review item provided at no cost, this is my honest experience and opinion.

Sunday, December 22, 2013

Chunky Soft Bobble Bangles- Crochet


I love making soft bangles! This pattern was supposed to be posted yesterday because the one on the far left was done day before yesterday. But then I decided it would look good with 2 colors of yarn and my geeky daughter picked the yarn. She decided on Portal blue and orange

So after I finished one, she also decided she needed one with the opposite colorway. Fortunately they are very quick but that's why the pattern is being posted today instead of yesterday. My examples are in Lily Sugar 'n Cream yarn. The bottom is Psychedelic Ombre, the top two (Portal!) are in Hot Orange and Hot Blue.

You will need:

  • Worsted weight yarn in one or two colors- a small amount will do.
  • Size H hook (5mm)
  • Scissors
  • yarn needle
Stitches used: 
ch=chain
sc=single crochet
bobble= 3dc bobble

To make the bobbles- yarn over, insert hook into stitch, yarn over, pull loop through stitch, yarn over, pull through 2 loops (2 loops on hook), yarn over, insert hook in same stitch, yarn over, pull through stitch, yarn over, pull through 2 loops (3 loops on hook), yarn over, inset hook in same stitch, yarn over, pull though stitch, yarn over, pull through 2 loops, yarn over, pull through all loops. 

To work with 2 colors- the contrast color is carried along the main color after the first chain. Pull out some of the contrast color and lay it over the chain with a tail to weave in- crochet over it as you work the first row of single crochets. Then for the next row, the last yarn over of each stitch is done with the color you will use for the next stitch. This is an easy color change here since the color changes with each stitch, so for the single crochets, you'll insert the hook, yarn over, pull through stitch, yarn over with the other color and pull through the 2 loops on the hook. For the bobbles, you'll work in that color until the last yarn over then switch and pull through all loops. Then the final round, work in the main color working over the contrast color across the top of the stitches.

Chain 28 loosely, slip stitch to join, being careful not to twist the ring.
Rnd 1: ch 1 tightly (does not count as first stitch) single crochet in each stitch around. Slip stitch to join.
Rnd 2: ch 1 tightly (does not count as first stitch) single crochet in first stitch, bobble in next stitch, work that way around alternating single crochets and bobbles. Slip stitch to join (14 bobbles)
Rnd 3: ch 1 tightly (does not count as first stitch), single crochet in each stitch around, slip stitch to join. 

Break off, and weave in the ends!

If 28 is too small or too big, you can increase or decrease the size by working any even number of stitches.

These are so fast! Hope you enjoy them as much as I do.

Thursday, August 22, 2013

Chinese replica coin soft bangle- crochet pattern


I love making soft bangles, and have a few patterns for them available.

This one is done in a single crochet strip with the coins worked into the crochet fabric, then seamed up one side.

You will need:

  • 8 17 mm Chinese replica coins- available from Fire Mountain Gems
  • Size 3 crochet cotton thread- I used Aunt Lydia's Warm Teal
  • Size D (3.25 mm) hook
  • Tapestry needle- large enough for the thread to weave in ends
  • scissors
Pattern in American terminology

Abbreviations:
  • sc= single crochet
  • ch= chain
Start by stringing on 8 coins. If you have larger hands/wrists, do 9 coins, for smaller hands/wrists- 7 coins.

Ch 5
Row 1: Ch 1 to turn, sc in each stitch (5 stitches)
Row 2: Ch 1 to turn, sc in first 2 stitches, insert hook in the next stitch, and yarn over, pull through stitch (2 loops on hook) push 1 coin up, yarn over around the coin, and pull through both loops, sc in next 2 stitches,
Row 3-5: ch 1 to turn, sc in each stitch across
Row 6: Ch 1 to turn, sc in first 2 stitches, insert hook in next stitch and through the middle of the coin, yarn over, pull through the coin and the stitch from the previous row (2 loops on hook), yarn over, pull through both loops, sc in next 2 stitches.

Repeat rows 1-6 until you've used up all the coins. Break off thread, and sew edges of strip together, then weave in the ends. 

This will work with other doughnut shaped pieces but you'll have to adjust for the size. Just remember that it needs to be an odd number of rows between the coins, and behind the coins. In this case, it's one row between each coin, and 3 rows behind the coins.


Tuesday, July 2, 2013

Soft Waves Bangle Bracelet- crochet pattern


I love making soft bangle bracelets! This one is really easy and uses increases and decreases in single crochets to create a softly wavy pattern that looks great in oceany colors.

You will need:

  • 3 colors of size 3 fashion thread
  • Size D- 3.25
  • Tapestry needle big enough for the thread
  • scissors
I used Aunt Lydia's Fashion Crochet Cotton in Blue Hawaii, Lime and Soft Teal. 

Stitch abbreviations:
st or sts= stitch or stitches
ch= chain
sc= single crochet
dec sc= decrease single crochet
sl st= slip stitch
Repeat ** means repeat the steps between the *asterisks*

To work a decrease- insert hook first stitch, yarn over and pull through the stitch leaving 2 loops on the hook, insert hook in next stitch, yarn over, pull through the stitch, yarn over, pull through all the loops on the hook. 

American terminology. 

You only need a small amount of each color. 

Chain 48, slip stitch to join being careful not to twist the chain.
Round 1: ch 1, (doesn't count as first stitch here or throughout) sc in each st around, sl st to first sc to join. Make sure you have 48 stitches.
Round 2: Repeat round 1, break of yarn.
Round 3: Join in second color, ch 1,  sc in first st, dec sc in next st, sc in next st, dec sc in next st, sc in next st, dec sc in next st, sc in next st, dec sc in next st, 2 sc in each of next 4 sts, *sc in next st, dec sc in next st, sc in next st, dec sc in next st, sc in next st, dec sc in next st, sc in next st, dec sc in next st, 2 sc in each of next 4 sts,* repeat **, sl st in first sc to join.
Round 4: ch 1, sc in each st around. Break off thread.
Round 5: join in new color, ch 1. dec sc over first and second sts, dec sc over next 2 sts, dec sc over next 2 sts, dec sc over next 2 sts, sc in next st, 2 sc in next st, sc in next st, 2 sc in next st, sc in next st, 2 sc in next st, sc in next st, 2 sc in next st, *dec sc over next 2 sts, dec sc over next 2 sts, dec sc over next 2 sts, dec sc over next 2 sts, sc in next st, 2 sc in next st, sc in next st, 2 sc in next st, sc in next st, 2 sc in next st, sc in next st, 2 sc in next st,* repeat **, sl st to first sc to join.
Round 6: ch 1, sc in each st around. sl st to join, break off thead and weave in all ends with the tapestry needle.

I love how this turned out, and it's so simple and quick. I hope you enjoy it too! 

Tuesday, May 28, 2013

Thread crochet soft bangle


This pattern is for the rainbow colored bracelet which is one of my soft bangles. The other bracelet is a wrap bracelet and you can find the pattern for that here.

You will need:

  • Size 10 crochet cotton
  • steel crochet hook- I used a Boye size 7, which is 1.65 mm. If you are using a Susan Bates hook, a size 6 would be a close equivalent.
  • tapestry needle
  • scissors
This is done in chains and single crochets, which means it works up very fast and easily except for the slightly tricky closing of the base. 

Base chain-
Chain 9, single crochet in first chain. Chain 6, skip single crochet and next chain, single crochet in the next chain. Repeat pattern, going back and forth until the bracelet is the right length to fit over your hand, ending with a loop on the opposite side as your starting chain 9 loop. The diagram is in 2 colors and each stitch set begins with the chain 6 and ends with the single crochet.

Chain 4, and single crochet into the 3rd chain from the starting chain. chain 1, and turn to do the last single crochet skipping the single crochet and the chain before it and working in the next single crochet, chain 4, slip stitch to the starting chain/single crochet to join. 

 The outer edge is worked by doing 4 single crochet in each loop, then breaking off the thread to work the single crochets on the other side.

Weave in all ends.

This can be blocked and stiffened into a standard bangle bracelet as well. If you plan to do that, find a bangle you like the fit of, and measure the diameter. Multiply that by 3.14 and make your starting chain that length. To block, I'd wrap a bottle or can with a piece of cardboard and cover with plastic, then use a permanent blocking solution to block. 

The bracelets above were both made with Aunt Lydia's cotton. The pearl bracelet is in Aspen, and the bangle bracelet is in Mexicana. 

Tuesday, June 12, 2012

Paper Bangle Bracelets- Tutorial


I'm really excited about these super easy upcycled paper bangles because there are so many possibilities for them, using a strip of paper for the outside I could put images or type a quote using one of my typewriters on it. They are made very easily using things would normally be thrown into the recycling bin and a new kind of paint which I won from the weekly drawing at Craft Test Dummies.

Luminarte's Silks Acrylic Glazes makes the perfect paint for these because they are sheer but well pigmented. You can use them wet on wet or wet on dry. I thought of doing stripes or something more ordered, but I really like the look of the layered random effect of the paints.

You will need:

  • Thin cardboard
  • strips of paper- I used newspaper for the one above.
  • White PVA glue- I used Aleene's Tacky Glue 
  • Silks Acrylic Glazes- I used Sky Blue, Watermelon Mist and Solar Gold
  • Acrylic Spray Sealer
  • Scissors
  • Paint Brushes
  • foam brush
This made much like paper mache, but using straight PVA glue instead of a paper mache mix. 
The base of the bracelet is a strip of cardboard from a cereal box or something similar. The easy way to size it is to cut a strip and wrap it around your hand at the widest part, then add an inch for the overlap.
For a quick reference though-
8 inches for a small bracelet (7 inches in circumference, 2.22 inches in diameter)
8.5 inches for a medium bracelet (7.5 inches in circumference, 2.38 inches in diameter)
9 inches for a large bracelet (8 inches in circumference, 2.54 inches in diameter)

Cut the cardboard the width you want the finished bracelet to be, and measure a 1/2 inch in from both ends. Cut slits on both ends to overlap them together on opposite edges.

Glue the overlapping pieces down. Cut lots of 1/4 inch wide strips of your paper. Put a thin layer of glue on the base, an inch at a time, and wrap on a slight diagonal, overlapping the edges. Apply more glue, and keep wrapping. Do at least 3 layers of paper, and set it aside to dry.

After it's dried, decide what you want the outer layer to be, and apply that. You can either cut a strip that's the same width and circumference around, or you can do what I did and cut more 1/4 inch strips to wrap around it. Apply with a thin layer of glue. Let dry.

Then the fun part, painting! The glazes are gorgeously pigmented, and work on a lot of different mediums. I wish I could properly photograph how they look on black rubber! They are very sheer and add a nice sheen of color to the rubber. On paper, they look a lot more like they do in the jar, but in sheer layers. Just paint, have fun layering colors. I put on the pink first, then put the blue on the outside. Let that dry, and added more pink and gold in spots. The end result is a lot of subtle shades of purple and green on the blue.

Let the glaze dry, and spray with an acrylic sealer. The end result is a lightweight, inexpensive bangle bracelet.


Sunday, March 18, 2012

Zig Zag Soft Bangle Bracelet Pattern- crochet

This is the easiest of all my crocheted bracelet patterns. It's just chains and single crochets, worked in a strip then sewn together to make a ring. My daughter loves her chunky soft bangles, including these.
The ones shown above were made using Lion Brand Fun Yarn, which is an acrylic yarn that comes in small skeins that using a 20% off yarn coupon at my local Fred Meyers costs 80¢. It comes in bright colors, and I got several skeins for my daughter to use in her projects.

You will need:

  • Worsted weight yarn
  • Size F or 3.75mm hook
  • Yarn needle
Pattern written in American terminology

Chain 4
Row 1: 2 sc in first chain, ch 3
Row 2: 2 sc in last sc of previous row, chain 3
Row 3-24: Repeat row 2
Break off yarn and stitch ends together, making sure they aren't twisted. Weave in ends. Size it up or down in 2 row increments.

This simple technique creates a nice soft zig-zag effect and works up super fast. Great way to use up small amounts of yarn. It can be done in other yarns, just use a hook size that's 1 or 2 smaller than the hook recommended and increase or decrease the rows as needed for length. Good project for beginning crocheters or crocheters who just want a super simple tv watching project.

Previously posted crocheted bracelet patterns on this site-
A thread and button bangle bracelet pattern
Thread crocheted cuff fastened with buttons pattern
Ribbed yarn bangle bracelet pattern
Yarn bangle bracelet pattern-2 colors