Printing Tips

Check out my printing tips if you're having problems printing to the right size
If you'd like to support this site and all the free things I post- please check out my Don't Eat the Paste Mandala collection coloring book for 9.99 at Amazon.
Showing posts with label Darn Good Yarn. Show all posts

Saturday, May 11, 2019

Soft statement bracelets- crochet and fabric tutorial

Crochet statement bracelets

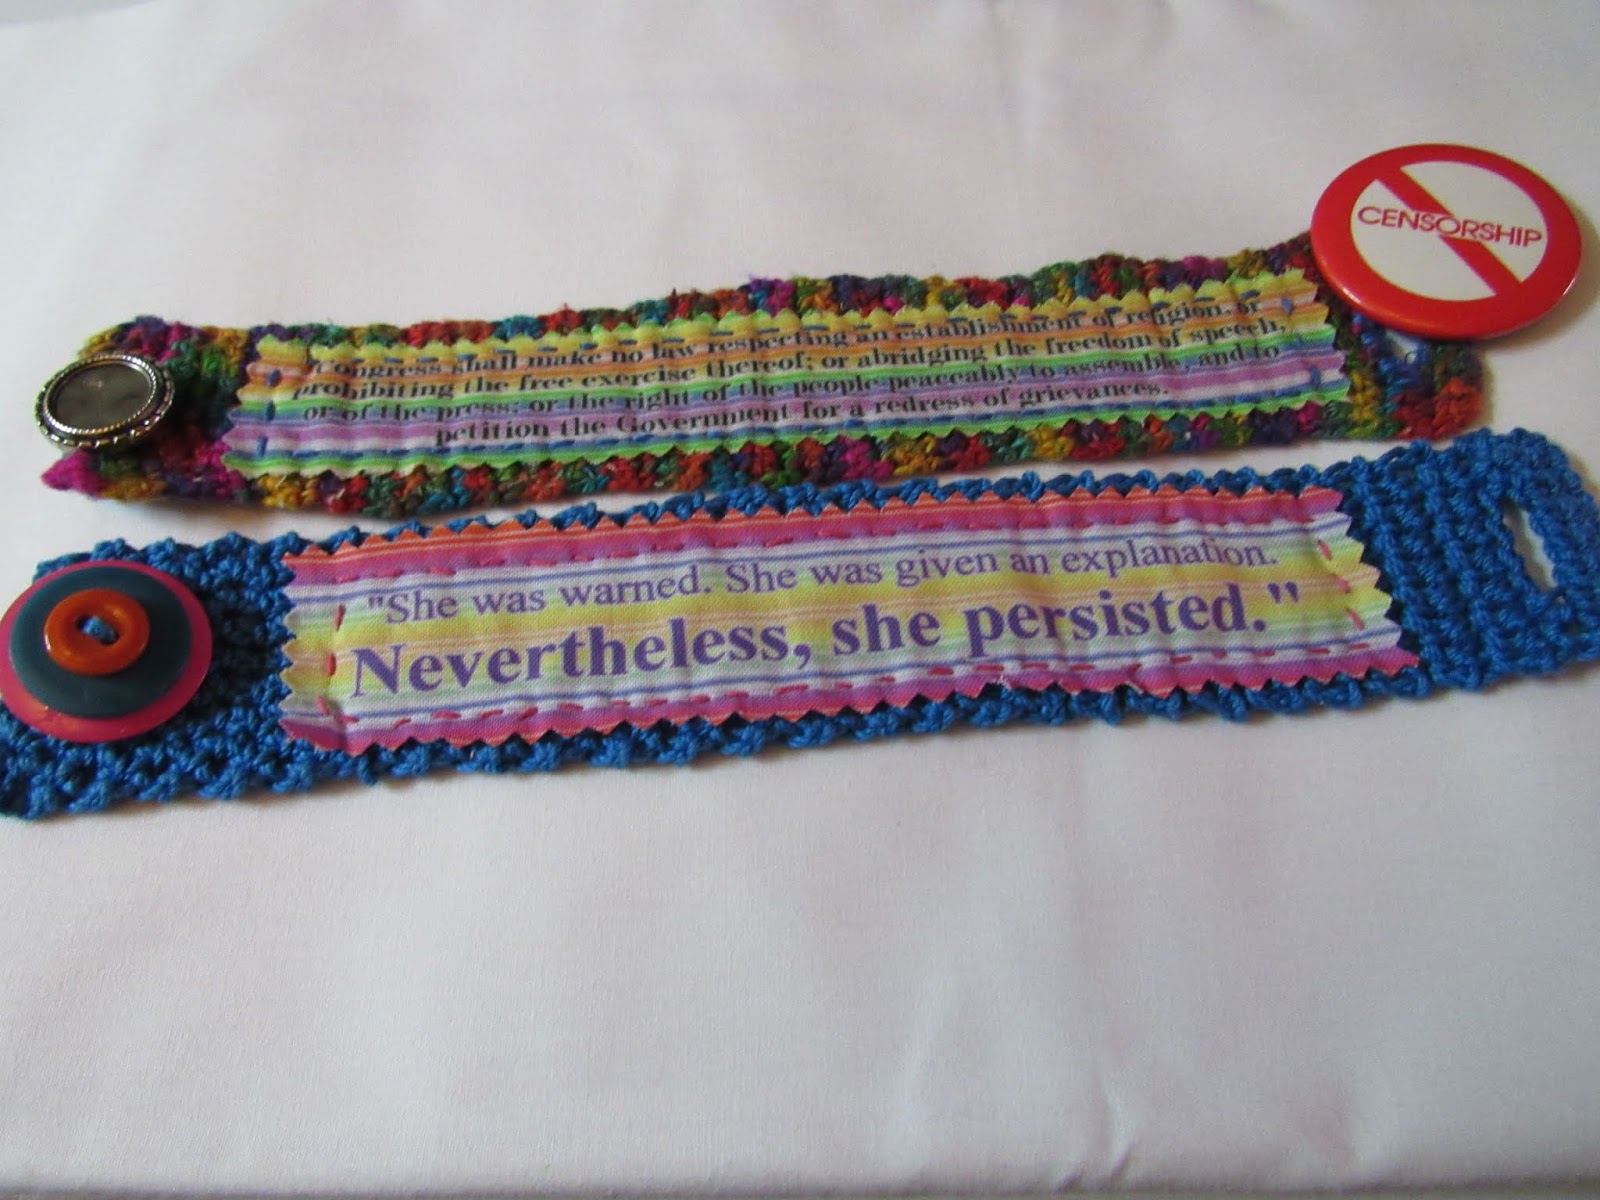
These bracelets are one of my new favorite projects. I like crocheted bracelets, Spoonflower fabric, and quotes.

The fabrics for these bracelets is available here- Bracelet Swatch Fabrics, a swatch is 5.00 USD and will make 5 bracelets, or you can use some of it as appliques. I'll be adding more quotes as time goes on. These are too much fun.

The first part is making your very own fabric.

You'll need a graphics program, a quote and an idea for how you want it to look. Remember that making it too busy makes it hard to read the quote. I love my 1st Amendment bracelet, but it's a lot of text on a rainbow background and very busy. Using a soft stroke outline on the text helps it stand out a bit.

Open an image 8 inches wide and 1.6 inches tall at 150 ppi minimum. Lay out your background and text, but remember it has to fit your wrist, so 6 inches wide and 1 inch tall for the text works well. Add graphics if you want, keeping them within the borders of what will fit your wrist when it's stitched into place.

Upload your design to Spoonflower. Set it up so the ppi matches the ppi of your design. Order a swatch. I used their woven cotton.

OR!! You can get really crafty and embroider your statement on fabric!

To make the bracelet:

You will need

  • yarn
  • appropriate sized hook
  • button or buttons
  • needle to weave in ends
  • fabric
  • pinking shears
  • embroidery floss
  • tapestry needle


Pick a yarn.

1st Amendment Bracelet
 This is Darn Good Yarn Lace Weight Silk Yarn in Exotic Rainbow. It's gorgeous with really short color changes so it's very colorful even on small scale projects. The hand is very soft.

She Persisted crocheted bracelet
This is a basic size 3 crochet cotton thread. More structure than the silk, and it's a heavier weight so it works up quicker.

Yes, you can use worsted weight, that will be chunkier, but that's a neat look too.

Both bracelets are made close to the same way. Chain approximately 1.5 inches, single crochet a few rows, then you make your button hole. The button hole is made by figuring how big the button you're using is, and how many stitches across that is, then you subtract that number from the number in your base row, and divide that number by 2. sc that many stitches, chain the number of stitches for your hole, skip those stitches, and then sc to the end. So for the cotton bracelet, it was 8 stitches wide, and my button would fit into a 4 stitch hole.
8-4=4
4/2=2
Sc in first 2 stitches, chain 4, skip 4 stitch, sc in last 2 stitches, turn.

Then continue working back and forth until it's long enough to fit around your wrist with a 1 inch overlap. Break off, weave in ends.

For the silk, I used a size 0 steel hook and 11 stitches. For the cotton, I used a size D hook and 8 stitches.

The fabric needs to be washed, but because it's just a very small piece, I hand washed it and laid it flat to dry. Use the pinking shears to cut the strip and cut off the ends to fit on your bracelet. Press the fabric. Again, tiny piece. Rather than set up an ironing board and iron, I just used my daughter's hair straightening iron!

Stitch the strip into place. I used a running stitch. Starting it, I made a knot at the end of the thread with a few inches tail. Pulled it up through the fabric alone, then went down into both the fabric and the crocheted bracelet, then stitched around the entire patch. When I got to the end, I tied the thread off to the tail in a firm knot, then buried the ends in the crochet.

The button on the 1st Amendment bracelet is one from my mom's button box. The buttons on the Nevertheless bracelet are stacked inexpensive plastic buttons because I love how the colors pop that way.

The No Censorship pinback is from the early 90s. My family was advocating against a local measure and I still have several of them.

Wednesday, September 28, 2016

Fun Hood Pattern (crochet)

Free crochet hood pattern

Originally when I ordered this chunky yarn from Darn Good Yarn it was going to be for a shawl- which I frogged 3 times. Then told my husband "What I really want is a hat!
A fun hat. It was before our day cruise and I wanted a fun and warm hat to wear on the cruise.
Once I had that figured out, it just flew off the hook- even with keeping notes for writing up the pattern.

The yarn is stunning. As good as the colors look, the spin is lovely, very regular and the texture is so very soft. When I pulled it out of the the envelope, I told my husband that he had to touch my yarn.

Here it is! I hope you enjoy this too.

3 skeins of Super Soft and Chunky Reclaimed Silk Yarn
Size K hook
Scrap of cardboard to make pom poms or tassel
Scissors
large yarn needle for weaving in ends.

American terminology
ch=chain
sc= single crochet
dc= double crochet
sl st= slip stitch
st or sts= stitches
rsc= reverse single crochet- you can use a single crochet, it will look a little different.
repeat ** means repeat the steps between the asterisks.

Ch 1
Round 1: Ch 3 (counts as first dc), 7 dc in first ch, sl st to top of ch 3 to join. (8 sts)
Rnd 2: Ch 3 (counts as first dc),dc in next 7 sts, sl st to join (8 sts)
Rnd 3: Ch 3 (counts as first dc), 2 dc in next st, *dc in next st, 2 dc in next st*, repeat ** 2 more times, sl st to join (12 sts)
Rnd 4: Ch 3 (counts as first dc), dc in next st and each st around. Sl st to join (12 sts)
Rnd 5: Ch 3 (counts as first dc), dc in next st, 2 dc in next st, *dc in next 2 sts, 2 dc in next st*, repeat ** 2 times, sl st to join (16 sts)
Rnd 6: Ch 3 (counts as first dc), dc in next st and each st around. Sl st to join (16 sts)
Rnd 7: Ch 3 (counts as first dc),dc in next 2 sts, 2 dc in next st, *dc in next 3 sts, 2 dc in next st*, repeat ** 2 times, sl st to join (20 sts)
Rnd 8: Ch 3 (counts as first dc),dc in next st and each st around. Sl st to join (20 sts)
Rnd 9: Ch 3 (counts as first dc),dc in next 3 sts, 2 dc in next st, *dc in next 4 sts, 2 dc in next st*, repeat ** 2 times, sl st to join (24 sts)
Rnd 10: Ch 3 (counts as first dc),dc in next st and each st around. Sl st to join (24 sts)
Rnd 11: Ch 3 (counts as first dc),dc in next 4 sts, 2 dc in next st,*dc in next 5 sts, 2 dc in next st*, repeat ** 2 times, sl st to join (28 sts)
Rnd 12: Ch 3 (counts as first dc),dc in next st and each st around. Sl st to join (28 sts)
Rnd 13: Ch 3 (counts as first dc),dc in next 5 sts, 2 dc in next st,*dc in next 6 sts, 2 dc in next st*, repeat ** 2 times, sl st to join (32 sts)
Rnd 14: Ch 3 (counts as first dc),dc in next st and each st around. Sl st to join (32 sts)
Rnd 15: Ch 3 (counts as first dc),dc in next 6 sts, 2 dc in next st,*dc in next 7 sts, 2 dc in next st*, repeat ** 2 times, sl st to join (36 sts)
Rnd 16: Ch 3 (counts as first dc),dc in next st and each st around. Sl st to join (36 sts)
Rnd 17: Ch 3 (counts as first dc),dc in next 7 sts, 2 dc in next st,*dc in next 8 sts, 2 dc in next st*, repeat ** 2 times, sl st to join (40 sts)
Rnd 18: Ch 3 (counts as first dc),dc in next st and each st around. Sl st to join (40 sts)
Rnd 19: Ch 3 (counts as first dc),dc in next 8 sts, 2 dc in next st,*dc in next 9 sts, 2 dc in next st*, repeat ** 2 times, sl st to join (44 sts)
Rnd 20: Ch 3 (counts as first dc),dc in next st and each st around. Sl st to join (44 sts)

Break off yarn.
Count 5 stitches from break off and join in new skein

Row 1: Ch 1 (does not count as first sc), sc in same stitch, sc in next 32 sts
Row 2: Ch 1 (does not count as first sc), rsc in each st across.
Row 3: Ch 1 (does not count as first sc), 2 sc in first st, sc in each st until last st, 2 sc in last st (35 sts)
Row 4: Ch 1 (does not count as first sc), rsc in each st across.
Row 5: Ch 1 (does not count as first sc), 2 sc in first st, sc in each st until last st, 2 sc in last st (37 sts)
Row 6: Ch 1 (does not count as first sc), rsc in each st across.
Row 7: Ch 1 (does not count as first sc), 2 sc in first st, sc in each st until last st, 2 sc in last st (39 sts)
Row 8: Ch 1 (does not count as first sc), rsc in each st across.
Row 9: Ch 1 (does not count as first sc), 2 sc in first st, sc in each st until last st, 2 sc in last st (41 sts)
Row 10: Ch 1 (does not count as first sc), rsc in each st across.
Row 11: Ch 1 (does not count as first sc), 2 sc in first st, sc in each st until last st, 2 sc in last st (43 sts)
Row 12: Ch 1 (does not count as first sc), rsc in each st across.
Row 13: Ch 1 (does not count as first sc), 2 sc in first st, sc in each st until last st, 2 sc in last st (45 sts)
Row 14: Ch 1 (does not count as first sc), rsc in each st across.
Row 15: Ch 1 (does not count as first sc), 2 sc in first st, sc in each st until last st, 2 sc in last st (47 sts)
Row 16: Ch 1 (does not count as first sc), rsc in each st across.

Break off.

Rejoin yarn in the back, and single crochet around the base of the hood, at the tips of the ear flaps, put in 3 single crochets to work around the corner. sl st to join.
Ch 1, single crochet around, at the center of the 3 sc at the tip of the ear flaps, sc, ch 50, sl st back up ch, sc in same st, continue sc around to tip of the second ear flap, repeat.

Make 3 pom poms or tassels, one large, 2 small. Attach the large one to the pointy top of the hat and the other 2 to the cords for the hood.


Get a discount at Darn Good Yarn using the link below!


Use code NEWSUBSCRIBER at checkout for 10% off! (affiliate link)

Thursday, October 1, 2015

Super Speedy Sari Silk Shawl (crochet)

Super Speedy Sari Silk Shawl pattern using Darn Good Yarn


I couldn't resist the alliteration, but if I were going to give it another name, it would be Rainbow Crow shawl, because the soft effect of the frayed edges of the recycled sari silk ribbon and all the colors reminds me of the story of Rainbow Crow.

By super speedy- you can make a small version of this shawl in an evening with 4 skeins of Darn Good Yarn's Tibet Jewels. The full sized version in my photos is made using 7 skeins and took 2 evenings of tv watching. Probably 6 hours? Maybe less.

Tibet Jewels is the easiest of the sari ribbons I've found to wind into balls, and it has so much texture and color it's just amazing.

Tibet Jewels by Darn Good Yarn
The 4 ball version- the finished size without the fringe is 52 inches along the hypotenuse and 26 inches deep.

You will need:

  • 7 (or 4) balls of Tibet Jewels 
  • Size S crochet hook 
  • Scissors
  • Size P crochet hook for putting on the fringe


So this is a bottom up shawl, and once you start, it just flies off your hook.
American terminology
Stitches used:
ch=chain
sc=single crochet
tr= treble crochet
sl st= slip stitch
st or sts= stitch or stitches

Chain 7, sl st to join in a ring

Row 1: Chain 5, sc in ring, ch 2, tr in ring (2 loops)
Row 2: Ch 5, sc in same loop, ch 3, sc in next loop, ch 2, tr in 3rd st of ch 5 from previous row (3 loops)
Row 3: Ch 5, sc in same loop, ch 3, sc in next loop,ch 3, sc in next loop, ch 2, tr in 3rd st of ch 5 from previous row (4 loops)
Row 4: Ch 5, sc in same loop, ch 3, sc in next loop, work across the same way- at the last loop, ch 2, tr in ch 3 of beginning ch 5 of previous row.
Keep repeating Row 4. Each row will be one loop wider than the row before it.

For the 4 skein variation- when you get close to the end of the 3rd ball of yarn, finish that row and if you need to add in the 4th skein to finish, do that. Then break off leaving the tail long enough to be one of the fringe, and cut your fringe. Put a fringe at the base of each row along the short sides, and one in the center of the beginning chain 7.

For the 7 skein variation- complete 26 rows, and break off leaving a 13 inch tail. Cut 53 fringe pieces 26 inches long (if you want it like mine, shorter fringe is fine) and put one fringe at the base stitch of each row. (where the rows join)

Attach the fringe by inserting your P hook into the stitch at the base of each row- where they join up, and fold the fringe in half, pull a loop though, then pull the ends through the loop.

This is 3 balls crocheted up-
Tibet Jewels shawl in progress


Sunday, September 20, 2015

Sunshine Shawl- crochet pattern

Sunshine Shawl

So this shawl has a bit of a story. When I finished my rainbow shawl- I had some yellows, oranges and reds leftover from the yarn sets I ordered for it. So I thought "Hey, I could make a sunshine shawl! and started it promptly with the idea it would be a simple half round with points!

It took a couple starts and restarts, but it did work out. However, I didn't keep notes, figuring I'd count it all up to write the pattern. But then within a day or two after showing it off and promising a pattern, I got a nasty virus and the idea of trying to work out the pattern was just more than I could handle.

This is one of my husband's favorite shawls on me. I'm not sure why, but he really likes this one!

You will need:
Darn Good Yarn Chiffon Ribbon 
2 skeins of orange
3 skeins of dark orange
2 skein of red
2 skein of yellow
There will be some leftover. I'm kind of guessing since some of it was leftover from the first shawl.

Size N hook
Scissors
Large needle or small hook to weave in ends
Because of the nature of the yarn, you can knot in color changes.
Pattern is in American terminology

sc= single crochet
ch=chain
dc=double crochet
sl st=slip stitch
Each odd number round begins ch 5, sc in first loop, and ends with ch 2, dc in first sc of previous round.
Each even number round is ch 1 to turn, sc in same stitch, ch 5, sc in next loop all the way across, then ends in ch 5, sc in 3rd chain from first ch 5 of the previous row. So the even number rounds have 1 less loop than the odd number round before it.

The odd number rounds have the increases, which are chain 5, sc in same loop.

Red
Chain 6- sl st to close

Round 1: Ch 5, sc in ring, ch 5, sc in ring, ch 5, sc in ring, ch 5, sc in ring, ch 2, dc in ring (5 loops)

Round 2: Ch 1 to turn, sc in dc, *ch 5, sc in next loop*, repeat ** 2 times, ch 5, sc in 3rd ch from first 5 from previous round. (4 loops)

Round 3: Ch 5, sc in first loop, ch 5, sc in next loop, ch 5, sc in same loop, ch 5, sc in next loop, ch 5, sc in same loop, ch 5, sc in next loop, ch 2, dc in first sc of previous round. (7 loops)

Round 4: Ch 1 to turn, sc in dc, ch 5, sc in next loop, repeat across round until the last loop, ch 5, sc in 3rd ch from first ch 5 on the previous row. (6 loops)

Round 5: Ch 5, sc in first loop, ch 5, sc in next loop, ch 5, sc in next loop, ch 5, sc in same loop, ch 5, sc in next loop, ch 5, sc in same loop, ch 5, sc in next loop, ch 5, sc in next loop, ch 2, dc in next loop. (9 loops)

Round 6: Ch 1 to turn, sc in dc, ch 5, sc in next loop, repeat across round until the last loop, ch 5, sc in 3rd ch from first ch 5 on the previous row. (8 loops)

Round 7: Ch 5, sc in first loop, ch 5, sc in next loop, ch 5, sc in next loop, ch 5, sc in same loop, ch 5 sc in next loop, ch 5, sc in next loop, ch 5, sc in next loop, ch 5, sc in same loop, ch 5, sc in next loop, ch 5, sc in next loop, ch 2, dc in first sc of previous round. (11 loops)

Round 8:  Ch 1 to turn, sc in dc, ch 5, sc in next loop, repeat across round until the last loop, ch 5, sc in 3rd ch from first ch 5 on the previous row. (10 loops)
Orange
Round 9:  Ch 5, sc in first loop, *ch 5, sc in next loop*, repeat ** 2 more times, ch 5, sc in same loop, ch 5, sc in next loop, ch 5, sc in next loop, ch 5, sc in next loop, ch 5, sc in same loop, *ch 5, sc in next loop*, repeat ** 2 more times, ch 2, dc in first sc of previous round. (13 loops)

Round 10: Ch 1 to turn, sc in dc, ch 5, sc in next loop, repeat across round until the last loop, ch 5, sc in 3rd ch from first ch 5 on the previous row. (12 loops)

Round 11: Ch 5, sc in first loop, ch 5, sc in next loop, ch 5, sc in same loop, ch 5, sc in next loop, ch 5, sc in next loop, ch 5, sc in same loop, *ch 5, sc in next loop*, repeat ** 4 more times, ch 5, sc in same loop, ch 5, sc in next loop, ch 5, sc in next loop, ch 5, sc in same loop, ch 5, sc in next loop, ch 2, dc in first sc of previous round. (17 loops)
Yellow
Round 12: Ch 1 to turn, sc in dc, ch 5, sc in next loop, repeat across round until the last loop, ch 5, sc in 3rd ch from first ch 5 on the previous row. (16 loops)

Round 13: Ch 5, sc in first loop, *ch 5, sc in next loop* repeat ** 2 more times, ch 5, sc in same loop, ch 5, sc in next loop, ch 5, sc in next loop, ch 5, sc in same loop, *ch 5, sc in next loop*, repeat ** 4 more times, ch 5, sc in same loop, ch 5, sc in next loop, ch 5, sc in next loop, ch 5, sc in same loop,*ch 5, sc in next loop* repeat ** 2 more times, ch 2, dc in first sc of previous round. (21 loops)
Dark Orange
Round 14: Ch 1 to turn, sc in dc, ch 5, sc in next loop, repeat across round until the last loop, ch 5, sc in 3rd ch from first ch 5 on the previous row. (20 loops)

Round 15: Ch 5, sc in first loop,*ch 5, sc in next loop*, repeat ** 2 more times,ch 5, sc in same loop, ch 5, sc in next loop, ch 5, sc in next loop, ch 5, sc in same loop, ch 5, sc in next loop, ch 5, sc in next loop, ch 5, sc in same loop, *ch 5, sc in next loop*, repeat ** 4 more times, ch 5, sc in same loop, ch 5, sc in next loop, ch 5, sc in next loop, ch 5, sc in same loop, ch 5, sc in next loop, ch 5, sc in next loop, ch 5, sc in same loop, *ch 5, sc in next loop*, repeat ** 2 more times, ch 2, dc in first sc of previous round. (27 loops)

Round 16: Ch 1 to turn, sc in dc, ch 5, sc in next loop, repeat across round until the last loop, ch 5, sc in 3rd ch from first ch 5 on the previous row. (26 loops)

Round 17: Ch 5, sc in first loop,*ch 5, sc in next loop*, repeat ** 2 more times,ch 5, sc in same loop, *ch 5, sc in next loop*, repeat ** 2 more times, ch 5, sc in same loop, *ch 5, sc in next loop*, repeat ** 2 more times, ch 5, sc in same loop, *ch 5, sc in next loop*, repeat ** 4 more times, ch 5, sc in same loop, *ch 5, sc in next loop*, repeat ** 2 more times, ch 5, sc in same loop, *ch 5, sc in next loop*, repeat ** 2 more times,ch 5, sc in same loop, *ch 5, sc in next loop*, repeat ** 2 more times, ch 2, dc in first sc of previous round. (31 loops)

Round 18: Ch 1 to turn, sc in dc, ch 5, sc in next loop, repeat across round until the last loop, ch 5, sc in 3rd ch from first ch 5 on the previous row. (30 loops)

Round 19: Ch 5, sc in first loop,*ch 5, sc in next loop*, repeat ** 3 more times,ch 5, sc in same loop, *ch 5, sc in next loop*, repeat ** 3 more times, ch 5, sc in same loop, *ch 5, sc in next loop*, repeat ** 2 more times, ch 5, sc in same loop, *ch 5, sc in next loop*, repeat ** 4 more times, ch 5, sc in same loop, *ch 5, sc in next loop*, repeat ** 2 more times, ch 5, sc in same loop, *ch 5, sc in next loop*, repeat ** 3 more times,ch 5, sc in same loop, *ch 5, sc in next loop*, repeat ** 3 more times, ch 2, dc in first sc of previous round. (35 loops)

Round 20: Ch 1 to turn, sc in dc, ch 5, sc in next loop, repeat across round until the last loop, ch 5, sc in 3rd ch from first ch 5 on the previous row. (34 loops)
Orange
Round 21: ch 5, sc in first loop,*ch 5, sc in next loop,* repeat ** 2 more times,ch 5, sc in same loop,*ch 5, sc in next loop,* repeat ** 2 more times,ch 5, sc in same loop,*ch 5, sc in next loop,* repeat ** 2 more times,ch 5, sc in same loop,*ch 5, sc in next loop,* repeat ** 2 more times,ch 5, sc in same loop,*ch 5, sc in next loop,* repeat ** 2 more times,ch 5, sc in same loop,*ch 5, sc in next loop,* repeat ** 2 more times,ch 5, sc in same loop,*ch 5, sc in next loop,* repeat ** 2 more times,ch 5, sc in same loop,*ch 5, sc in next loop,* repeat ** 2 more times,ch 5, sc in same loop,*ch 5, sc in next loop,* repeat ** 2 more times,ch 5, sc in same loop,*ch 5, sc in next loop,* repeat ** 2 more times,ch 5, sc in same loop,*ch 5, sc in next loop,* repeat ** 2 more times,ch 2, dc in first sc of previous round (45 loops)

Round 22: Ch 1 to turn, sc in dc, ch 5, sc in next loop, repeat across round until the last loop, ch 5, sc in 3rd ch from first ch 5 on the previous row. (44 loops)

Round 23: ch 5, sc in first loop,*ch 5, sc in next loop,* repeat ** 7 more times, ch 5, sc in same loop, *ch 5, sc in next loop,* repeat ** 6 more times, ch 5, sc in same loop, *ch 5, sc in next loop,* repeat ** 12 more times, ch 5, sc in same loop, *ch 5, sc in next loop,* repeat ** 6 more times, ch 5, sc in same loop, *ch 5, sc in next loop,* repeat ** 7 more times, ch 2, dc in first sc of previous round (49 loops)
Red
Round 24: Ch 1 to turn, sc in dc, ch 5, sc in next loop, repeat across round until the last loop, ch 5, sc in 3rd ch from first ch 5 on the previous row. (48 loops)
Dark Orange
Round 25:Ch 5, sc in first loop, *ch 5, sc in next loop*, repeat ** 15 more times, ch 5, sc in same loop, *ch 5, sc in next loop*, repeat ** 14 more times, ch 5, sc in same loop, *ch 5, sc in next loop*, repeat ** 15 more times, ch 2, dc in first sc of previous round (51 loops)

Round 26: Ch 1 to turn, sc in dc, ch 5, sc in next loop, repeat across round until the last loop, ch 5, sc in 3rd ch from first ch 5 on the previous row. (50 loops)

Start the points-
Attaching yarn from one tip:
Row 1:Sc in first sc, *ch 5, sc in next sc*, repeat ** 5 more times, ch 2, dc in next sc, (7 loops)
Row 2: ch 1,turn, sc in dc, *ch 5, sc in next loop*, repeat ** 4 more times, ch 2, dc in top of first loop of previous row. (6 loops)
Row 3: ch 1,turn, sc in dc, *ch 5, sc in next loop*, repeat ** 3 more times, ch 2, dc in top of first loop of previous row. (5 loops)
Row 4: ch 1,turn, sc in dc, *ch 5, sc in next loop*, repeat ** 2 more times, ch 2, dc in top of first loop of previous row. (4 loops)
Row 5: ch 1,turn, sc in dc, ch 5, sc in next loop, ch 5, sc in next loop,  ch 2, dc in top of first loop of previous row.  (3 loops)
Row 6: ch 1,turn, sc in dc, ch 5, sc in next loop, ch 2, dc in top of first loop of previous row. (2 loops)
Row 7: ch 1,turn, sc in dc, ch 6, sl in 4th chain from hook, ch 2, sc in top of first loop of previous row, break off. (1 loop with picot)

Start the next point in the same stitch as the end of the row 1 of the previous point.
7 points total. I used yellow for every other point, then used other colors in between the yellow. Adapt the points to the colors you have left after working the body of the shawl.
Weave in ends.




Sunday, September 13, 2015

Darn Good Apple Cozy

Darn Good Apple Cozy Crochet Pattern
I can't even tell you how much I love this yarn. I got a skein in a grab bag from Darn Good Yarn and balled it up and just pet it and stroked it until I had a plan for it. It's made from banana fibers! So yes, I wrapped my apple in bananas.

Darn Good Yarn Banana Fiber - they also have a gorgeous multicolor version- Kaleidoscope Banana Fiber

It's soft, fluffy, absolutely touchable. One ball will make an apple cozy with some leftover for making a bracelet or other accessory, 2 balls will make 3 apple cozies. The cozies fit the "school boy" sized small apples, but it would be easy to adjust the pattern for one of those huge apples if you're really apple crazy.

You will need:
Banana fiber yarn
Size K crochet hook
scissors
smaller hook to weave in ends OR a ribbon threaded through a tapestry needle to make a loop works too. The yarn does not go through needles easily.

Time- very short. These are quick, easy and make great gifts.
American terminology
Stitches:
chain=ch
sc= single crochet
dc= double crochet
sl st= slip stitch
st or sts=stitch or stitches
dec sc= insert hook in first st, yarn over, pull loop through, insert hook in next st, yarn over, pull loop through, yarn over, pull through all three loops on the hook.
Repeat ** means repeat the instructions between the asterisks.

Ch 2 or magic ring
Round 1: 6 sc in first ch or magic ring. Sl st to join (6 sts)
Round 2: ch 1 (does not count as first st) 2 sc in each st around, sl st to join (12 sts)
Round 3:  ch 1 (does not count as first st) sc in first st, 2 sc in next st, *sc in next st, 2 sc in next st*, repeat ** around, sl st to join. (18 sts)
Round 4: ch 1 (does not count as first st) sc in each st, sl st to join (18 sts)
Round 5: ch 1 (does not count as first st) sc in each st, sl st to join (18 sts)

Now we switch to back and forth rows.

Row 1: ch 1 (does not count as first st), sc in same st, sc in next 15 sts (16 sc)
Row 2: ch 1 (does not count as first st) dec sc over first two sts, sc in next 12 sts, dec sc in last 2 sts. (14 sc)
Row 3: ch 1 (does not count as first st) dec sc over first two sts, sc in next 10 sts, dec sc in last 2 sts. (12 sc)
Row 4: ch 1 (does not count as first st) sc in each st (12 sts)
Row 5: chain 15 at end of row 4. Sc in second chain from hook, dc in next 7 sts, sc in next st, sl st in next 5 ch, sc in next 12 sts, ch 15, turn, Sc in second chain from hook, dc in next 7 sts, sc in next st, sl st in next 5 ch, sl st to join. Break off and weave in ends.

Yay! Apple cozy done! In 5 rounds and 5 rows. Put in apple, tie the ties once.

Coming as soon! A pattern for my sunshine shawl.


Sunday, August 9, 2015

Sunflower and bee photo box

Sunflower with a bee


I think that I should start doing more boxes from photographs. This is from a photo that I took last week. I love the bright, summer colors of the sunflower and bee. 

Click the box below for a larger version to print on card stock, cut out, score folds, fold and glue! 

Printable sunflower and bee box

I'm using the same colors in a shawl I'm working on now. 


Sunday, August 2, 2015

An idea for leftover bits of DGY ribbons


So I'm watching this video- and thinking "Hey, awesome use for leftover scraps of Darn Good Yarn chiffon or silk ribbons."
But a couple things- the yarn is recycled- use recycled plastic too. If you don't mind the shape, I'm wild for milk jug plastic. It's generally white or translucent and I use it for barrette backings, building disks, stencils, planters, scoops, I literally have a kitchen drawer full of milk jug plastic cut into sheets from gallon jugs to use for all sorts of things.
Otherwise- yogurt containers, whipped top containers, esp the ones with labels that can be peeled off easily- plus most plastics can be painted if you can't get printing off of them and don't want it showing through the ribbon.
Now, everyone has that friend who keeps every container that comes into their kitchen, the give you seed starts in plastic yogurt containers, they pack lunches in sour cream or margarine tubs and that person is awesome. Except for using margarine (vegans excepted) , but you probably have friends who don't do that. (I'm not that friend, don't even ask. But I do pack my husband's lunches in Lock & Locks because of a nasty accident a while back. If you absolutely don't want it to spill, Lock & Lock) Those friends? If you point out that it's good to want to save the environment and the best kind of recycling is re-purposing? They will sometimes save you things. Then you'll be the one with a big bucket of soda pop tabs waiting to be turned into armor as soon as you feel like working on something really boring for hours. Oh, wait- anyway, ask. You'll wind up with containers.
Secondly-
The only folds bias tape should have in a project are the nice ones down the length. The card wrap folds are easy to get rid of- use a hair straightening iron.

----
So the above was written as a FB update and wound up getting a little longer than expected. I'll be honest- at 3:am, when my sleeping schedule is all inside out, and given the really amazing week I had last week (more on that later) - I tend to get a little enthused, run on, and have very little control over my stream of consciousness. It's good though, because that's also the time that I get the most inspired. 

Thursday, July 30, 2015

Rainbow Shawl

Rainbow shawl using Darn Good Yarn chiffon ribbon- crochet pattern
I love Darn Good Yarn so much, and while I was buying yarn for my purse, I saw the chiffon rainbow pack, which was unfortunately sold out. I knew right then that I wanted a rainbow shawl made from that yarn.

Darn Good Yarn is a pretty amazing company. Owned by a US veteran, selling fair trade yarn made from recycled goods, in incredibly bright, beautiful colors, a winner in every way.

To make this shawl, I ordered 2 rainbow packs of chiffon ribbon yarn from Darn Good Yarn. The ribbon packs come in different colors, so you don't have to make a rainbow shawl. Pick your favorite color packs. I just really like rainbows. The packs have 4 skeins each. The shawl works up very quickly. It took me 2 evenings to finish it.

In the end, I used 7 skeins, and had about half a skein left of the orange and yellow. Because of the nature of the ribbon packs, your colors may vary from mine, so you'll adapt the colors of the rows to fit the colors you get. Arrange your rainbow so color 6 is one you have two skeins.

UPDATE! 8-5-15 Darn Good Yarn has put together a kit of yarn to make this shawl! Available here- Rainbow Shawl Kit

My shawl used:
1 purple- color 1
1 red- color 2
1 orange- color 3
1 yellow- color 4
1 green- color 5
2 blue- color 6


A size N hook

Stitches used:
ch=chain
sl st= slip stitch
dc=double crochet

Some quick notes- because of the nature of the yarn, to change colors, I just tied square knots in the yarn and kept working, working the ends in as I went. That made it go fast, and it works because there are knots and loose ends from stitched together ends as well in the ribbon. It adds to the texture and makes it super easy.

When you're winding the center pull balls, make them loose and easy. Keep a pair of scissors handy to trim loose threads.

Pattern:
Using color 1= chain 6, sl st into ring
Row 1: Ch 4(counts as first dc and ch 1), dc in ring, ch 1, dc in ring, ch 1, dc in ring, ch 1, dc in ring (5 dcs 4 spaces)
Row 2: Ch 4 (counts as first dc and ch 1),dc in same stitch, ch 1, dc in next dc, ch 1, dc in next dc, ch 1, dc in same stitch, ch 1, dc in next dc, ch 1, dc in last dc, ch 1, dc in same dc

Now it's all the same pattern. All the rows start with Ch 4 (counts as first dc and ch 1), dc in same stitch, ch 1, dc in next stitch, until the center loop of the previous row, ch 1, dc in loop, ch 1, dc in loop, continue ch 1, dc in next stitch to the last stitch of the previous row, dc in stitch, ch 1, dc in stitch. So the increases are worked in the first and last stitch of the previous row and in the center.
stitches for Darn Good Yarn rainbow shawl


Rows 3-4 in color 2
Rows 5-6 in color 3
Rows 7-8 in color 4
Rows 9-10 in color 5
Rows 11-12 in color 6
Row 13-14 in color 1
Rows 15-16 in color 2
Row 17 in color 3
Row 18 in color 4
Row 19 in color 5
Row 20-21 in color 6

Fringe- Cut 43 pieces of ribbon 10 inches long. Pull loop of ribbon through first space, pull ends through loop and tighten, skip next space, put fringe in next space all the way around.

Tuesday, May 12, 2015

Festival Bun Cover- Photon Yarn

Recycled Silk Bun Cover Pattern

I'm so wild for this yarn, and the long bohemian fringe of it hanging from this bun cover.

The bun cover is actually made in 2 parts. The cover is one, and the fall is the other, so you can wear it without the fall. The yarn is Darn Good Yarn's Recycled Photon Rainbow Sport Weight Silk Yarn.
(check out this bracelet pattern in the same yarn)

To make this festive bun cover you will need:

  • 2 thick no metal hair elastics
  • Recycled Photon Rainbow Sportweight Silk Yarn
  • Size G hook
  • Yarn needle
  • Scissors

Stitches=

  • ch=chain
  • sc= single crochet
  • dc=double crochet
  • sl st= slip stitch
  • st or sts= stitch or stitches
  • repeat ** means repeat the instructions between the asterisks.


American terminology

Bun cover:
Ch 8, sl st to join
Round 1: Chain 1 loosely (counts as first stitch), 11 sc in ring, sl st to ch 1 to join (12 sts)
Round 2: Ch 5 (first dc and ch 2), *dc in next st, ch 2, * repeat ** 10 times, sl st to 3rd st in beginning ch 5 to join (12 spaces)
Round 3: ch 1 loosely, 2 sc in space, *sc in next st, 2 sc in space*, repeat ** 10 times, sl st to first chain to join (36 sts)
Round 4: Ch 5, skip 2 sts, *dc in next st, ch 2*, repeat ** 10 times, sl st to 3rd st in beginning ch 5 to join. (12 spaces)
Round 5: Repeat round 4
Round 6- Hold hair elastic against the last round, and single crochet over the hair elastic into the stitches on the last round to encase and attach the elastic. Sc in each stitch around, sl st to join. Break off, weave in ends.

Hair fall-
Cut 18 lengths of yarn twice as long + 2 inches as you want the fall to be. Working with 2 strands at a time, pull them through the other elastic and tie in overhand knot close to the elastic.


To wear it, you make your bun- I just twist a section of hair up and hold it in place while slipping the bun cover over, then hold the bun cover in place while putting the fall over it. Slip a nice hair stick through weaving it into your bun to lock it into position.


The bun cover above is made with Darn Good Yarn's Chiffon Ribbon, and I'm giving the pattern to them exclusively. Follow Darn Good Yarn and Shala's Beadwork and Printables on Facebook to find out when it's posted! (I'll also update this entry then) 


Saturday, April 11, 2015

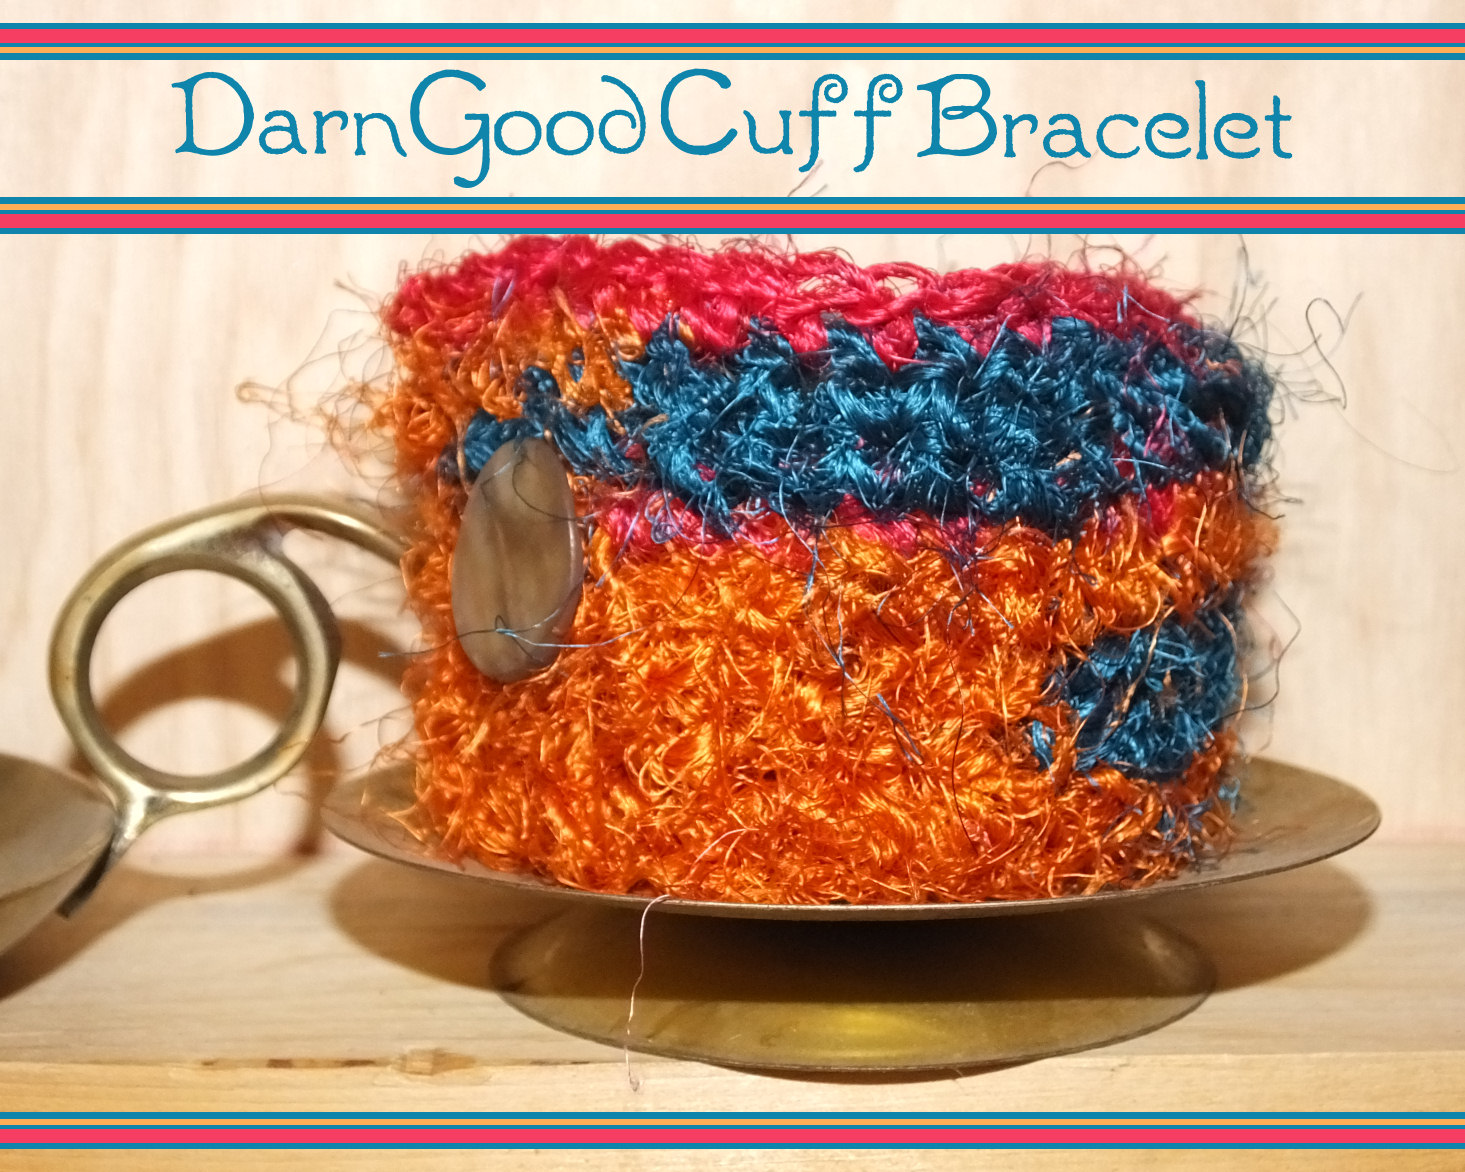
Darn Good Cuff Bracelet Tutorial (crochet)

Darn Good Cuff Bracelet- a bracelet made with recycled sari silk yarn

I love recycled sari yarn. It has all the things my little hippie heart adores. It's recycled from saris, it's silk!, it's got all sorts of colors and fun texture things going on. A lot of people like it but then don't know what to do with it. It's almost too much goodness. I didn't have that problem with this skein because I ordered it knowing it was going to be bracelets and accessories.

The company that sells it is Darn Good Yarn- and if you use my link, you'll get a coupon for a good savings and I'll get a credit on my next order. Win win right? Then you can refer your friends and they can get a coupon and you can get credit. Awesome loyalty program.

This is the yarn I bought from them in my first order and what I plan to do with it. The 4 skeins on the right hand side are a chiffon ribbon yarn that I'll be using to make a purse. The one in the forefront is the Recycled Photon Rainbow Sport Weight Recycled Silk Yarn that I used to make the bracelet above.

So the bracelet is simple enough to make. It's single crochets, chains and a pretty button. The yarn has so much going on that I wanted to simply show off the yarn. The problem is, because of the length of color changes, simply crocheting back and forth didn't work. It just made stripes instead of the sort of organic shape color changes I wanted. You can see my bracelet on top in this picture- and what it looks like working back and forth in the bottom picture.
So to get the color changes, I worked in 2 directions.

Darn Good Cuff Pattern:

You'll need a size D or E hook

  • 1 skein of sport weight recycled sari silk yarn
  • Large needle for weaving in ends
  • attractive/8ths to 7/8th inch button
Chain 4
Row 1: sc in second chain from hook, sc in next 2 chains
Row 2-32: Ch 1 to turn, sc in each st (3 sts)
(adjust rows as needed for size. You want it to fit with an inch of overlap for the button) 
Switch direction! 
Row 34: Ch 1, working down the long side, sc in next 2 sts, ch 3, skip 3 sts, sc in the rest of the sts
Row 35-37: ch 1, sc in each st down the length

Round 1: ch 1, sc in st, sc down length, 3 sc in corner, sc across end, 3 sc in corner, sc down length, 3 sc in corn, sc across end, 2 sc in last st, sl st to first sc of round to join.  Break off

Weave in all ends.  Stitch button on opposite side of button hole. I just used some of the yarn.

The yarn is very strong, and very crisp feeling. It looks kind of like jute twine, but it's very soft to the touch with a nice amount of structure. You can gently handwash finished pieces, lay flat to dry. If you want your finished item softer, putting it in a dryer on delicate/low heat for a few minutes will soften the yarn.  One skein will make a lot of small projects like this with 147 yards per skein.