Printing Tips

Check out my printing tips if you're having problems printing to the right size
If you'd like to support this site and all the free things I post- please check out my Don't Eat the Paste Mandala collection coloring book for 9.99 at Amazon.
Showing posts with label pattern. Show all posts

Wednesday, June 11, 2014

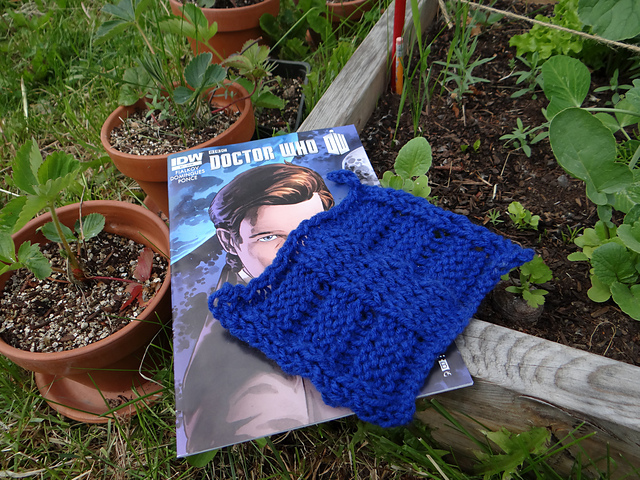
Spoilers Washcloth (knit pattern) by The Amazing Turnip Girl

Spoilers Washcloth

From The Amazing Turnip Girl's Ravelry Page:
just a little scrubbie i made. 
i tried to make it look like river’s diary. 
i took the photos in my family’s garden.
Most of her project instructions are "I just did this until it looked like this" and her knitting instructions are pretty similar. She works without patterns, and usually without taking notes. However, she decided to make a second one of these, so I gave her a piece of graph paper and told her to mark the purl stitches.

The needles she is using are this set that I made her-

Made with 1/4 inch oak dowels, they are just over 6 mm in diameter, or between a size 10 and size 10.5 needle. Either size will work. 

The pattern is mostly garter stitch with some purl stitch panels. If you are a beginning knitter, it's an easy, quick project that will help you get more comfortable with purling. The end result is a nicely textured scrubbie. Using cotton yarn, it will be insanely soft, for a more exfoliating scrub- use acrylic. 

Worsted weight yarn- the open blocks are knit stitches, the dots are purls.


Cast  on 23 stitches
Knit 3 rows
Row 4-7: Knit 3, purl 6, knit 5, purl 6, knit 3
Rows 8-9: Knit across
Rows 10-13: Knit 3, purl 6, knit 5, purl 6, knit 3
Rows 14-15: Knit across
Rows 16-19: Knit 3, purl 6, knit 5, purl 6, knit 3
Rows 20-22: Knit across
Bind off. Weave in ends. 
Make an i-cord to hang it if you'd like. 

Extra bonus Amazing Turnip Girl craft geek:


You can find out more about how she made her Benny the Lego Space Guy costume here on Cut Out and Keep!


Tuesday, July 16, 2013

Quick to stitch kerchief crochet pattern


I love bottom up techniques for kerchiefs and shawls because everyone likes a different size. Some people like them tiny, just a scrap of a triangle. TG and I like them wide enough to trap back the side of our hair behind our ears. This one is one of my favorite techniques because it works with nearly any yarn or thread for shawls or kerchiefs.

You will need:

  • size H hook (5 mm)
  • size I hook (5.5mm)
  • worsted weight yarn- my example is done in Bernat Mosaic in the Psychedelic colorway
  • scissors
  • yarn needle
Pattern is in American terminology.
Stitches and abbreviations used:
  • chain = ch
  • single crochet = sc
  • double crochet = dc
  • slip stitch = sl st
Repeat ** means to repeat what is between the asterisks.

Chain 9, sl st to join
Row 1: ch 5, sc in ch 9 ring, ch 3, dc in 5th ch from sl st in in ch 9 ring. (2 loops)
Row 2: ch 5, sc in ch 3 from previous row, ch 3, sc in ch 5 from previous row, ch 3, dc in 3rd ch on the ch 5 from the previous row. (3 loops)
Row 3: ch 5, sc in first loop of previous row, ch 3, sc in next loop, ch 3, sc in last loop, ch 3, dc in 3rd ch on the last loop of previous row. (4 loops)

Each row works the same way, starting with a chain 5 loop that is joined with a single crochet in the first loop, and ch 3 loops all the way across to the last loop which is ch 3, double crochet in the 3rd chain of the ch 5 from the last row. Each row increases the loops by one. 

So when you get your triangle big enough for your kerchief- for the one above, it was 22 rows, then you put on the final row.
Last row: ch 1, sc in same stitch, *ch 3, sc in next loop*, repeat ** across, on the last ch 3, sc in 3rd stitch from ch 5 loop on previous row.

Single crochet border and ties-

Switch to I hook- Ch 1 to turn. working down the sides of the kerchief, sc in last sc of previous row, work 2 sc in each space until the bottom corner. Do 5 chains in bottom corner, then 2 sc in each space up the other side. When you get to the first sc in the last row, sc in that.
Chain 50 or 60 (depending on how long you want your ties, I did 60) then slip stitch back up the chain. Do another sc in the last sc of previous row. Sc in each stitch across the top of the kerchief. When you reach the last sc, chain 50 or 60, sl st back up the chain, then sl st to join to the first sc on the round. 

Weave in all ends.

This is what it looks like from the back-
And this is what a shawl looks like worked using the same technique. This is one of my favorite shawls! Sorry, can't help you with that pattern because so far, I've been completely unwilling to count stitches to figure out how I made it! 

Wednesday, May 15, 2013

Peace Symbol Crocheted Earring Pattern


I wasn't sure about posting this pattern, so I asked on FB and a few people said they would like the pattern.

These earrings need to be stiffened to look right, but they are quick to make and are a lot of fun!

You will need:

  • size 10 crochet cotton- I used Aunt Lydia's Mexicana which is a wonderful rainbow variegated thread
  • size 7 (1.5 mm) steel crochet hook
  • tapestry needle
  • Mod Podge (still loving Mod Podge to stiffen crochet!)
  • water
  • earring wires
  • plastic covered cardboard (to pin the earrings on when blocking)
  • rust proof pins
Stitches used:
chain=ch
single crochet= sc
triple treble= tr tr

A triple treble is stitch that you yarn over 4 times, then insert the hook into the stitch, yarn over, pull through the stitch, (6 loops on hook), yarn over, pull through 2 loops (5 loops on hook), yarn over, pull through 2 loops (4 loops on hook) , yarn over, pull through 2 loops (3 loops on hook), yarn over, pull through 2 loops (2 loops on hook), yarn over, pull through final 2 loops. 

For long stitches like that, each wrap on the hook is one more chain in length for the starting chain of the round. Since I use 3 chains as the start for a double crochet round, that means a triple treble is 6 chains for the starting chain.

Earrings- Make 2
Ch 4, slip stitch to make ring.
Round 1: Ch 6, tr tr in ring, chain 9, tr tr in ring 2 times, ch 3, tr tr in ring 2 times, ch 3, tr tr in ring 2 times, ch 9, slip stitch to join in top chain on starting ch 6. 
Round 2: ch 1 (doesn't count as first sc), sc in each stitch around (NOT in the spaces, but actually in the stitches, it looks neater), slip stitch to join in first sc 
Loop- ch 5, sl st in next sc. Break off and weave in ends. 

Now adjust the triple trebles as needed in the ch 4 loop to look nice and neat. Mix equal parts Mod Podge and water- I actually keep the mixture in clean medicine bottle so it's ready to use for other things that need stiffening but only mix a small amount at a time.  Soak the earrings in the mix, and squeeze it out. You may want to blot it slightly with a paper towel. Pin the earrings on the cardboard to block. Nudge the triple trebles to be very close to each other and straight as possible, and make sure the loop on top is open. Let the earrings dry and put them on wires.

For international readers- 

Tuesday, February 5, 2013

The Bunda- crochet pattern

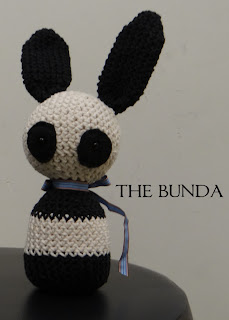
The Bunda, a crocheted bunny panda

The Bunda is what you get when you simply can not decide if you're making a panda or a bunny.
This little stuffie is a bit bigger than what I usually make because it has an important difference.
how to put a music box into a crocheted animal

It has a music box in it! The music boxes I use are 18 notes and completely encased in plastic, made by Sankyo. They can be found at a lot of hobby stores, but I got mine from CRSPinner's Variety Store on Ebay because she had the specific song* I most wanted. She has a great selection of songs and they are listed alphabetically.

The Amazing Turnip Girl helped me with the design. She's the one who decided it should be one of my limbless almost peg like designs, and that it should absolutely have big felt circles around the eyes.

You will need:

  • Ecru or white worsted weight yarn- I used Peaches and Cream Ecru (1 ball)
  • Black or if you like, a different color!  (1 ball)
  • Size G hook, if you work loose, use a size F instead
  • Yarn needle
  • Stuffing
  • Weighted stuffing of some sort, some people use plastic pellets. I use high density plastic BB pellets
  • scrap of fabric about 3x4 inches
  • sewing needle
  • sewing thread- black or to match your contrast color
  • black felt or felt to match your contrast color
  • 2 safety eyes or buttons
  • ribbon (optional)
  • music box (optional)
Start by hand sewing a little pocket to hold the pellets with the scrap of fabric. I just used 2 rows of a running stitch to make mine. That will keep the pellets in one place inside the stuffing, it can be very plain sewing because it's going to be hidden. I like high density plastic BB pellets because they are very smooth and rounded but they can also be expensive. Other people use plastic pellets that are made for stuffing, they weigh less by volume. One friend uses snippets off of plastic canvas projects, and I've even heard of people using aquarium rocks. Just something that's going to be a little heavy, and that's safe if it gets wet.
Cut 2 eyes out of the felt. This pattern can be printed at 100 dpi, or you can do it by eye to make two rounded tear drop shapes that are about 1.5 inches tall by 1.25 inches wide.


ch= chain
st= stitch
sl st= slip stitch
sc= single crochet
dec sc= insert hook in first stitch, yarn over, pull up loop, insert hook in second stitch, yarn over, pull up loop, yarn over, and pull through the 3  loops on the hook. 
Repeat ** means repeat what is between the asterisks. 
American terminology

Ears- Make 2:
With black yarn
Magic ring or chain 2
Round 1: Sc 6 times in ring, sl st to join.
Round 2: Ch 1 (doesn't count as first stitch here or throughout) sc in first st, sc in next 2 sts, ch 1, sc in next 3 sts, ch 1, sl st to join.
Round 3: ch 1,  2 sc in first st, sc in next st, 2 sc in next st,  ch 1 and skip ch 1 loop, 2 sc in next st, sc in next st, 2 sc in next st, ch 1, sl st to join
Round 4: ch 1, sc in first st, sc in next 4 sts, ch 1, skip ch 1 loop, sc in next 5 sts, ch 1, sl st to join.
Round 5: ch 1, 2 sc in first st,  sc in next 3 sts, 2 sc in next st, ch 1, skip ch 1 loop, 2 sc in next st, sc in next 3 sts, 2 sc in next st, ch 1, sl st to join.
Rounds 6-15: ch 1, sc in first st, sc in next 6 stitches, ch 1, skip ch 1 loop, sc in next 7 stitches, ch 1, sl st to join
Round 16: ch 1, dec sc over first and second stitches, sc in next 3 stitches, dec sc over next 2 sts, ch 1, skip ch 1 loop, dec sc over next 2 sts, sc in next 3 sts, dec sc over next 2 sts, ch 1, sl sto to join.
Round 17-18: ch 1, sc in first st, sc in next 4 sts, ch 1, skip ch 1 loop, sc in next 5 sts, ch 1, sl st to join.
Break off yarn leaving a long tail for sewing it to the head. Fold ear in half at base and stitch closed to create a taper.

Head:
With white yarn
Magic ring or ch 2
Round 1: sc 6 times in ring, sl st to join (6 sts)
Round 2: ch 1, 2 sc in first st, 2 sc in each st after, sl st to join. (12 sts)
Round 3: ch 1, sc in first st, 2 sc in next st, *sc in next st, 2 sc in next st*, repeat ** around, sl st to join. (18 sts)
Round 4: ch 1, sc in first st, sc in next st, 2 sc in next st, *sc in next 2 sts, 2 sc in next st*, repeat ** around, sl st to join (24 sts)
Round 5: ch 1, sc in first st, sc in each st around, sl st to join (24 sts)
Round 6: ch 1, sc in first st, sc in next 2 sts, 2 sc in next st, *sc in next 3 sts, 2 sc in next st*, repeat ** around, sl st to join (30 sts)
Round 7: ch 1, sc in first st, sc in next 3 sts, 2 sc in next st, *sc in next 4 sts, 2 sc in next st*, repeat ** around, sl st to join (36 sts)
Round 8: ch 1, sc in first st, sc in each st around, sl st to join (36 sts)
Round 9: ch 1, sc in first st, sc in next 4 sts, 2 sc in next st, *sc in next 5 sts, 2 sc in next st*, sl st to join (42 sts)
Round 10-14: ch 1, sc in first st, sc in each st around, sl st to join (42 sts)
Round 15: ch 1, sc in first st, sc in next 4 sts, dec sc over next 2 sts, *sc in next 5 sts, dec sc over next 2 sts*, repeat ** around, sl st to join (36 sts)
- While the hole is still big enough, it's time to sew on the ears and place the eyes. The ears are sewn into place 5 rows from the center top, one on each side. They need to be sewn at the base, then slightly up the side facing the center to stand up. The image below shows the base in red and the stitching on the side in green. Cut a small hole in the center of each felt circle, and push the safety eye through that, then into the face on round 14 between 2 stitches. The other eye on mine is 10 stitches away. Don't sew down the circles yet!

Round 16: ch 1, sc in first st, sc in next 3 sts, dec sc over next 2 sts, *sc in next 4 sts, dec sec over next 2 sts*, sl st to join (30 sts)
Round 17: ch 1, sc in first st, sc in each st around, sl st to join. (30 sts)
Round 18: ch 1, sc in first st, sc in next 2 sts, dec sc over next 2 sts, *sc in next 3 sts, dec sc over next 2 sts*, repeat ** around, sl st to join (24 sts)
Round 19: ch 1, sc in first st, sc in next st, dec sc over next 2 sts, *sc in next 2 sts, dec sc over next 2 sts*, repeat ** around, sl st to join. (18 sts)
Round 20: ch 1, sc in first st, dec over next 2 sts, *sc in next st, dec sc over next 2 sts*, repeat ** around, sl st to join (12 sts)
Break off yarn, leaving a tail for sewing. Using the thread and needle, stitch the felt into place.

Body:
The music box comes in 2 pieces, the box itself, with a winder taped to it. The winder screws into place and it's easy to tell when your done screwing it in because then you're winding it up! 

Ch 2 or make a magic ring
With black yarn-
Round 1: 6 sc in ring, sl st to join
Round 2: ch 1, 2 sc in first sc, 2 sc in each st around, sl st to join (12 sts)
Round 3: ch 1, sc in first st, 2 sc in next st, *sc in next st, 2 sc in next st* repeat ** around, sl st to join (18 sts)
Round 4: ch 1, sc in first st, sc in next st, 2 sc in next st, *sc in next 2 sts, 2 sc in next st* repeat ** around, sl st to join (24 sts)
Round 5: ch 1, sc in first st, sc in next 2 sts, 2 sc in next st, *sc in next 3 sts, 2 sc in next st* repeat ** around, sl st to join (30 sts)
Round 6-9: ch 1, sc in each st around, sl st to join (30 sts)
Switch to white yarn
Round 9-10: ch 1, sc in each st around, sl st to join (30 sts)
Round 11: If you are using a music box- otherwise work as for round 9. Ch 1, sc in first st, sc in next 25 sts, ch 1, skip 1 st, sc in next 3 sts, sl st to join- mark ch 1 loop with a scrap of yarn(30 sts)
Round 12-14:  ch 1, sc in each st around, sl st to join (30 sts)
Switch to black
Round 15: ch 1, sc in each st around, sl st to join (30 sts)
Place the music box by putting the key through the chain 1 loop, and then putting the music box into the body, line up the key hole with the key and screw the key into place until it starts winding the music box. Put the plastic pellet bag in the other side of the body to keep the weight even. 
Round 16: ch 1, sc in first st, sc in next 2 sts, dec sc over next 2 sts, *sc in next 3 sts, dec sc over next 2 sts*, repeat ** around, sl st to join (24 sts)
Round 17: ch 1, sc in first st, sc in each st around, sl st to join (24 sts)
Round 18: ch 1, sc in first st, sc in next st, dec sc over next 2 sts, *sc in next 2 sts, dec sc over next 2 sts*, repeat ** around, sl st to join (18 sts)
Round 19: ch 1, sc in first st, dec sc over next 2 sts, *sc in next st, dec sc over next 2 sts*, repeat ** around, sl st to join. 
Round 20: ch 1, sc in each st around, sl st to join, break off yarn.

Stuff the head and body firmly, and pack stuffing around the edges of the music box to round it out some. Use a dowel, back end of a crochet hook or a knitting needle to stuff it around and between the pellet bag and music box. Stitch head to body, adding in more stuffing before doing the last couple of stitches. Tie off securely and pull all ends to the inside of the Bunda. If you pull it tight, then cut close, when you let go, the yarn end disappears into the toy. If the head is still a little floppy, tying a ribbon around the neck will help.

Because of the weighting, this does stand up well even with the over sized head. 

* The song is You and Me Against the World, which was one my mom used to sing to me. I'm making a second Bunda with the same song so my kids each have one to someday share with their children.
 

Thursday, October 11, 2012

2 Hour Crocheted Kitty Hat


First- this hat is definitely sized for larger heads. I'll include a couple tips at the end for people with smaller heads or a lot less hair than TG.  Originally, I had planned on just a plain ear flap hat with big pompoms, but after it was done, TG said "It should have kitty ears."

This did take 2 hours to make start to finish for me using bulky yarn and a big hook.

You will need:

  • Size Q plastic crochet hook*
  • Size L aluminum crochet hook*
  • yarn needle
  • 3x5 inch piece of cardboard
  • scissors
  • Lion Brand Wool-Ease Thick and Quick - 2 skeins- I used Wheat
*I got both hook sizes from a Crochet Dude set available at Michaels

Abbreviations:
ch = chain
sc = single crochet
rsc= reverse single crochet (optional)
st or sts = stitch or stitches
sl st= slip stitch
dec sc= decrease single crochet- insert hook in first stitch, pull up loop, leave on hook, insert hook in next stitch, pull up loop, yarn over, pull through all 3 loops on hook.

Hat:
Round 1: With the great big size Q hook, chain 2 OR do a magic ring. Work 6 sc in first ch or in magic ring. Slip stitch to join.
Round 2: Ch 1 (does not count as first sc here or throughout)- 2 sc in each sc around, sl st to join. (12 sts)
Round 3: ch 1, sc in first sc, 2 sc in next sc, *sc in next sc, 2 sc in next sc,*, repeat ** around. Sl st to join. (18 sts)
Round 4: Ch 1, sc in each stitch, sl st to join. (18 sts)
Round 5: Ch 1, sc in first st, sc in next st, 2 sc in next st,* sc in next st, sc in next st, 2 sc in next st,* repeat ** around, sl st to join (24 sts)
Round 6: Ch 1, sc in each st around. Sl st to join. (24 sts)
Round 7: Ch 1, sc in first st, sc in next st, sc in next st, 2 sc in next st, *sc in next st, sc in next st, sc in next st, 2 sc in next st,* repeat ** around. Sl st to join (30 sts)
Rounds 8-11: Ch 1, sc in each st around, sl st to join. 
Break off yarn.

Ear Flaps:
Count 6 stitches from back seam, and join in yarn using Q hook.
Row 1: Sc in next 6 stitches, ch 1 to turn
Row 2: rsc or sc in each stitch from previous row, ch 1 to turn
Row 3: dec sc, sc in next 2 sts, dec sc, ch 1 to turn (4 sts)
Row 4: rsc or sc in each sc across, ch 1 to turn
Row 5: dec sc, dec sc (2 sts) ch 1 to turn
Row 6: rsc or sc in each stitch. 
Break off yarn, and repeat on the other side

This makes the back of the hat 10 stitches between flaps, the flaps at 6 stitches wide, and the space in front is 8 stitches. 

With Q hook, join yarn at back seam, and single crochet in each stitch around until the bottom of the ear flap. *Switch to L hook, and sc in first sc on the bottom of the flap, ch 40, sl st back up ch, sc in next st on the bottom of the of the flap,* switch back to Q hook, and single crochet in each stitch until you reach the tip of the other ear flap, repeat **, switch to Q hook, and sc in each stitch back to the first st, sl to join.
Break off yarn.

Ears (make 2):
Round 1: With the great big size Q hook, chain 2 OR do a magic ring. Work 5 sc in first ch or in magic ring. Ch 1 to turn.
Round 2: 2 sc in first sc, sc in next sc, 3 sc in next sc, sc in next sc, 2 sc in last sc. 
Break off yarn leaving a tail to stitch ears to hat. Stitch to hat. I centered them over the ear flaps and stitched them starting from the 3rd round on the hat.

Pom poms (make 2):
Cut a length of yarn about 10 inches long, lay it across cardboard lengthwise. Wrap yarn 140 times around the cardboard and the piece of yarn. Cut off and slide yarn carefully off the cardboard. Tie the 10 inch pieces tight around the yarn loops, and knot securely. Cut open loops and trim to make it round leaving the tie ends alone. Sew the pom poms to the end of the ties and knot securely.

Weave in all ends! 

To make it smaller- I don't recommend a smaller hook size because there is so much difference in the bigger sizes. Instead, for much smaller sizes, don't do the increase to 30 stitches, and do 5 rounds of 24 stitches instead. For just a little smaller heads, instead of starting with 6 stitches, start with 5 stitches. 

My daughter loves the hat, and the big pom pom ends! 

Monday, June 25, 2012

Crochet change purse pattern

This crochet change purse is closed with an internal flex frame. The alternates rows of slip stitch with rows made up of slip stitch, single crochet and half double crochets (American terminology). The slip stitch rows cause a nice thin ribbed effect on one side of the fabric. It's crocheted flat, then seamed up the side. A second piece is made for the top to case the frame.

I chose Eco-Cotton Blend by Red Heart because it's a nice medium weight yarn that's a bit thinner than the kitchen cottons and won't stretch badly out of shape. It's made pre-consumer recycled cotton remnants from tee-shirt production in the USA blended with acrylic.

You will need:

  • Eco-Cotton by Red Heart
  • Size G hook
  • Yarn Needle
  • 3.5 inch internal flex frame
  • pliers
Stitch abbreviations- American terminology
  • ch= chain
  • sl st= slip stitch
  • sc= single crochet
  • hdc= half double crochet
  • st or sts= stitch or stitches
Internal frames come open, and you have to close them with the included pins. They are generally inserted into sewn casings. Because of the bulkiness of crocheted fabric, trying to insert them in crocheted casings was difficult and worked best making the top a bit short. Instead, I close the frames, then open them up and slide the pouch inside the frame, get it aligned right, then stitch the top part of the casing over it. 

To close the frame, first you use the pliers to fold one of the tabs over, then close the frame so the hinge overlaps, and put the pin in. Fold down the top tab to lock the pin in.

The pouch:
Chain 30 loosely. Leave a long enough tail for one side seam (about 12 inches)
Row 1: ch 1 to turn (does not count as first stitch here or throughout), slip stitch down the length of the chain
Row 2:  ch 1 to turn, sl st in first 5 sts, sc in next 5 sts, hdc in next 10 sts, sc in next 5 sts, sl st in last 5 sts
Row 3: ch 1 to turn, sl st in each st
Rows 4-27: Repeat rows 2 and 3

Break off leaving a long tail for the side seam.

Decide which side you want on the outside. Fold in half, narrow ends together, and stitch side seams leaving the narrow end open. Make sure you stitch and knot securely. 

Open the frame and slide it in the frame, aligning it so the top is just outside the top of the frame and it's stretched out across the inside of the frame.

Ch 4
Row 1: ch 1 to turn, sc across each stitch
Row 2: ch 1 to turn, sl st across each stitch
Rows 3-36: Repeat rows 1 and 2

Break off.
Fold around top of the pouch, and stitch the top in place to the top of the pouch. Be careful to only go through one layer of stitches on the pouch so you don't accidentally sew it closed! Ease as necessary to fit. When you get to the open ends, stitch them shut, then open the frame with your fingers, and stitch the bottom of the outside casing in place. Make sure you stitch and knot securely. 

Weave in all ends. 

You can find 3.5 inch internal frames on both Etsy and Ebay. 

Saturday, December 17, 2011

Snowflake Cross Stitch Pattern


Mrs. P, of Sew Phat said that she would add quarter stitches for the more detailed lines anyway to a basic cross stitch pattern and that I should probably use whole stitches. I'm not giving color suggestions for this pattern because it's only 4 colors and a geometric design. I do think that it would look lovely in DMC Light Effects Pearlescent colors.
On 14 count, this design works up to 10x10 inches
11 count just shy of 13x13 inches
18 count just shy of 8x8 inches
Print at fit to page settings. Click on the image for the larger version.

In other news, I'm out of ink! Rather than buying ink this week, I'm going to be switching out printers.

I have almost all my holiday stuff done, except the hat I'm making for my husband (which hasn't even been started yet! eeek!) I'm going to try cables on it and have never knitted cables before. So he might get it for Valentine's Day instead.

Monday, April 11, 2011

Ribbed Rows Dishcloth Pattern (crochet)


I had just finished a new cuff that used front post double crochets to create lines along the length when I thought "I wonder how that would look if I did a chain 1 space between each front post double crochet?"
The result was a wonderfully textured fabric that I think would be ideal for dishcloths or washcloths. 
One side of the fabric has ribs, the other side has something like flaps, almost like shades at a 90 degree angle from the ribs. Here's a photo of the shade/flapped side.

Close up of the ribbed side.


It's all done by working back and forth in rows. No embellishment added after, and it's a very simple 2 row repeat after the first 2 rows.

To work this stitch effect, you'll start with an odd number of stitches, and I think longer it would make an interesting scarf or could be used for other projects. 

Here's the  instructions for the dishcloth as shown. I'd love to see anything you did using this technique.

To work a front post double crochet- the post is the stitch, so instead of working the double crochet on the top of the stitch, you work the double crochet AROUND the stitch, so you'll yarn over, insert hook behind the stitch, and finish the double crochet.
I don't ever count my turning chain as a first stitch, if you prefer to do it counting as the first stitch, by all means do.
st -stitch
sc - single crochet
ch -chain
fpdc - front post double crochet
repeat ** means repeat the instructions between the asterisks 


For Ribbed Rows Dishcloth
Size H or 5mm hook
worsted weight cotton yarn- I'm not sure how much, I was working off a stash cone.

Chain 26 loosely
Row 1: sc in each stitch across (25 sts)
Row 2: ch 1 to turn, c in last stitch of previous row,* ch 1, skip st, sc in next st*, repeat ** across
Row 3: ch 1, sc in each stitch across
Row 4: ch 1, c in last stitch of previous row, ch 1, fpdc around sc from row 2, repeat across working a fpdc around each sc in the second row until the last one,  sc in first stitch of previous row to finish row.
Row 5: ch 1, sc in each stitch across
Row 6: ch 1, sc in last stitch of previous row, ch 1, * fpdc around fpdc, ch 1*, repeat ** across, sc in first stitch of previous row to finish row
Row 7: ch 1, sc in each stitch across
Repeat rows 6-7  12 times
Break off, weave in ends, or you can work a single crochet around the whole block and weave in ends.


Thursday, June 17, 2010

Wood burn effect boxes

My son wood burned a box for his grandfather for Father's Day. This is the pattern he used. Feel free to use it for craft applications or just for coloring!
I played around with a wood burning effect, and these are the two printable boxes I made. Click on the images for the full sized 100 ppi versions.


Well, this last week has been a little overwhelming. I'm getting to my email now. It started with my husband's b-day on Saturday. He prefers no celebration at all. That's not an option but we do keep it very low key, and I make him one of his favorites for dinner. This year it was chicken and dumplings with 2 kinds of dumplings, the first kind, his favorite, is a basic egg noodle recipe which I roll in walnut sized balls then flatten with my hand to about 3/8th of an inch thick to make flat round thick noodle dumplings. The second kind is the more traditional sort. Big fluffy dumplings using your choice of biscuit recipe basically. For those, I used baking soda and baking powder, combining leavening almost gets rid of the baking powder flavor. I also put in a tablespoon of vinegar with the buttermilk. That much acid wound up making the fluffiest dumplings I've ever made (it actually looked really disgusting boiling and fluffing up in the pot). Flour for both was a whole wheat pastry flour. Lots of veggies in the soup as well. Mike was a very happy man. Dad was happy because we got chocolate cake and let him take most of it home. 
Well.. actually it started Friday with Mike taking me to the mid fair feast. But that's a whole 'nother post I need to get pictures for.
Sunday we had errands to run, picking up some hair sticks from the blacksmith (photos with the post about the fair feast when I write it) and to pick up damaged inner tubes from the bicycle shop. The teens and I are making jewelry and other things with them. Look for a tutorial soon. The bicycle shop has been nice enough to be saving them for me for a while and wound up giving me 37 inner tubes. That's a LOT of free black rubber for bracelets and such!
So this week we've done wood burning, cleaned cut sections of bicycle inner tubes, it's been raining off and on all week. Tuesday it pretty much did in my arthritis and so I spent the day reading and trying to distract myself. Wednesday went to pick up snaps for the bracelets. Tomorrow, going to pick up more. I don't like the snaps I got even a little bit.  Today was working with those very bad snaps and getting frustrated and making pretty wood burn effect boxes. Tonight we are going to watch a show we picked up on DVD a couple weeks ago and I'll finish my crocheted clock face which I had to frog because I messed it up the first time.
I really seriously need to start following some of Rachel's excellent organizational tips. She gets so much done and never seems to feel as though time is running her over like a steamroller.
There are some new reviews up on MyCraftReview.com

Friday, May 29, 2009

Cooking Death embroidery pattern


Click on the image to see it full sized, and print on landscape settings. Appropriate for embroidery, wood burning or coloring.

Thursday, May 14, 2009

Crocheted Bun Cover


This is a crocheted bun cover I made for myself, so size wise, it's reasonably large. I have waist length, straight medium thickness hair, so if you have very curly or very full hair, it will probably be too small for you, and if you have shoulder length medium thickness hair,it may be too big, but bun covers are easy to resize, more or less rounds will make them larger or smaller as you need to. What I like doing is using the center of a doily I really like, or just designing as I go to make the top part of the bun cover something pretty and more involved then just a round mesh to cover my bun, then I work mesh as needed to increase the size to what I need, and decrease the mesh for the back of the bun cover.
For this one, you will need size 10 cotton
Steel size 8 or 1.5 mm hook
A medium sized covered elastic hair band. I use the ones that are about 2.5 inches and come carded at my local supermarket.
Needle to weave in ends
scissors
Chain (ch) 8, slip stitch (sl st) to join
Round 1: Chain 3- counts as first double crochet (dc), 23 dc in ring sl st to join (24 stitches (sts) made)
Inverted V shaped cluster stitch: first dc, yarn over(yo), insert hook in st, yo, draw through first two loops, yo, draw through one loop leaving 2 loops on hook, skip 1 st, yo, insert hook in st, yo, draw through first 2 loops, yo, draw through one loop, yo, draw through all 3 loops on hook.
Round 2: Ch 6- counts as first dc and ch 3, *starting in the same st, work a v shaped cluster (one loop, 1 v formed), chain 3* repeat ** around, dc in same stitch as last stitch on v cluster, sl st to join to 3rd ch of starting ch 6. (12 loops/Vs made) (edit- sounds lot more complicated then it is. Try it)
Round 3- Sl st to middle of first ch 3 loop, sc in ch 3 loop, *dc in next loop, ch 2, dc in same loop, ch 2, dc in same loop, ch 2, dc in same loop, sc in next loop* repeat ** around, on last loop, dc in loop, ch 2, dc in loop, ch 2, dc in loop, ch 2, dc in loop, sl st to join with first sc (6 petal made)
Round 4- Ch 1 (doesn't count as first sc), sc in same st, *sc in first ch 2 sp, 2 dc in same space, 5 dc in next sp, 2 dc in next sp, 1 sc in same space, sc in sc* repeat ** around, on last petal, continue in pattern and sl st to join to first sc.
Round 5: Ch 1 (doesn't count as first sc), sc in same st, *sc in next 5 sts, ch 3, sk st, sc in next 6 sts* repeat ** around until the last petal, sc in next 5 sts, ch 3, sk st, sc in next 5 sts, sl st to join to first sc (6 petals with ch 3 loops)
Round 6:Ch 8, counts as first treble crochet (tr cr) and ch 4, tr in same st, ch 4, *sc in ch 3 loop, ch 4, skip 5 st, tr cr in next st, ch 4, tr cr in same st, ch 4,* repeat ** around,ch 2, dc in 4th ch of starting ch 8. The dc puts you right on top of loop for starting the next round.
Round 7: Ch 1, sc in same st, ch 5, sc in next loop all the way around until the last loop, ch 2, dc in first sc. (18 loops)
Round 8: Repeat round 7.
Round 9: Ch 1 (doesn't count as first st), 2 sc in same loop,sc in sc, * 2 sc in next loop, ch 3, 2 sc in same loop, sc in sc* repeat around, on last loop, 2 sc in loop, ch 3, sl st to join to first sc.
Round 10: Sl st to 3rd sc, ch 6 (counts as first dc and ch 3), sc in ch 3 loop, ch 3, skip 2 sts, dc in next st, ch 3, *sc in next ch 3 loop, ch 3, skip 2 sts, dc in next st, ch 3* repeat ** around, on last ch 3, instead of ch 3, ch 1, dc to 3rd stitch of starting ch 6 loop. (36 spaces)
Round 11: ch 1 (doesn't count as first st), sc in space, ch 5, *sc in next sp, chain 5,* repeat ** around until last ch 5, ch 2, dc in first sc.
Round 12: Repeat Round 11
Round 13: ch 1 (doesn't count as first st), sc in same place, ch 3, *sc in next loop, ch 3, * repeat ** around, when you reach last ch 3, ch 1, dc in first sc.
Rounds 14-16: Repeat round 13
Round 17: ch 1, sc over elastic band, in same loop, sc around elastic band, repeat all the way around, 2 sc in each loop over the elastic band. (72 sts), sl st to join. Break off, weave in ends. Push down stitches as you need to, then when it's all done, redistribute the stitches evenly around the elastic band.
To wear it, I don't like putting my hair in a pony tail if I can avoid it, so I just hold it in place and twist it gently and form a cinnamon roll bun, then I hold the bun with one hand, and pull the cover over it with the other and slide a stick through weaving it in my bun and through the cover to hold it all securely in place.

Friday, May 1, 2009

Crocheted Pineapple Nano Pouch


I use pouches for my nano at the gym because they are easy to wash, and they don't get in my way like an armband does when I'm working with resistance machines or free weights.

Size 10 crochet cotton
I used a size 8 hook, but worked a bit loose, a size 7 may be better. Check gauge after first 5 rounds. It should be 1 7/8 inches across the bottom and 3/4 inch long. I used a chain then slipstitched that for the foundation chain because I like the way it looks and holds up better that way. I turn the chain on it's side and work the front and back through two loops like you do with just flat crochet. The reinforcement seems to help all my bags not stretch and get that lacy look at the bottom.
5/8 inch button- I actually stacked one button on top of another button because I liked the way it looked.
Tapestry needle that the cotton will fit through.

Chain (ch) 16, slip stitch (sl st) into second chain from hook and sl st down length. Foundation chain made.
Round 1: Ch 1, does not count as first single crochet (sc). Sc in same stitch, sc on one side of the chain in each stitch (15 sts) then sc down the other side of the foundation ch. Sl st to join (30 sts)
Round 2-4: Repeat round 1
Round 5: Ch 3, double crochet (dc) in next st, ch 2, skip 2 sts, dc in next 2 sts, ch 3, skip 3 sts, dc in next 2 sts, ch 2, dc in next 4 sts, ch 2, skip 2 sts, dc in next 2 sts, ch 3, skip 3 sts, dc in next 2 sts, ch 2, dc in next 2 sts, sl st to join.
Round 6: Ch 3, dc in next st, ch 2, sc in ch 2 space, 5 dc in ch 3 space, sc in ch 2 space, ch 2, dc in next 4 sts, ch 2, sc in ch 2 space, 5 dc in ch 3 space, sc in ch 2 space, ch 2, dc in next 2 sts, sl st to join.
Round 7: Ch 3, dc in next st, ch 2, *dc in next dc, ch 1,* repeat ** 3 times, dc in next dc, ch 2, dc in next 4 dc,st, ch 2, *dc in next dc, ch 1,* repeat ** 3 times, dc in next dc, ch 2, dc in next 2 dc, sl st to join.
Round 8: Ch 3, dc in next st, dc in ch 2 space, ch 2, sc in ch 1 space, ch 3, sc in ch 1 space, ch 3, sc in ch 1 space,ch 3, sc in ch 1 space, ch 2, dc in ch 2 space, dc in next 4 dc, dc in ch 2 space, ch 2, sc in ch 1 space, ch 3, sc in ch 1 space, ch 3, sc in ch 1 space,ch 3, sc in ch 1 space, ch 2, dc in ch 2 space, dc in next 2 dc, sl st to join.
Round 9: Ch 3, dc in next 2 dc, dc in ch 2 space, ch 2, sc in first loop, ch 3, sc in next loop, ch 3, sc in next loop, ch 2, dc in ch 2 space, dc in next 6 sts, dc in next 2 dc, dc in ch 2 space, ch 2, sc in first loop, ch 3, sc in next loop, ch 3, sc in next loop, ch 2, dc in ch 2 space, dc in next 3 sts, sl st to join.
Round 10: Ch 3, dc in next 3 dc, dc in ch 2 space, ch 2, sc in first loop, ch 3, sc in second loop, ch 2, dc in ch 2 space, dc in next 8 dc, dc in ch 2 space, ch 2, sc in first loop, ch 3, sc in second loop, ch 2, dc in ch 2 space, dc in next 4 dc, sl st to join
Round 11: ch 3, dc in next 4 dc, dc in ch 2 space, ch 1, sc in loop, ch 1, dc in ch 2 space, dc in next 10 dc, dc in ch 2 space, ch 1, sc in loop, ch 1, dc in ch 2 space, dc in next 5 dc, sl st to join.
Round 12: ch 3, dc in each st around. (30 sts)
Round 13: Ch 3, dc in next st, ch 2, skip 2 sts, dc in next 2 sts, ch 3, skip 3 sts, dc in next 2 sts, ch 2, dc in next 4 sts, ch 2, skip 2 sts, dc in next 2 sts, ch 3, skip 3 sts, dc in next 2 sts, ch 2, dc in next 2 sts, sl st to join.
Round 14:Ch 3, dc in next st, ch 2, sc in ch 2 space, 5 dc in ch 3 space, sc in ch 2 space, ch 2, dc in next 4 sts, ch 2, sc in ch 2 space, 5 dc in ch 3 space, sc in ch 2 space, ch 2, dc in next 2 sts, sl st to join.
Round 15:Ch 3, dc in next st, ch 2, *dc in next dc, ch 1,* repeat ** 3 times, dc in next dc, ch 2, dc in next 4 dc,st, ch 2, *dc in next dc, ch 1,* repeat ** 3 times, dc in next dc, ch 2, dc in next 2 dc, sl st to join.
Round 16:Ch 3, dc in next st, dc in ch 2 space, ch 2, sc in ch 1 space, ch 3, sc in ch 1 space, ch 3, sc in ch 1 space,ch 3, sc in ch 1 space, ch 2, dc in ch 2 space, dc in next 4 dc, dc in ch 2 space, ch 2, sc in ch 1 space, ch 3, sc in ch 1 space, ch 3, sc in ch 1 space,ch 3, sc in ch 1 space, ch 2, dc in ch 2 space, dc in next 2 dc, sl st to join.
Round 17: Ch 3, dc in next 2 dc, dc in ch 2 space, ch 2, sc in first loop, ch 3, sc in next loop, ch 3, sc in next loop, ch 2, dc in ch 2 space, dc in next 6 sts, dc in next 2 dc, dc in ch 2 space, ch 2, sc in first loop, ch 3, sc in next loop, ch 3, sc in next loop, ch 2, dc in ch 2 space, dc in next 3 sts, sl st to join.
Round 18: Ch 3, dc in next 3 dc, dc in ch 2 space, ch 2, sc in first loop, ch 3, sc in second loop, ch 2, dc in ch 2 space, dc in next 8 dc, dc in ch 2 space, ch 2, sc in first loop, ch 3, sc in second loop, ch 2, dc in ch 2 space, dc in next 4 dc, sl st to join
Round 19:ch 3, dc in next 4 dc, dc in ch 2 space, ch 1, sc in loop, ch 1, dc in ch 2 space, dc in next 10 dc, dc in ch 2 space, ch 1, sc in loop, ch 1, dc in ch 2 space, dc in next 5 dc, sl st to join.
Round 20: ch 1 (does not count as first sc), sc in first 7 sts, chain 10, skip next st, sc the rest of the way around. Sl st to join. Ch 10 works as button loop.

Strap: Chain 180, count 7 sts from opposite side of button loop, sl st in that st, sl st back up ch and sl st to join at the start point. Break off thread.

Sew on button on the top of the other side opposite button loop.

I hope you enjoy this pattern!