Printing Tips

Check out my printing tips if you're having problems printing to the right size
If you'd like to support this site and all the free things I post- please check out my Don't Eat the Paste Mandala collection coloring book for 9.99 at Amazon.
Showing posts with label upcycling. Show all posts

Saturday, May 4, 2019

SEED Lab- Repairing a very special box that was damaged in the earthquake

Anchorage SEED Lab

Anchorage Museum won a competition for a Public Art Challenge from Bloomberg Philanthropies. 5 cities got 1 million dollars each for the challenge. Ours is the SEED Lab.

"SEED Lab, a center to bring artists, designers, engineers and community members together to propose solutions to climate change and related challenges." 
Today, as part of their opening ceremonies, they had a community workshop for repairing things. There was a lot going on. Screen printing, rubber boot repair, repairing poetry,  and the thing that caught my eye- repairing pottery.

In the earthquake, one of my mom's favorite boxes got it's lid broken. I saved the pieces, unsure what to do with them.

I was so happy to be repairing the piece that I didn't get the name of the woman who helped me. Whoops. Bad blogger!

But!! Also good blogger, because I'm going to explain how it was repaired!

This is what was there. They had a few pieces from thrift stores for people to break and learn how to repair using a method inspired by kintsugi- the Japanese art of repairing with gold.

This is the lid to my mom's box. 5 pieces, all there! Isn't that pretty and happy?

If you're going to try this- you'll need:

  • 5 minute epoxy- double syringe type (available in any hardware department) 
  • Mica or Pearl Ex Powder Pigments (affiliate link - like these Jacquard Pearl Ex Powder Pigments 32 color set ) 
  • something to mix the epoxy on- scrap of cardboard, disposable plate, etc
  • craft sticks
  • soft brush
  • deep bowl or pan with uncooked rice to hold pieces
  • rubbing alcohol
  • cotton swabs
  • craft knife
Now the disadvantage to this method is it's decorative only. Don't use it for anything that comes in contact with food. If you're using it for a fruit or candy bowl- line the bowl or use only wrapped candies. 

Advantage- it will work with glass, color availability and it's very affordable and easy. You can also practice with thrifted pieces. 

Figure out which edges you're going to put together first. Clean them with the alcohol and cotton swab to make sure no skin oils or dirt are on them. 


Put a small amount of the epoxy on your mixing surface- about the size of a nickle. You'll only do a little bit at a time because of the short open working time of the epoxy when mixed.Mix in a very small amount of the pearl powder or mica- about 1/8th of a teaspoon. 

Use the craft stick to spread a small amount on both edges you're connecting. Then line them up and press them together. A bit of the epoxy will ooze out. it's supposed to. Hold until they are tacky enough to hold together, put them into the rice to hold it. Make sure your glued seam isn't in the rice! 


After a few minutes, about 3 or 4 on a warm day or about 6 on a cold day like today, use the brush to sweep some of the powder over the oozed seam of epoxy. Let it set a few more minutes.

In a couple hours, use the craft knife to clean up any blobs. I had to cut off a few blobs on the bottom so the lid would fit properly on the box. 

Now with this piece, I did 2 sections of 2 pieces each. Also while I was working on it, we got a visitor to the table who was watching and asking questions! I told him the  history of the piece. That my mom had brought it with her when she came up to Alaska as a VISTA volunteer. It's Anchorage's Mayor Ethan Berkowitz!! (see my lid in the rice behind him?) 


The job I did wasn't perfectly neat, but it was, for me, perfectly right. When I showed it to William and TG (who were at a comic book convention and that's another post)- they were both very happy. They both said they want me to teach them this method to repair things. I'm glad they are happy with how it turned out. It's their history too. 


They were also upcycling shirts with fantastic silkscreens by local artists. I had one put on the back of the jacket I was wearing that says "Seeding Change" (I'll get a photo later) and did this shirt that I know TG is going to "borrow" at some point with a gorgeous salmon print. 


It was a very fun day. 

Tuesday, April 21, 2015

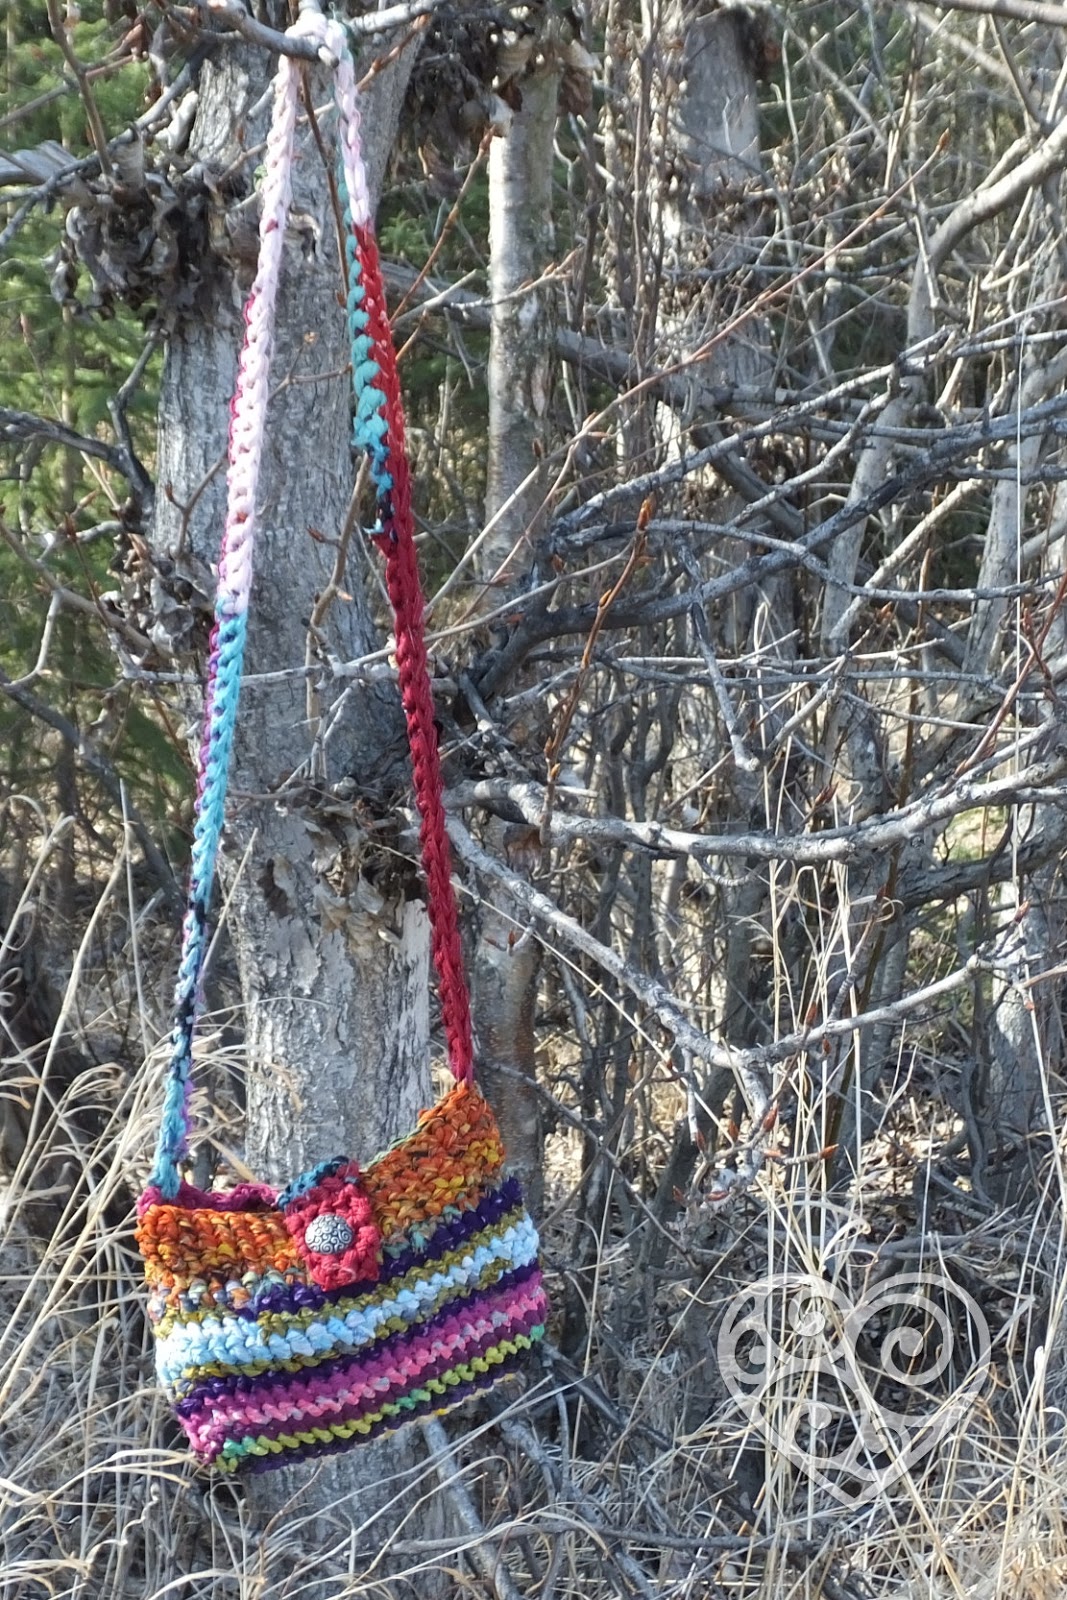
Recycled Chiffon Ribbon Purse

Darn Good Yarn - recycled chiffon sari ribbon purse
I'm wild for Darn Good Yarn's recycled yarn. This is actually the project that I originally ordered yarn for- a cross body hippie bohemian bag made in bright colors was just what I wanted. The bag is quite simple to make- it uses just chains, slip stitches and single crochets that show off the beauty and variations in the recycled yarn.

The purse takes just over 2 skeins of yarn- you can make it with 2 skeins if you do something simpler for the strap. You could make your own rag yarn, but the advantage to this yarn is that the thin chiffon makes a very workable yarn. The chiffon is sourced from saris and it's fair trade. I have this weird hangup about purses. Beyond preferring cross body and big enough for the stuff I carry daily, I also like recycled or upcycled. I buy my purses used, or handmade, or make them myself.

Click here for a discount on yarn! - the discount applies to your first purchase from Darn Good Yarn, and because of their amazing loyalty program, I'll get a credit to help pay for more pretty things from them! They have several assortments of the yarn used, it's more yarn than you'll need for this project, but that's good because I'll be posting a basket tutorial soon too and there are a lot of other things to do with the yarn. Check out the chiffon ribbon color packs. The color I used is Istanbul.

So first- some tips.


The yarn is going to have some natural variation. I noticed that some of the joins are stitched, and some are knotted. It also has raw edges that can unravel a bit. When you're balling it up, work a loose ball and don't use a ball winder. I wound center pull balls around my fist working nice and loose with a pair of scissors to trim long raveled edges as I wound. The skeins are easy to work with. One end is knotted, so you'll need to unknot it carefully when you reach the end. 

While you're crocheting, you may run across a join that's too bulky, just unknot it or clip it, taper the ends of the ribbons and tie a new overhand knot. Make sure you don't taper too narrow. It's so exciting watching the colors that are coming up next.  

The chiffon yarn is stronger than you'd think, it twists as you crochet into something like a ribbon rope.  You can use anything from a size K to a size Q hook easily with this- but since I wanted a purse that I may or may not line, I used a K for a nice tight stitch. 

Chiffon Ribbon Purse Pattern
American terminology

You will need: 
  • 2-3 skeins of Chiffon Ribbon Yarn
  • size K crochet hook
  • Yarn needle
  • Scissors
  • 1 inch button 

  • Ch=chain
  • sl st= slip stitch
  • st or sts= stitch or stitches
  • sc= single crochet


Chain 17 stitches, insert hook in second chain from hook and slip stitch to the end (this reinforces the bottom) 

Round 1: Ch 1 tightly (does not count as first sc) sc in first st, sc in next 14 sts, sc 4 times in end st, working down the other side, sc next 14 sts, 3 sc in end st, sl st to join (36 sts)
Round 2: Ch 1 tightly (does not count as first sc), 2 sc in same st, sc in next 14 sts, 2 sc in next st, sc in next 2 sts, 2 sc in next st, sc in next 14 sts, 2 sc in next st, sc in next 2 sts, sl st to join. (40 sts)
Round 3:   Ch 1 tightly (does not count as first sc), 2 sc in same st, sc in next 14 sts, 2 sc in next st, sc in next 4 sts, 2 sc in next st, sc in next 14 sts, 2 sc in next st, sc in next 4 sts, sl st to join (44 sts) 
Base formed
Rounds 4-17:  Ch 1 tightly (does not count as first sc), sc in same st, sc in each st around, sl st to join. Break off, weave in end. 

Strap: 
Chain 80-90 depending on the length you'd like. I like a longer strap so it hangs close to my hip. 
Sc in second chain from hook, sc in each st. 
Ch 1 to turn, sc in each st. Break off. 

Count back 2 sts from joining st on the bag, and stitch strap in place in next 2 sts. Count 20 sts from strap on one side, and join on the other side. 

Button hole tab- count 8 sts from strap on bag and join in yarn. Single crochet in that stitch and next 4 sts.
Rows 2-8: ch 1 to turn, sc in each st across
Row 9: ch 1 to turn, sc in first st, ch 2, sc in last st
Row 10-11: ch 1 to turn, sc in each st
Row 12: ch 1, skip first st, sc in next 2 sts, sl st in last st. Break off, weave in ends. 

Put the flap over the front and mark where to sew in button. Sew on button. I had a big shank on mine so I was able to use the chiffon ribbon. Otherwise just use strong thread or embroidery floss.

Darn Good Yarns Chiffon Ribbon Purse Pattern

I haven't decided if I'm lining it or not. If I do, I'll use one my husband's old, stained shirts to keep with the recycled theme, and possibly a salvaged zipper. My daughter saves zippers and buttons off the thrifted clothing she upcycles into costumes. 

Monday, September 15, 2014

Upcycled Briefcase into a Stenciled Art Case with FolkArt paints and stencils

How to stencil a stylish case for art supplies using FolkArt Multi-Surface paints #plaidcraft

This is a sponsored post, which means I got free products and paid for writing it. All opinions are my own and based on my experience. 

Getting the chance to use FolkArt Stencils and Paints for a project was a lot of fun. So first I'd like to talk about the supplies because they are incredibly nifty. Find FolkArt® stencils, paint and more at Michaels.


FolkArt Multisurface Paint- If you're a craft painter, you want this paint. It comes in a bunch of colors and some really gorgeous finishes. I got to use a pearl finish and some metallic finishes in my project. In 3 weeks it air cures on smooth surfaces like glass and ceramics, it works on plastic, on paper, on every surface that gets painted in my home. We are using it this weekend on some white cups, and possibly on some white blankets. As much as everyone in my family likes to upcycle, this is our new favorite paint.


FolkArt Stencils- laser cut precise stencils, these have perfect sharp edges that are smooth, lots of detail and are reusable. They also come in lots of trendy designs, like the jaguar stencil that I used.

FolkArt Stencil Adhesive- I love this stuff. You apply it to the back of your stencil- it daubs on. Then your stencil is lightly adhesive and won't move around. If you make sure to get the fine details that might come up when you pounce your paint on, they don't move either. Then you can peel up the stencil easily and it doesn't leave a sticky residue. Best part? Even if you're re-using the stencil in your project, you only have to apply it once. It stays sticky for a few uses.

So I had a lot of ideas, but decided on making the art case for my daughter because she can keep a lot of her supplies nice and neat in it. So many people have switched to using laptops and bags that briefcases are all over thrift stores and garage sales. They are perfectly designed for paper and art supplies with a hinged lid and rigid build to keep everything very flat. So you'll need to find a briefcase in good condition in a thrift store.


You'll also need your favorite paint applicators, foam plates and painter's tape. I used a larger sponge for stenciling and a foam roller. My photos show a sheet of vinyl for the first part instead of painters tape because the vinyl was damaged and convenient.

The colors I used are
Metallic 14K Gold
Metallic Bright Gold
Metallic Chocolate Brown
Mandarin Satin Pearl

So the first thing you'll do is block off the middle top of your briefcase.
Put some paint on the foam plate. I put on a few colors, starting with the golds, and adding a few small spots of the other two colors. Paint the edges of the case. Pull up the tape and let it dry.

While it's drying, daub the back of the stencil with the FolkArt stencil adhesive. After the FolkArt paint is dry, put the stencil in place in the center of the case.
You can tell that I tried out the stencil first! Make sure the small areas that might come up while your pounce are well adhered. Because of the texture of the case, using a nearly dry brush and going over it twice worked better than using a lot of paint and helped prevent bleeding into the texture. Pounce the brush, and shade your colors from lightest down to the bottom with darkest. As you can see, the stencil needed to be moved to finish. I let the paint dry, then put the stencil on the bottom to put in the last little bit.

The final step is the stripe edging. Make sure all your paint is dry before taping.
As you can see- I used just the gold for the inner stripe, and gold and brown for the outer stripe. The difference between the stripe and the edging is subtle and looks really good.

My daughter is thrilled with the case, and even my son said it looks neat. I think he plans to pinstripe a case for himself using the same colors. The finishes are so nice looking.

Want a LOT of great project ideas? Check out these links.
Check out The Plaid Palette blog
Sign up for their  newsletter
Follow on Pinterest
Like Plaid on Facebook
Follow on Instagram
Follow on Twitter
Watch Plaid on YouTube
Follow Plaid on Google+


Saturday, August 2, 2014

The Turnip Girl's newest costume

The Amazing Turnip Girl as The Winter Soldier - creative upcycled costume making

So The Amazing Turnip Girl has been working for weeks on a new costume. Now, if you've been following The Adventures of a Turnip Girl , you know that all her costumes are what's called "closet cosplay". It's an inexpensive form of cosplay that uses things that are easily available in creative ways. She's not casting rubber, or spending hours drafting patterns to sew. She starts with an idea, and heads to thrift stores and garage sales to pick up the pieces she needs. It takes a fair amount of creativity, and involves sees possibilities in the shapes of things. For this particular costume, the only brand new items in it are the buttons, spray paint, glue and a zipper.


The shirt is a lightweight sweater, that was modified heavily. she removed one arm to make room for the armor, and created tac style pockets for it and added a full length zipper. All hand stitched in. The knee pads were a huge find. She got those at a local garage sale- 50 cents for the full set of pads. The others are set aside for other costumes. The armor on her arm is made using paper mache, so is the knife and gun.

The glove was a good find too. She found that actually alone in my things and asked if I was going to do anything with it. Um.. not so much. A pair of gloves, I might crochet an edging for, but a lone glove? She happily took it.

All those straps? She bought a lot of belts. One was the wrong color, but a quick coat of paint fixed that! She used fabric to make a harness back piece for some of the belts. The holster and sheath are hand stitched from black vinyl.


She's getting really good at paper mache isn't she? 

The mask is paper mache glued to fabric. The star was stenciled on, using Frog Tape to get a really clean edge.

So in the process of working on this costume, we found out that part of Barnes and Noble's Pop Culture Nights was a Marvel night! She was excited, no waiting to wear her costume, she even had to hurry to finish it! There were a LOT of Captain Americas, it was hero night at B&N.

The Winter Soldier won, and people stopped and complimented her costume.

Friday, February 8, 2013

Book Review- Jeaneology


Jeaneology by Nancy Flynn is written for teens and has projects for recycling torn or old jeans into new things. Since my teenage daughter is a big fan of upcycling and sewing, it seemed like something she would enjoy.

I was right. It's written at a close to beginners level. The author does assume at least basic hand sewing skills, and that was my first very pleasant surprise about this book. We have a lot of sewing books, but most modern books focus strongly on machine sewing. They never seem to take into account young sewers like my daughter who can use a sewing machine but honestly prefers to sew by hand. The instructions are written so they can be used by both hand sewers and machine sewers. The beginning section includes useful information like explaining about bias tape and other tools you may need and how to pick the right hand sewing or machine sewing needles for working with denim.

The layout is image heavy with clear illustrations, and spiral bound with a heavy paper cover so it can lie flat. There is a full color photo of every project, and interspersed throughout the book are trivia, facts and tips about jeans. This was one of my daughter's favorite parts of the book.

The projects are well organized, starting with clothing in a chapter called Rocking Rags. Converting jeans into a maxi skirt or a mini skirt, making shorts and a great set of tips for distressing or customizing an existing pair of jeans. I absolutely loved the photo of the star stenciled jeans that were discharged using a bleach pen.

Mean Jean Accessories has headbands, gadget pockets and the nice big purse that's pictured on the cover as well as some great casual jewelry projects for making the most of even small scraps. This was my favorite chapter because it's a good way to use jeans your family gives you that are torn or stained.

Blues You Can Use has gift ideas and projects that are functional. This chapter had my daughter's favorite project, an oven mitt. It also has projects like coasters, place mats and a cute little key fob.

As a crafter, I love the ideas in this book for upcycling and using jeans. My daughter loved it just as much. The projects are a good mix of things to do with whole intact pairs of jeans and pairs that have seen better days. 25 projects total, all very well illustrated with good text instructions.

Published by Zest Books - Teen Reads with a Twist.


I received a complimentary copy of this book to review, I received no other compensation, and my review is my honest opinion of the book. You can read more about my review policy here.

Wednesday, June 27, 2012

Book Review- Improv Sewing

Improv Sewing by Nicole Blum and Debra Immergut is a collection of projects and patterns that you can make on the fly and sew using a standard sewing machine.

It's my favorite kind of sewing book. It doesn't depend on couture techniques or fussy cut detailed patterns. The patterns are made of simple lines and easy to create in the size you need. They leave some things unhemmed because knits don't come unraveled. Lots of embellishment techniques to create a look for yourself, your child or your home that's unique and artistic.

It starts with an introduction to fabric types and tips for sewing using a sewing machine with those fabrics, how to clip seams , use foldover elastic and ideas for thrift store shopping.

The instructions are very complete. If you're a novice sewer, you'll want to read through the chapters in order to understand how to put together the basic patterns before you get into the embellishments.

The clothes I wear the most are comfortable jersey knit skirts and dresses, and I like things that are easy to make and can be made with thrifted finds. Chapter 2 is Finding Your Fit- starting with how to take measurements, then using a well-fitting teeshirt your willing to cut up to use to make basic patterns. You will learn how to make a pattern for an a-line skirt that will fit perfectly with an elasticized waistband and how to make dress patterns with different necklines  using the teeshirt pieces. The patterns use jersey knits for easy sewing.

Chapter 3 is Five Basic Designs. While there are several projects for children in this book, these patterns are for adults. They explain different sleeve types, and the patterns are easy wear casual pieces with lots of style. Tunics that can be dresses and skirts that could easily become wardrobe staples. Two of the skirts use woven fabrics. My favorite is the three panel wrap skirt.

In Chapter 4, Ruffles, Pleats and Trims, you'll use your basic pattern pieces with techniques like ruffles, ruching, shirring, binding and pleats to make dresses and shirts. My favorite project in this chapter is a toss up between the very feminine ruffled dressy dress and the ruffled wrap.

Chapter 5, Lines, uses lines of thread machine sewn for embellishing. This chapter has some clothing, but it also has a bunch of great home accessories that also make good gifts. My favorite projects are the nesting boxes made of canvas with great contrasting thread details and the meandering cardigan made from an old long sleeve teeshirt.

Chapter 6, Doodling, Sketching and Writing, doodle stitching with your sewing machine. Creating images and designs, this chapter has an introduction which explains the basic method. There are great home decor projects in this chapter, as well as a tubular constructed sun dress with a nice detail of leaf embroidery. My favorite projects are the fiddlehead dress with it's delicately spiraled fiddlehead fern shapes, and the potluck dish cover.

Chapter 7, Applique, has both regular applique and reverse applique projects. The scarf from the cover is in this chapter. My favorite projects are the colorful All-Weather Applique Mobile, and the easy to sew Hoodie Scarf which also makes a wonderful gift.

Chapter 8 , Stenciling, one of my favorite techniques, these are freezer paper stencils for nice sharp lines. A monogrammed shaving pouch that makes a nice gift for men and a soft knit wrap skirt stenciled with an umbrella are my favorites from this chapter.

Chapter 9 , Beyond Fabric, is non-fabrics. Sewn paper, plastic, cork, Tyvek and vinyl. I love the pencil pouch that could be made using a favorite sketch and the wind spinner made from card stock.

Chapter 10 is Upcyling! One of my favorite things in the world. Felted sweaters make long mitts, cotton fabric from old shirts and dresses to make very pretty potholders and other wonderful projects. My favorite is the wrap skirt made from 3 men's dress shirts.

Chapter 11 is Instant Gifts, Instant Gratification, super quick to sew items that make great gifts for friends on short notice. These use techniques from the previous chapters to make small, fun gifts. The loose leaf paper machine stitched to look like notebook paper can be hand embroidered with your personal note. I like the idea of stitching that with something like "Michael + Shala= True Love 4-ever" for a newly married couple. The jersey shawl is really easy to make and customize and that's my other favorite project from this chapter.

It finishes nicely with the templates for the decorations, a resources list and a complete index.

Published by Storey Publishing.

I received a complimentary copy of this book to review, my reviews are always my personal and honest opinion. You can read more about my review policy here.

Friday, May 25, 2012

Recycled thread wrapped donut pendants

Recycled Thread Wrapped Donut Pendant

We don't have a Target locally anymore, and my medicine doesn't come with these nifty personal identification rings. A friend of mine who knows how much I love to craft with reclaimed things sent me a bag of them. 

They seem to be made of silicone, so the rings have some give. The base ring for the pendant above is blue. It's thread wrapped and color blocked, two popular trends. 

You will need:
A medicine personal identification ring
Embroidery floss in the colors you want
tapestry needle with an eye big enough for 6 strands of floss
scissors
cord

Cut a strand of floss that's at least 2 feet long, and tie it loosely around the ring.

Start wrapped the floss around the ring. You want to lay the wraps right against each other so they cover the ring completely. When you've finished the area you want to wrap, thread the needle with the floss, and then slide the needle between the floss wraps and the ring. Pull the floss under to lock it into place. Trim thread close, then tie the next color loosely on.
For the smaller wrap areas, rather than trying to neatly end off a small area, I added floss into one of the longer sections, holding a 2 foot length of floss and wrapping over it, then letting the end dangle until I finished the main color blocking.
After the ring was covered, I put the needle on the strand of floss and wrapped over a small section, then passed the needle between the floss and ring to come out in the next area I wanted a small wrap section.

It looks neater if you always go backwards through the section just wrapped, so that floss went back and forth a few times. The silicone has enough give that it worked well and didn't show very much.


Add a cord. The one I used has a simple overhand knot over the donut and sliding knots for adjustable length.


Tuesday, May 1, 2012

Recycled Bicycle Inner Tube Earrings

It's summer! Which means if you call your local bicycle shop, you can probably get lots of one of my favorite craft materials for free. Bicycle tire inner tubes.

My favorite use is making bracelets. This tends to leave some pieces too small to use. These earrings use small scraps, and are very lightweight.

To prepare your inner tube, you cut it open and use dish soap and a sponge to clean the rubber. The inside has a powder coating you'll want to clean off. Let it dry.

The tubes can be cut using hand punches, scissors or a craft knife.

You will need:

  • 2 6mm jump rings
  • 2 3 mm jump rings
  • a couple of inches of a bicycle inner tube
  • earring findings
  • pliers
  • 1/16 inch hole punch


For these earrings you'll need 2 sets of 2 strips. The shorter ones should be at least a half inch shorter than the long ones. Mine were about 3.5 inches long and 2.5 inches long.

My jump rings were made using 18 gauge round wire. For the bigger ones, I used a size 10 knitting needle as a mandrel, for the smaller ones, I use my round nose pliers.

Use a 1/16th hole punch to punch holes centered on each end of each strip.

Open the 6 mm jump ring, and thread on the long strip and the short strip, then the other side of the short strip and the other side of the long strip. Close the ring. Open the 3 mm ring and put it through the large jump ring and the earring finding. Close. Repeat the same steps to make the matching earring.

These are so fast and easy to make. They would make a fun gift for cyclists in your life, and hopefully inspire lots more ideas!


Friday, April 13, 2012

Upcycling Soda Can Flowers

These tiny flowers are so easy to make. My arrangement is in a tiny bottle.

You will need:
A flower punch- I recommend EK Success Paper Shapers Retro Flower Medium Punch
1/16th inch hole punch
Empty and rinsed soda cans
Wire- The wire that I used is also upcycled. It's part of a big bunch of telephone wire that I bought at a garage sale for 50¢- it's a tangled mess of lots of colors. If you don't have telephone wire handy, regular crafting wire, about 18-20 gauge will work.
Round nose pliers

Please exercise caution. This project is not appropriate for children because of the sharp edges of the cans.

Start by cutting open your can. The best way that I've found to do that is to use the tip of household scissors (not good scissors) to poke a hole just under the sloped top of the can. Cut off the top, repeat on the bottom, then cut down the length of the tube carefully. Flatten out the sheet.

Punch flowers from the can. You can get a lot of flowers from one can! Then use the hole punch to punch a small circle from the center of them. Just as they are now they would make fun sequins for decorating things like lamps.

Use the round nose pliers to curve or fold the flowers for a bit of dimension.

Cut 4 inch sections of the wire, and make a small leaf in the wire by making a loop and twisting it. Add a small loop with the round nose pliers a 1/4 inch from the top of the wire. Thread on the flower, and use the round nose pliers to make a spiral with the top of the wire to hold it in place.


Repeat until you have as many flowers as you'd like for your miniature arrangement. Trim them at different lengths to arrange them. For the wire around the neck of the bottle, I wrapped it a few times, twisted, then spiraled the ends around a knitting needle. I'll probably add more spirals to the arrangement to fill it out a bit.

handmade projects

Tuesday, March 13, 2012

Shampoo Bottle Case- upcycling project

I made this little case from an empty shampoo bottle to hold my shampoo bar for the gym. It's super simple to make!
You will need:

An empty, rinsed out shampoo bottle

  • craft knife
  • 1/2 inch wide elastic
  • needle
  • thread
  • pin -safety or straight pin
Take the cap off your bottle, and cut off the top part, from just under where the shoulders of the bottle start sloping in.
Now cut down the sides, after you've cut off the top, you can switch to strong scissors if it's easier. I think a craft knife is neater. Cut half way down the bottle on both sides, then across to remove the front section.

Flip it to the other side, and cut the flap. You'll want to bring it in past where the sides curve. The top of the flap can be cut however you want. I curved mine.

Cut out slots for the elastic- just over a half inch wide, and spaced at least a 1/4 inch apart.

Thread the elastic through the slots so it goes under the area between the slots and the rest is on the outside of the bottle.


Now close the flap over, and pull the elastic as tight as it needs to be to hold the case closed. Overlap the elastic and pin it, then trim it so there is a half inch overlap. Cut the elastic, and stitch the overlapped elastic closed. 

It's done! Just that easy.

Mine is for the gym, but I'm sure there are lots of other uses for these cases.