Printing Tips

Check out my printing tips if you're having problems printing to the right size
If you'd like to support this site and all the free things I post- please check out my Don't Eat the Paste Mandala collection coloring book for 9.99 at Amazon.
Showing posts with label hippie. Show all posts

Tuesday, October 22, 2019

Happy Face Coloring Page

Happy Face Coloring Page


I do hope you like this bit of whimsy. A Happy Smiley Coloring page!

You can click the images below to download it, print and color it.

Small jpg Happy Face coloring page:
Free printable happy face smiley coloring page available in jpg and transparent png formats. #Groovy #Hippie

Large transparent png Happy Face coloring page:
Free printable happy face smiley coloring page available in jpg and transparent png formats. #Groovy #Hippie


Affiliate link! Clicking this link will take you to Amazon for purchase, and I'll make a small amount off of that. Also this is one of my books. :) It's inspired by my mother.

If you like this coloring page, I recommend

Wednesday, January 17, 2018

Splotch Peace Symbol coloring page

Peace symbol coloring page- black available in png and jpg formats

After doing the Deep Waves printable boxes yesterday, playing with the same technique sounded like fun today.

I hope you enjoy this peace symbol coloring page available in JPG and PNG formats.

Click the images to download them, print and color.

small jpg version:
Peace symbol coloring page- available in jpg and transparent PNG

large transparent png version:
Peace symbol coloring page- available in jpg and transparent PNG


If you like this, you might like my Groovy Mandalas coloring book which is a heck of a deal right now.

Monday, July 25, 2016

Infinity mandala to color

Infinity mandala to color


One of the canonical tenets of Vulcan philosophy in the original Star Trek series is IDIC- Infinite Diversity, Infinite Combinations. In the series, this represented by a medallion designed by Gene Roddenberry that his company offered for sale. Read more here- Memory Alpha- IDIC

I used that basic concept as the inspiration for this mandala of two interlinked infinity symbols framed by twists which reinforce that, a star, and the rays design. I like the idea that no two colorists are going to use the exact same colors, that there are so many ways to color this in and so many different visions and ideas for the best colors to use on any coloring page. That there is no one right way, but rather, as many right ways as there are colorists. It appeals to the hippie in me, that there are so many things that are right for individuals and that it doesn't have to be done the same way for everyone.

So click the images below to for large versions of this infinity mandala to color! I hope you enjoy it.

Small jpg version:
Double infinity mandala to color- available in jpg and transparent png formats

Large transparent png version:
Double infinity mandala to color- available in jpg and transparent png formats


Tuesday, May 12, 2015

Festival Bun Cover- Photon Yarn

Recycled Silk Bun Cover Pattern

I'm so wild for this yarn, and the long bohemian fringe of it hanging from this bun cover.

The bun cover is actually made in 2 parts. The cover is one, and the fall is the other, so you can wear it without the fall. The yarn is Darn Good Yarn's Recycled Photon Rainbow Sport Weight Silk Yarn.
(check out this bracelet pattern in the same yarn)

To make this festive bun cover you will need:

  • 2 thick no metal hair elastics
  • Recycled Photon Rainbow Sportweight Silk Yarn
  • Size G hook
  • Yarn needle
  • Scissors

Stitches=

  • ch=chain
  • sc= single crochet
  • dc=double crochet
  • sl st= slip stitch
  • st or sts= stitch or stitches
  • repeat ** means repeat the instructions between the asterisks.


American terminology

Bun cover:
Ch 8, sl st to join
Round 1: Chain 1 loosely (counts as first stitch), 11 sc in ring, sl st to ch 1 to join (12 sts)
Round 2: Ch 5 (first dc and ch 2), *dc in next st, ch 2, * repeat ** 10 times, sl st to 3rd st in beginning ch 5 to join (12 spaces)
Round 3: ch 1 loosely, 2 sc in space, *sc in next st, 2 sc in space*, repeat ** 10 times, sl st to first chain to join (36 sts)
Round 4: Ch 5, skip 2 sts, *dc in next st, ch 2*, repeat ** 10 times, sl st to 3rd st in beginning ch 5 to join. (12 spaces)
Round 5: Repeat round 4
Round 6- Hold hair elastic against the last round, and single crochet over the hair elastic into the stitches on the last round to encase and attach the elastic. Sc in each stitch around, sl st to join. Break off, weave in ends.

Hair fall-
Cut 18 lengths of yarn twice as long + 2 inches as you want the fall to be. Working with 2 strands at a time, pull them through the other elastic and tie in overhand knot close to the elastic.


To wear it, you make your bun- I just twist a section of hair up and hold it in place while slipping the bun cover over, then hold the bun cover in place while putting the fall over it. Slip a nice hair stick through weaving it into your bun to lock it into position.


The bun cover above is made with Darn Good Yarn's Chiffon Ribbon, and I'm giving the pattern to them exclusively. Follow Darn Good Yarn and Shala's Beadwork and Printables on Facebook to find out when it's posted! (I'll also update this entry then) 


Saturday, April 18, 2015

Swirled Peace Coloring or Doodling Page

Swirly colorful peace symbol- also available blank for coloring

I hope the doodlers will enjoy this as much as the colorists! It's the swirly peace symbol that I used on this printable box- Swirly Peace Symbol box

Click the images for larger versions to color-
Small JPG version:
Swirly peace symbol for doodling or coloring- available in transparent png as well

Larger Transparent PNG version:
Swirly peace symbol for doodling or coloring- available in jpg as well

If you like this- check out my coloring book! It's full of peace symbols, lava lamps, doves and beads!


Saturday, April 11, 2015

Darn Good Cuff Bracelet Tutorial (crochet)

Darn Good Cuff Bracelet- a bracelet made with recycled sari silk yarn

I love recycled sari yarn. It has all the things my little hippie heart adores. It's recycled from saris, it's silk!, it's got all sorts of colors and fun texture things going on. A lot of people like it but then don't know what to do with it. It's almost too much goodness. I didn't have that problem with this skein because I ordered it knowing it was going to be bracelets and accessories.

The company that sells it is Darn Good Yarn- and if you use my link, you'll get a coupon for a good savings and I'll get a credit on my next order. Win win right? Then you can refer your friends and they can get a coupon and you can get credit. Awesome loyalty program.

This is the yarn I bought from them in my first order and what I plan to do with it. The 4 skeins on the right hand side are a chiffon ribbon yarn that I'll be using to make a purse. The one in the forefront is the Recycled Photon Rainbow Sport Weight Recycled Silk Yarn that I used to make the bracelet above.

So the bracelet is simple enough to make. It's single crochets, chains and a pretty button. The yarn has so much going on that I wanted to simply show off the yarn. The problem is, because of the length of color changes, simply crocheting back and forth didn't work. It just made stripes instead of the sort of organic shape color changes I wanted. You can see my bracelet on top in this picture- and what it looks like working back and forth in the bottom picture.
So to get the color changes, I worked in 2 directions.

Darn Good Cuff Pattern:

You'll need a size D or E hook

  • 1 skein of sport weight recycled sari silk yarn
  • Large needle for weaving in ends
  • attractive/8ths to 7/8th inch button
Chain 4
Row 1: sc in second chain from hook, sc in next 2 chains
Row 2-32: Ch 1 to turn, sc in each st (3 sts)
(adjust rows as needed for size. You want it to fit with an inch of overlap for the button) 
Switch direction! 
Row 34: Ch 1, working down the long side, sc in next 2 sts, ch 3, skip 3 sts, sc in the rest of the sts
Row 35-37: ch 1, sc in each st down the length

Round 1: ch 1, sc in st, sc down length, 3 sc in corner, sc across end, 3 sc in corner, sc down length, 3 sc in corn, sc across end, 2 sc in last st, sl st to first sc of round to join.  Break off

Weave in all ends.  Stitch button on opposite side of button hole. I just used some of the yarn.

The yarn is very strong, and very crisp feeling. It looks kind of like jute twine, but it's very soft to the touch with a nice amount of structure. You can gently handwash finished pieces, lay flat to dry. If you want your finished item softer, putting it in a dryer on delicate/low heat for a few minutes will soften the yarn.  One skein will make a lot of small projects like this with 147 yards per skein.


Thursday, March 26, 2015

Groovy Paper Pendant

Instructions for a tie dye effect done with nail polish and templates for hand cutting or Cricut

Groovy right? Like I said before, I love peace symbols jewelry, but prefer handmade ones. The neat thing about this project is that you probably have all the supplies on hand.

There are 2 methods- I used the Cricut Explore Air to cut my pieces of peace (tried to resist the word play, failed.) The Cricut Explore Air is really nifty. It does all the wonderful things that the Cricut Explore does, it cuts, it draws, it embosses and scores, it uses the same online Design Space which makes it easy to upload your own images and cut, draw, emboss them. It has the same print and cut feature which let's you use your home printer from the interface to print a design then cuts it. But it's not chained to your computer- it works with Design Space application for iPad. I tried it! Sign in and all the stuff you have is still there. Cartridges you've loaded to your account, your own images, library items and things you've purchased, all there on the app. One of the really nice things about Cricut Explore is that you don't need to use vectors to create your own shapes. Upload images and shapes from your computer. Erase stuff, put new stuff in it, add text, it's all super easy.

So okay, done being all fangirl about the Cricut Explore Air (except that I really, really do love it)

The other method is obviously cutting out the pieces by hand. It's pretty easy too.

So how to make this groovy tie dye effect paper peace symbol necklace?

You will need:

  • Card stock
  • Scissors 
  • Mod Podge!
  • Nail polish in several colors
  • Bowl of cool water
  • skewer, chopstick or fork
  • Ribbon
  • optionally- Cricut Explore or Explore Air
  • template
So you can print the template on cardstock. Size it to make the thickest peace symbol the size you want the finished pendant to be. You can fit 2 to a page for smaller peace symbols.

Or upload this image to your Design Space account, don't preserve the image, you just want the cutting lines. Upload it as a simple image. It's a transparent PNG so there won't be anything to clean up. 

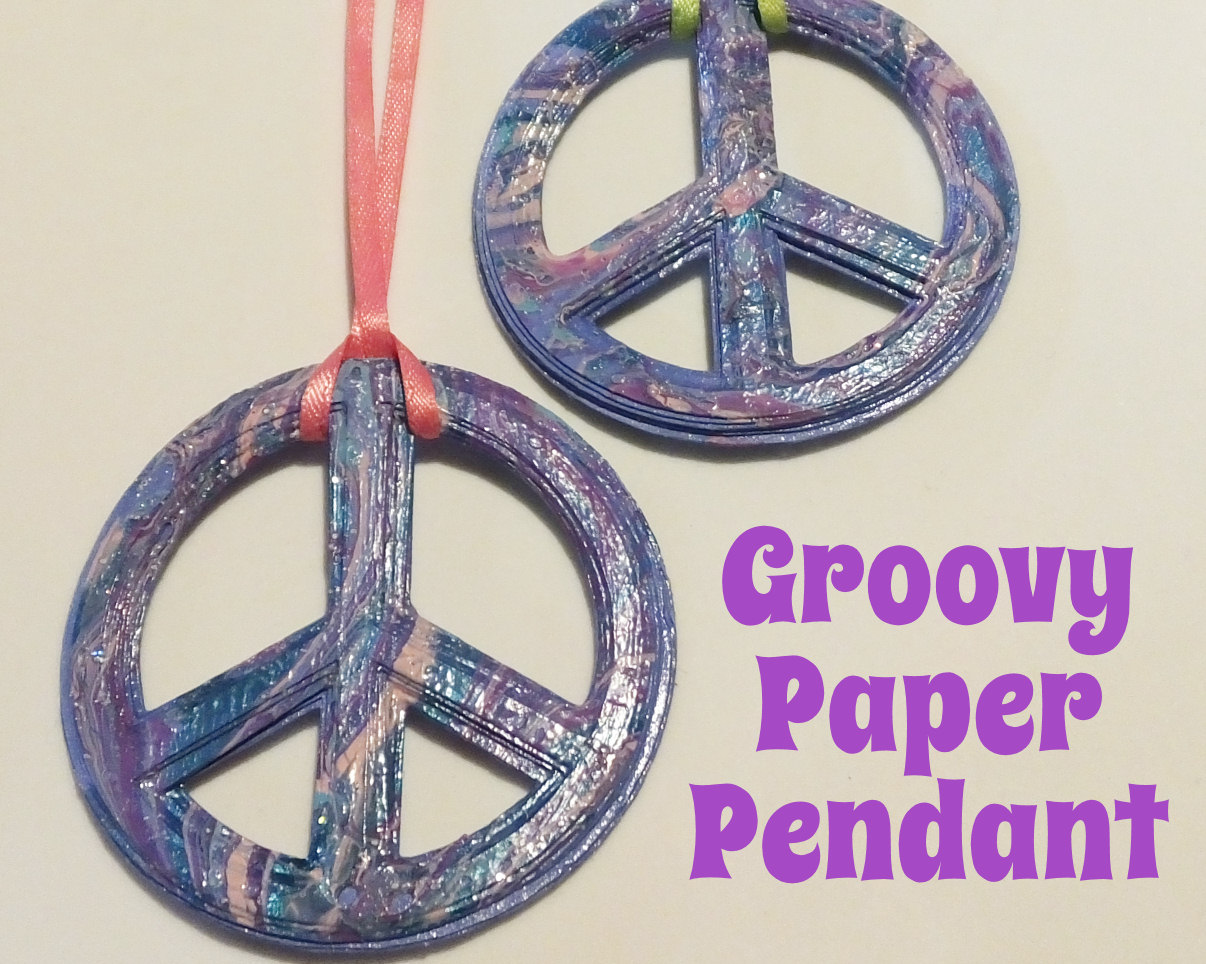
Cut your peace symbols. Glue them together from thickest to thinnest using Mod Podge. Getting them exactly centered isn't really necessary. I didn't, as you can see, I used blue card stock. 

Let the Mod Podge dry overnight, then do the back of the peace symbols and let that dry. 

Mod Podge IS water soluble, but getting it wet quickly and not letting it soak won't ruin a project. This is a good thing because the next part, the tie dye effect part, uses water. 

Water and nail polish!

Inexpensive nail polish is just fine for this project. If you want to make this a party project with friends, you can cut and glue a bunch of the peace symbols, 1 per friend, then have them each bring a bottle of nail polish. Using a few colors with good contrast works best.

Now grab a bowl and fill it with cool water, then open your nail polishes and drizzle them into the bowl. 

Yeah, really. 

Then I used a skewer to cut through the colors and swirl them.

Isn't that neat looking? Then you'll hold the paper peace symbol by the edge and quickly tap the whole front into the floating layer of polish. Lift straight out. 

Place it polish side up on a safe surface to dry, and if necessary use a bit of tissue to pull water off the piece. You don't want to touch the polish, just touch the corner of the paper to the water and let it wick it up. 

Let the nail polish dry. Put your ribbon on, add beads if you'd like! 

I was provided a Cricut Explore Air at no cost for review purposes for my non-biased opinion, I was not given any other compensation, and this is my honest opinion and experience. 

Amazon.com links help pay for my addiction to book and new cast iron pans for The Amazing Turnip Girl, so I appreciate it whenever people can use my links! 

Below is a link for the Cricut Explore Air Wireless Bundle, and my own coloring book full of peace symbols and other groovy things. 

Thursday, November 6, 2014

Home mandala to color AND Groovy Mandalas is available!!

First, the big news!! You can order and get copies of Groovy Mandalas NOW! I got some copies in the mail yesterday and will do a giveaway soon. But yay!! Groovy Mandalas is ready to order. The very last mandala in the book is my favorite one that I've ever drawn. It's complex, intricate, inspired by hippies like my mom and incredibly groovy.


Still hard at work at the color-by-numbers mandala book, but took a break to draw this mandala for you all.
Home is where the heart is mandala

Click the images below for larger versions to print and color. 
Small jpg version-
Home is where the heart is mandala to color in jpg and transparent PNG versions.

Large transparent PNG version-
Home is where the heart is mandala to color in jpg and transparent PNG versions.


Monday, February 3, 2014

Peace Mail Mandala to color

I hope you enjoy this design to color! It's sort of like a peace symbol chain mail sun catcher. I'd love to have the components to make something like this!

Click the images for larger version to print and color.

Small JPG version:
Peace symbol mandala to color- also available in transparent PNG format!

Large transparent PNG version:
Peace symbol mandala to color- also available in JPG format.


Wednesday, January 8, 2014

An easier, less expensive way to make yogurt

So lately, in between drawing lots of what are hopefully very groovy mandalas (another preview at the end of this)- I've been thinking of my hippie mom a lot and started making yogurt again.

Now I've always made yogurt just like she did. A bit of plain yogurt with live cultures from the grocery store or a freeze dried culture. But this time I decided to try something new (old!) for me- mesophilic heirloom cultures.

So why? Heirloom cultures can be used over and over again as long as you keep them happy and fed. They last indefinitely and have all sorts of interesting flavor and texture profiles. Why mesophilic? The cultures I've used before are all thermophilic- which means they needed steady heat to work. Mesophilic cultures work at room temperature. No more messing with a cooler and hot tap water, or filling one side of my sink with hot tap water and keeping track of the temperature over the course of the day. No thinking "It's time to break down and buy a yogurt maker". None of that. For mesophilic cultures- all I need are clean jars, coffee filters, rubber bands and lids.

I got a set of 4 mesophilic yogurt cultures and a live buttermilk culture from Wells of Health on Etsy - no affiliation, just a happy customer. You can also get them from Cultures for Health. I chose the seller I did based on a combination of factors- they had a ropey viili was one, another was shipping cost.

The cultures arrived- about a tablespoon of each one to mix with a cup of plain milk to make a mother culture from. So I set them all up and out by putting them in mason jars with a coffee filter rubber banded over the top. I placed them all over the house so the cultures wouldn't cross each other and would stay pure. Several feet apart is sufficient, but it also gave me a chance to figure out where the best place to culture was going to be. (turned out not to be the kitchen but in my laundry room!)

The next day, my daughter and I tried teaspoons of each culture. The flavors were fantastic and different. We put the lids on them, and put them on the fridge. To make yogurt- you mix 1 part yogurt culture with 8 parts milk or milk and cream mixed, then cover with something permeable like fabric or coffee filters and set out for 8-16 hours until set. You can tell it's set by tipping the jar and seeing if the yogurt moves like a liquid, or if it moves as a mass. If it moves as a mass, it's set and ready to be properly capped and put in the fridge. Reserve some of that batch to make your next, and flavor and eat the rest!

The viili is wonderful. The consistency is about like that of thinned glue or honey. It forms gorgeous long ropes off the spoon and it's entirely too much fun to play with- the flavor is pretty mild.
My personal favorite for flavor is the matsoni- it's a tart flavor that is going to be just grand frozen or with sweet berries and honey or dates added for sweetness
The piima is the perfect smoothie yogurt, and I think with the viili will be good as a frozen yogurt with a more ice cream type flavor profile. It's a bit like a drinkable cream cheese and another possible use is cheesecake flavored smoothies adding a bit of the matsoni. Will try later.
Fil mjolk seems to be the best bet for ice cream type froyo and it's the yogurt I'd suggest for people who don't much like yogurt. It's extremely mild and it's my personal choice for trying whipped first. I think it would be a good topping.

I use a little bit of cream when culturing, and also thicken the milk a bit with powdered milk for everything but the piima. The viili was William's favorite just because it's fun. My second culture of that turned out very ropey and reminded me of hot cheese on a pizza except that it was cold and yogurt-y! The Amazing Turnip Girl loved the Matsoni/Caspian Sea yogurt. But thinks the viili is good mixed with a bit of her homemade jam. She also agreed the texture made it a really fun yogurt. I plan to try that one with matcha to make a green Nickelodeon-like slime yogurt! But just a bit of vanilla and raw sugar tastes good mixed into the finished yogurts too.

I'm sold. I love these yogurts so much. It's so easy to make and share. I'm giving some of it with instructions for making to a friend of my mom's- so if anything does happen to my cultures, she'll have a backup for me!

I also talked to my favorite local potter about making yogurt cups. She's going to make me a set of 4 10-12 oz cups with lids that I can keep in the fridge, so my morning yogurt will be in something pretty. It deserves to be. Hopefully it's going to be a family heirloom.

As promised- another sneak preview of what I'm working on for the coloring book.


Saturday, January 4, 2014

Smiley Box

Groovy Happy Face #haveaniceday
Happy Happy New Year! Several days late. But I got fairly close on that deadline. Didn't quite make it, and asked for an extension and have my fingers crossed now. After doing lots of groovy things- I'm still enjoying it, so you all get a printable tie dye and smiley button effect box!
Click on the image for the larger version, print on card stock, cut out, score, fold, glue!
Smiley printable box by Don't Eat the Paste #printable #paper #groovy


I also celebrated my son's birthday- he was born on NYE. That was big fun. He made something with Alaskan snow crab and cream cheese that was pretty fantastic. He's going to fine tune the recipe and then I'll post it because it's that good. The 3rd was my deadline (EEP!), my anniversary, and the anniversary of Alaska becoming a state and of the day my dad arrived in Anchorage- exactly one year after Alaska became a state.

I'm also going to post a pattern soon for a crocheted bow and some book reviews!

Have a NICE day!

Sunday, July 28, 2013

Printable alien gift box

Groovy chibi alien
We are up to season 7 on X-files now. So an alien seemed like the thing to do. I hope you like this printable gift box!

Click on the image for a larger version, print on card stock, cut out, score folds, fold, glue!


Raspberries are ripening! Yum yum. More later. It's been an exciting week!

Monday, February 18, 2013

Peace and Love- Coloring Page

Peace and Love
This peace and love coloring page has lots of wide open space to color in. You can see how I colored it digitally above. I like the way the hearts and peace symbols entwine!

I hope you enjoy it!! Click the images below for larger versions.

Small jpg version:

Peace and love coloring page

Large transparent PNG:

peace and love coloring page

Saturday, August 4, 2012

Peace Symbol Knot to Color

Knotwork Peace Symbol

Yesterday I got a pleasant surprise when Hippie Peace Freaks on FB shared one of my images. Reading the comments just made me so very happy. Since I was tipped off when Celtic Trims reshared the image, it inspired me to draw a knotted peace sign.

I hope you all enjoy coloring it! Usual terms (or lack of them)- feel free to use the design for any craft purpose.
Click on the images for the larger version.
Small JPG version:

Large PNG version:


Tuesday, July 24, 2012

Printable peace symbol boxes- 2x2x2 inch cubes

The colors used for these are based off the Pantone Fashion color report for Fall 2012, not exact matches, the tones are different, but the shades are similar. Peace symbols because it's been a while since I did anything with them.

Click on the images for large versions, then print on card stock, cut, score, fold, glue!


Tuesday, January 26, 2010

On the subject of yogurt

 I posted instructions here for making yogurt from a starter.
Usually I make my yogurt using commercial yogurt as a starter. I'll do two batches. One from the original starter and when that's down to a half cup of plain yogurt, I start a second batch. Going too many generations can lead to a manky taste in yogurt. Look for plain yogurt that's milk and cultures only. I get a larger thing of it and package it up into half cup size portions I keep in my freezer for the next batch so out of one thing of yogurt I can culture an awful lot of fresh plain yogurt. I put it reusable containers and always flavor some, we use it in smoothies and make savory yogurts that can be strained to make labneh which is just marvelous as a sandwich spread. In the summer I puree it with fruit and a bit of honey and pop it in frozen pop molds to make frozen pops for my children. Just like my mom used to do for me!  You'd use a half cup of commercial plain yogurt in place of the starter, and increase the powdered milk to 3/4 c. because otherwise it won't get quite as thick. Runny yogurt works well in biscuits, smoothies and bread. If you don't want to buy half cup containers to freeze the starter, just put it in an ice cube tray and after it's frozen put the yogurt cubes in a bag in the freezer, then pull out 2 or 3 to use as a starter. That's how mom did it!
My children are wild for vanilla yogurt sweetened with maple sugar or honey.
If you have a dehydrator, you can make your own yogurt covered raisins. Flavor and sweeten your yogurt then strain it as for labneh which mean line a strainer with a coffee filter or cheese cloth and put in the yogurt. Put that over a bowl and cover it up with a plate and put it some place cool (fridge works) for 24 hours. A lot of the liquid comes out of it making a gorgeous thick cheese. Coat your raisins with that and put them in the dehydrator for a few hours. You'll want to keep these in the fridge because they aren't shelf stable but they do just fine in lunch/bento boxes, snack boxes for long car trips. The store bought kind have waxes and such in them, these taste a whole lot better and are probably better for you.

But you know? I still hate carob.

Book Review- The Hippie Handbook

The Hippie Handbook by Chelsea Cain, Illustrated by Lia Miternique
I have kind of mixed feelings about this book.
The author who grew up on a commune wrote a humorous and sweet book with some little snippets of autobiographical anecdotes and a lot of overviews of hippie type crafts and recipes. I laughed out loud at some parts remembering my own upbringing and seeing how my current lifestyle does reflect growing up the daughter of a hippie.
The projects include a macramé belt, how to tie dye, how to organize a political protest as well as several "How to cook like a hippie" recipes such as how to make tempeh and a recipe for a vegan chocolate cake. I was a little disappointed that the sprouting jars and homemade yogurt of my youth weren't in the book.
It's very basic, the illustrations are lovely and fun, and it is kind of funny. It's more a book for "daytrippers" than for people who really want to try living a hippie lifestyle, but she does include a good bibliography if you are really interested in the philosophy and lifestyle.

Every time she mentioned Native Americans I flinched though. I know that influence was strong in the hippie counterculture and with people who consider themselves hippies now but at the same time, the stereotypical images, like on the page giving ideas for murals "blissfully content Native Americans" just made cringe.

Did this review help you?

Books I liked more on similar subjects:
Virginia Gleser's Tie Dye- The How To Book. You can read my review here
The Illustrated Hassle-Free Make Your Own Clothes Book by Joan Wiener Bordow and Sharon Rosenberg. Don't be fooled by the clean cut girl on the cover. The original version had a completely different cover and it's a wonderful hippie clothes making book. You can read my review of that here and get some embroidery patterns inspired by this wonderful book.
Carla Emery's Encyclopedia of Country Living- no review because I'm not done reading it yet. This thing is huge with tons of information on how to live off the grid.
The Amazon links are affiliate links and help pay some of the costs of maintaining this site.

Friday, November 20, 2009

Imagine Peace Box


Today's MP3 album deal of the day on Amazon is John Lennon's Imagine for 2.99. Maybe the only song you know on it is Imagine, maybe not.
John Lennon has been my favorite singer for most of my life. I love the song Imagine, most people do, but my favorite song on that album is actually Oh My Love. John wrote some of the most honest and beautiful love songs ever, that's one of them. The whole album is wonderful though. Honesty and self examination is present in many of the songs like Crippled Inside and Jealous Guy, Gimme Some Truth is an angrier song than Imagine about war and politics.
Anyway, it just makes me happy that it's so inexpensive.
I hope you enjoy this box inspired by the cover of the album and the song Imagine.