Printing Tips

Check out my printing tips if you're having problems printing to the right size
If you'd like to support this site and all the free things I post- please check out my Don't Eat the Paste Mandala collection coloring book for 9.99 at Amazon.
Showing posts with label jewelry crafts. Show all posts

Sunday, October 25, 2015

Nearly Instant Halloween Accessories


Spider Bobby Pin Tutorial

I love this time of year. You can find all sorts of delightfully creepy things at the store, and shops open up just for Halloween.

I bought some very inexpensive spiders and bats to make accessories. The reason I got bright, colorful spiders is that they are less disturbing to the arachnophobe in my family.
To make the hair slides- the easy way is to use bobby pins that have a gluing pad. The thing is I don't actually like using those in my hair. So I did something a little different so I could use my preferred bobby pin type-

So for there easy spider hair pins, you will need:

  • Bobby pins 
  • Instant type glue (I used Krazy Glue)
  • White craft glue (I used Elmer's Glue All)
  • Craft felt
  • Plastic spiders with a largish body
  • scissors
Craft felt is made out of plastic, so are the spiders. Krazy Glue works great for bonding them together. Cut 4 strips per pair of spiders of craft felt that are about 1/4 inch wide and the length of the spider body. Glue one strip to the bottom of each spider. 
Spider pin tutorial 2

Slide the other strips into the bobby pins, and spread white craft glue on the craft felt on the spider, then press the strip in the bobby pin to the spider and hold for a couple minutes. Let the glue dry. 
Spider pin tutorial 3

Wow. See? Insanely easy. Now you could do a lot to the spiders before gluing them to the bobby pins. You could cover them in glitter, or use a plastic safe metallic spray paint on them. Make them as fancy as you'd like. 

Bat necklace!
Same thing, if you want, you can absolutely glitter or paint the bat. I went with plain black for mine. 
Bat necklace tutorial

So for this one- you will need
  • Plastic bats- they come in all sorts of colors. I have some that are neon green!
  • chain
  • 22 gauge wire- half hard if you have it.
  • round nose pliers
  • wire snips
  • 1/8 inch hole punch
So this is just as easy as the project above, and if you're a jewelry crafter- you might have the supplies on hand. I used some copper chain that I had, and bronze 22 gauge wire. Bronze is fairly hard compared to copper- if you're using a soft wire, lightly hammer the hooks before attaching them to the chain to harden them slightly. 

Punch a hole in the top of both wings with the hole punch. Then cut 2 1.5 inch pieces of wire and coil the top into a loop, then curl the rest into a hook with a little bit curled over at the end. 
bat necklace tutorial
Put one wire on each end of the chain, and slide through the holes in the bat wings. 


Back in 2011, I posted a project for Eyeball hair sticks using the plastic eyeballs that available this time of the year. That project is also an instant costume. Moms always have eyes in the back of their head! 
Eyeball hair sticks


Thursday, March 26, 2015

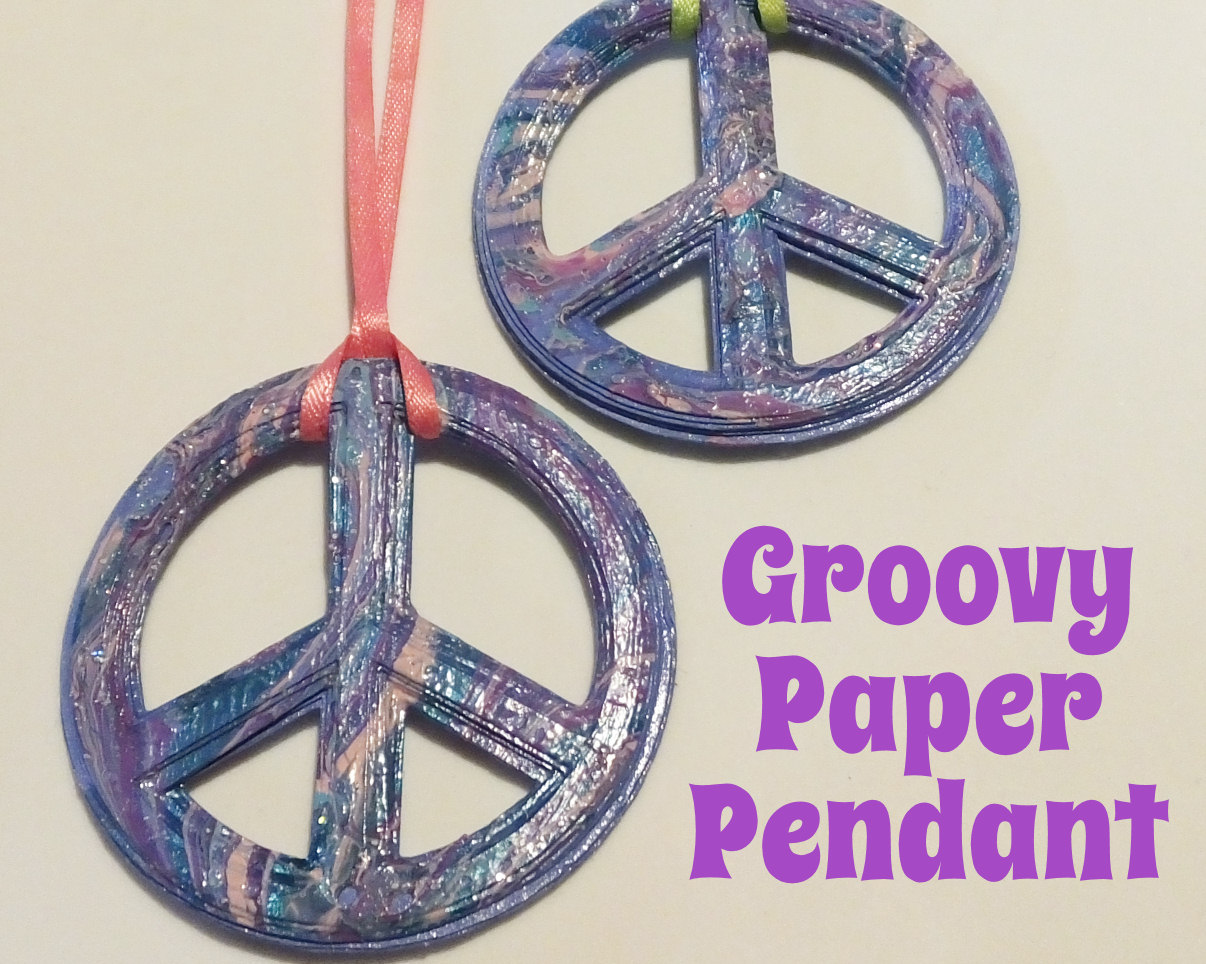
Groovy Paper Pendant

Instructions for a tie dye effect done with nail polish and templates for hand cutting or Cricut

Groovy right? Like I said before, I love peace symbols jewelry, but prefer handmade ones. The neat thing about this project is that you probably have all the supplies on hand.

There are 2 methods- I used the Cricut Explore Air to cut my pieces of peace (tried to resist the word play, failed.) The Cricut Explore Air is really nifty. It does all the wonderful things that the Cricut Explore does, it cuts, it draws, it embosses and scores, it uses the same online Design Space which makes it easy to upload your own images and cut, draw, emboss them. It has the same print and cut feature which let's you use your home printer from the interface to print a design then cuts it. But it's not chained to your computer- it works with Design Space application for iPad. I tried it! Sign in and all the stuff you have is still there. Cartridges you've loaded to your account, your own images, library items and things you've purchased, all there on the app. One of the really nice things about Cricut Explore is that you don't need to use vectors to create your own shapes. Upload images and shapes from your computer. Erase stuff, put new stuff in it, add text, it's all super easy.

So okay, done being all fangirl about the Cricut Explore Air (except that I really, really do love it)

The other method is obviously cutting out the pieces by hand. It's pretty easy too.

So how to make this groovy tie dye effect paper peace symbol necklace?

You will need:

  • Card stock
  • Scissors 
  • Mod Podge!
  • Nail polish in several colors
  • Bowl of cool water
  • skewer, chopstick or fork
  • Ribbon
  • optionally- Cricut Explore or Explore Air
  • template
So you can print the template on cardstock. Size it to make the thickest peace symbol the size you want the finished pendant to be. You can fit 2 to a page for smaller peace symbols.

Or upload this image to your Design Space account, don't preserve the image, you just want the cutting lines. Upload it as a simple image. It's a transparent PNG so there won't be anything to clean up. 

Cut your peace symbols. Glue them together from thickest to thinnest using Mod Podge. Getting them exactly centered isn't really necessary. I didn't, as you can see, I used blue card stock. 

Let the Mod Podge dry overnight, then do the back of the peace symbols and let that dry. 

Mod Podge IS water soluble, but getting it wet quickly and not letting it soak won't ruin a project. This is a good thing because the next part, the tie dye effect part, uses water. 

Water and nail polish!

Inexpensive nail polish is just fine for this project. If you want to make this a party project with friends, you can cut and glue a bunch of the peace symbols, 1 per friend, then have them each bring a bottle of nail polish. Using a few colors with good contrast works best.

Now grab a bowl and fill it with cool water, then open your nail polishes and drizzle them into the bowl. 

Yeah, really. 

Then I used a skewer to cut through the colors and swirl them.

Isn't that neat looking? Then you'll hold the paper peace symbol by the edge and quickly tap the whole front into the floating layer of polish. Lift straight out. 

Place it polish side up on a safe surface to dry, and if necessary use a bit of tissue to pull water off the piece. You don't want to touch the polish, just touch the corner of the paper to the water and let it wick it up. 

Let the nail polish dry. Put your ribbon on, add beads if you'd like! 

I was provided a Cricut Explore Air at no cost for review purposes for my non-biased opinion, I was not given any other compensation, and this is my honest opinion and experience. 

Amazon.com links help pay for my addiction to book and new cast iron pans for The Amazing Turnip Girl, so I appreciate it whenever people can use my links! 

Below is a link for the Cricut Explore Air Wireless Bundle, and my own coloring book full of peace symbols and other groovy things. 

Sunday, September 14, 2014

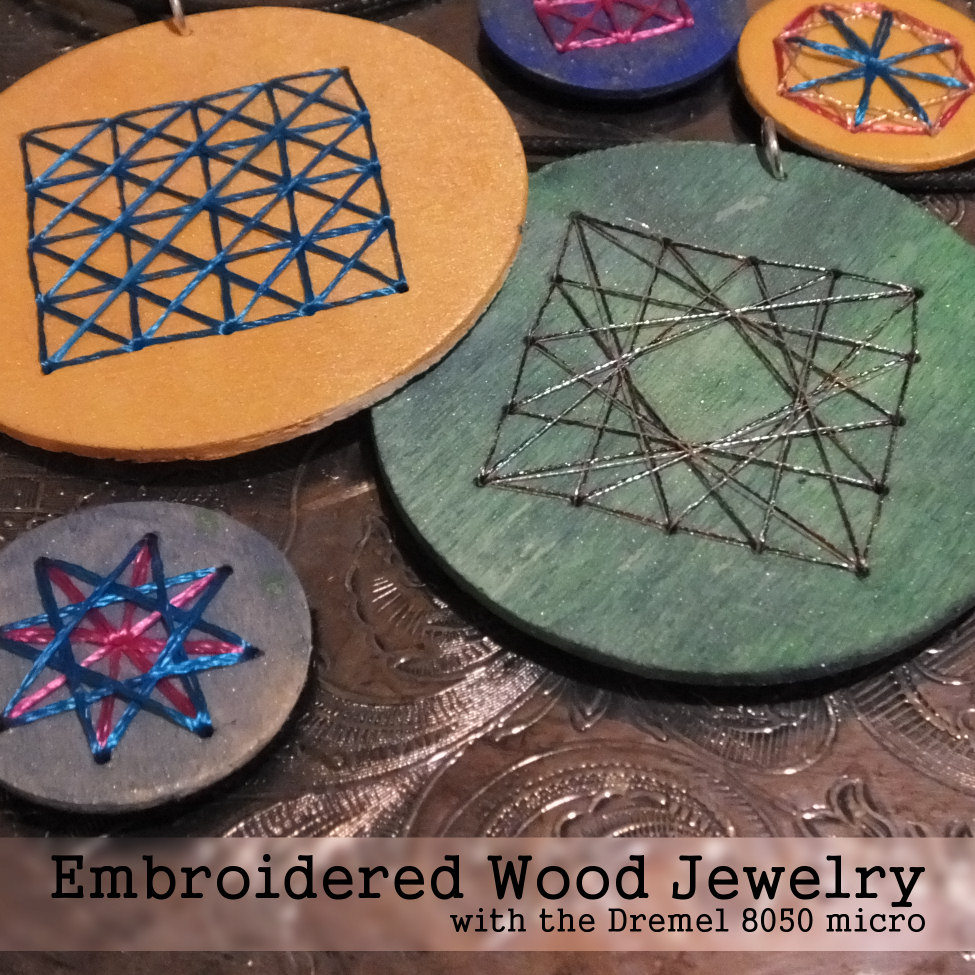
Embroidered Wood Jewelry using the new Dremel Micro 8050 (and why I LOVE this Dremel)


Embroidered Wood Jewelry tutorial using the Dremel 8050 Micro #MyBrilliantIdea #CleverGirls #sponsored
Dremel is awesome, you all know the. The first name in small power tools has the perfect new tool for crafters and hobbyists. The Dremel® Micro™ 8050 tool.

It looks like this, and it's available in all the usual places. Home Depot, Amazon, and it's 89 dollars USD.
So what makes it the perfect tool for hobbyists?

  • It works with standard Dremel bits, grinders, burrs and collets
  • Lots of power in a cordless that can be left on the charger until needed- it automatically stops charging when the battery is full. 
  • Light weight and ergonomic design is easy to hold and control
  • TASK LIGHT! When it's in use, it has a little directed LED that shines right on the project to really see what you're doing. 
  • It does everything you expect from your Dremel Rotary tool, it drills, grinds, sands, sharpens, engraves and carves
In fact, the only thing that's not perfect about it in my family is that we have only one. We plan to remedy that soon. My daughter loves it for making hard wood knitting needles. She whittles down to the basic shape for the point, then uses a sanding drum to finish shaping for a nice taper. My husband thinks it's the best thing in the world with a small collet and drill bit to put nice neat holes in leather without having to line up punches. Using the 8050 Micro, he can mark where the holes need to be then zip zip zip and they are done. My son likes engraving glass.
It's designed to fit well into small areas, and to work on small projects.

Check out Dremel on TwitterFacebook and Pinterest for lots of ideas and projects.

To make the jewelry shown, you'll need a Dremel 8050 Micro, a collet and 1/8th inch drill bit- both are available from Dremel, and if you want to bevel the edges, a sanding drum.
You will also need:
Wood disks, embroidery floss- this is a great use for specialty floss, paint, glue, needle to fit the floss, and jewelry findings. 

This is a good project for craft nights and if you pre-drill, a fantastic project to do with children because there are so many ways to embroider designs and paint the disks.


Plan your holes. I went with a couple layouts for the small disks, and one layout for the large pendant disks- I made marks on one of the wood disks.
Then instead of marking each disk, I taped a few together- these are fairly thin disks of wood. 
Then drilled the holes. So fast, so easy.
Now, you paint them. Remember to contrast the paint with the floss so the floss shows up well, and start stitching. The fun part is that the same hole layout can be used in different ways. 
Spread a layer of glue on the back to seal all the knots and thread. You can back the disks with paper, felt or even another disk. Then attach all your findings. I'm going to glue the small ones to barrettes and ring blanks. The large ones are fun pendants. 

Dremel wants to celebrate its fans’ brilliant projects, work and ideas! Now through October 12, share, tweet or post photos on Facebook, Twitter and Instagram that depict your brilliant ideas using the hashtag#MyBrilliantIdeaSweeps for the chance to win weekly prizes, including free tools and handmade gifts, or the grand prize: a custom-engraved Honda scooter and a Micro 8050. Visit www.facebook.com/dremel for rules and to learn more.

I was selected for this opportunity as a member of Clever Girls Collective and the content and opinions expressed here are all my own.