Printing Tips
If you'd like to support this site and all the free things I post- please check out my Don't Eat the Paste Mandala collection coloring book for 9.99 at Amazon.
Showing posts with label product review. Show all posts
Wednesday, January 3, 2018
Fresh Face Botanicals
If you’ve ever noticed, a lot of women get to a certain age with grace and laughter- there’s a secret to that.
The secret is that we have, out of necessity, learned not to take ourselves too seriously.
When you’re closer to 60 than to 30 you go through some changes.
You start growing hair in places you NEVER had it before and the last thing you do before leaving the house isn’t checking your teeth for lipstick, it’s checking your chin or cleavage to make sure nothing unexpected is there.
The hair that is where you expect it is not doing what you expect it to do. It’s suddenly wilder. It wants to stick up, or develops a wave, or it seems distributed differently.
Laughing too hard or sneezing is suddenly an act of courage in public.
Your skin changes.
If you’re like me, you wind up in that place between wrinkles and zits, with skin that is entirely too sensitive and prone to dryness for the things they make for teenagers, and too acne prone to use the stuff your grandmother used.
A friend that I trust very much developed a line of products that works hard, but gently.
My favorite thing in the Fresh Face Botanicals™ line up is the AHAmazing Exfoliating Facial Cleanser.
It’s gently exfoliating, it won’t scrape and tear delicate skin, but it does clean and smooth skin. Using it daily helps your skin look healthy and not dull. It’s got tiny microbeads of jojoba for scrubbing action, it has glycolic acid for exfoliation and revealing your best skin and pumping up the collagen (yay! Less lines apparent!), your skin feels soft, clean, and not dried out using this stuff. It rinses clean and easily.
You could get by with just this cleanser and the toner. Of course, using the whole line maximizes the benefit.
For bad hair days? My own method of dealing with them is using a bit of pomade and hair sticks to put my hair in an easy updo.
Most of my hair sticks are handmade, my current favorites are the willow hair sticks my children made for me, and will start making for sale soon.
Disclaimer: The owner of Fresh Face Botanicals is a personal friend. I did buy her products to try them out and this is based on my personal experience with them.
Thursday, March 26, 2015
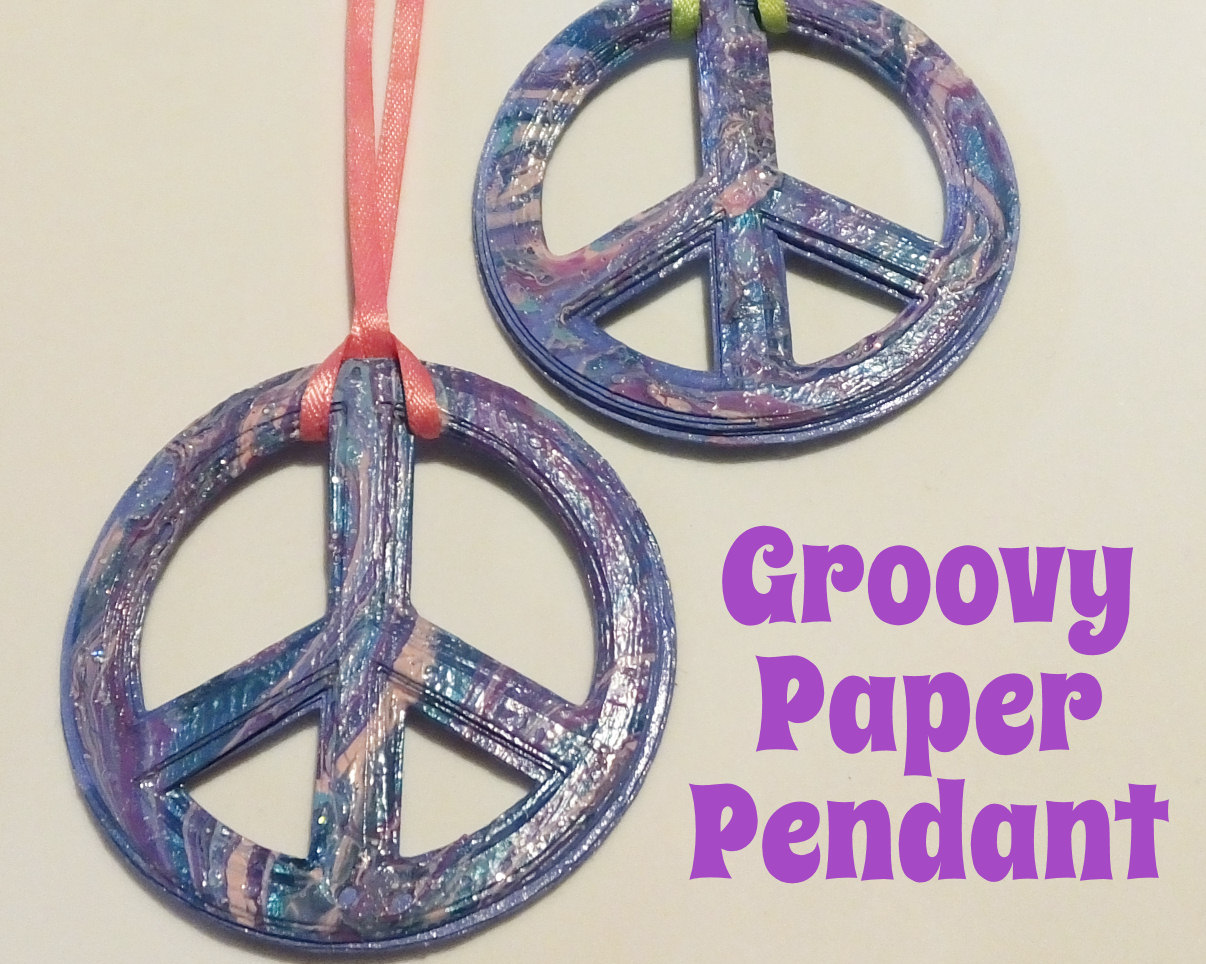
Groovy Paper Pendant
Groovy right? Like I said before, I love peace symbols jewelry, but prefer handmade ones. The neat thing about this project is that you probably have all the supplies on hand.
There are 2 methods- I used the Cricut Explore Air to cut my pieces of peace (tried to resist the word play, failed.) The Cricut Explore Air is really nifty. It does all the wonderful things that the Cricut Explore does, it cuts, it draws, it embosses and scores, it uses the same online Design Space which makes it easy to upload your own images and cut, draw, emboss them. It has the same print and cut feature which let's you use your home printer from the interface to print a design then cuts it. But it's not chained to your computer- it works with Design Space application for iPad. I tried it! Sign in and all the stuff you have is still there. Cartridges you've loaded to your account, your own images, library items and things you've purchased, all there on the app. One of the really nice things about Cricut Explore is that you don't need to use vectors to create your own shapes. Upload images and shapes from your computer. Erase stuff, put new stuff in it, add text, it's all super easy.
So okay, done being all fangirl about the Cricut Explore Air (except that I really, really do love it)
The other method is obviously cutting out the pieces by hand. It's pretty easy too.
So how to make this groovy tie dye effect paper peace symbol necklace?
You will need:
- Card stock
- Scissors
- Mod Podge!
- Nail polish in several colors
- Bowl of cool water
- skewer, chopstick or fork
- Ribbon
- optionally- Cricut Explore or Explore Air
- template
So you can print the template on cardstock. Size it to make the thickest peace symbol the size you want the finished pendant to be. You can fit 2 to a page for smaller peace symbols.
Or upload this image to your Design Space account, don't preserve the image, you just want the cutting lines. Upload it as a simple image. It's a transparent PNG so there won't be anything to clean up.
Cut your peace symbols. Glue them together from thickest to thinnest using Mod Podge. Getting them exactly centered isn't really necessary. I didn't, as you can see, I used blue card stock.
Let the Mod Podge dry overnight, then do the back of the peace symbols and let that dry.
Mod Podge IS water soluble, but getting it wet quickly and not letting it soak won't ruin a project. This is a good thing because the next part, the tie dye effect part, uses water.
Water and nail polish!
Inexpensive nail polish is just fine for this project. If you want to make this a party project with friends, you can cut and glue a bunch of the peace symbols, 1 per friend, then have them each bring a bottle of nail polish. Using a few colors with good contrast works best.
Now grab a bowl and fill it with cool water, then open your nail polishes and drizzle them into the bowl.
Yeah, really.
Then I used a skewer to cut through the colors and swirl them.
Isn't that neat looking? Then you'll hold the paper peace symbol by the edge and quickly tap the whole front into the floating layer of polish. Lift straight out.
Place it polish side up on a safe surface to dry, and if necessary use a bit of tissue to pull water off the piece. You don't want to touch the polish, just touch the corner of the paper to the water and let it wick it up.
Let the nail polish dry. Put your ribbon on, add beads if you'd like!
I was provided a Cricut Explore Air at no cost for review purposes for my non-biased opinion, I was not given any other compensation, and this is my honest opinion and experience.
Amazon.com links help pay for my addiction to book and new cast iron pans for The Amazing Turnip Girl, so I appreciate it whenever people can use my links!
Below is a link for the Cricut Explore Air Wireless Bundle, and my own coloring book full of peace symbols and other groovy things.
Monday, September 15, 2014
Upcycled Briefcase into a Stenciled Art Case with FolkArt paints and stencils
This is a sponsored post, which means I got free products and paid for writing it. All opinions are my own and based on my experience.
Getting the chance to use FolkArt Stencils and Paints for a project was a lot of fun. So first I'd like to talk about the supplies because they are incredibly nifty. Find FolkArt® stencils, paint and more at Michaels.
FolkArt Stencils- laser cut precise stencils, these have perfect sharp edges that are smooth, lots of detail and are reusable. They also come in lots of trendy designs, like the jaguar stencil that I used.
FolkArt Stencil Adhesive- I love this stuff. You apply it to the back of your stencil- it daubs on. Then your stencil is lightly adhesive and won't move around. If you make sure to get the fine details that might come up when you pounce your paint on, they don't move either. Then you can peel up the stencil easily and it doesn't leave a sticky residue. Best part? Even if you're re-using the stencil in your project, you only have to apply it once. It stays sticky for a few uses.
So I had a lot of ideas, but decided on making the art case for my daughter because she can keep a lot of her supplies nice and neat in it. So many people have switched to using laptops and bags that briefcases are all over thrift stores and garage sales. They are perfectly designed for paper and art supplies with a hinged lid and rigid build to keep everything very flat. So you'll need to find a briefcase in good condition in a thrift store.
You'll also need your favorite paint applicators, foam plates and painter's tape. I used a larger sponge for stenciling and a foam roller. My photos show a sheet of vinyl for the first part instead of painters tape because the vinyl was damaged and convenient.
The colors I used are
Metallic 14K Gold
Metallic Bright Gold
Metallic Chocolate Brown
Mandarin Satin Pearl
So the first thing you'll do is block off the middle top of your briefcase.
Put some paint on the foam plate. I put on a few colors, starting with the golds, and adding a few small spots of the other two colors. Paint the edges of the case. Pull up the tape and let it dry.
While it's drying, daub the back of the stencil with the FolkArt stencil adhesive. After the FolkArt paint is dry, put the stencil in place in the center of the case.
You can tell that I tried out the stencil first! Make sure the small areas that might come up while your pounce are well adhered. Because of the texture of the case, using a nearly dry brush and going over it twice worked better than using a lot of paint and helped prevent bleeding into the texture. Pounce the brush, and shade your colors from lightest down to the bottom with darkest. As you can see, the stencil needed to be moved to finish. I let the paint dry, then put the stencil on the bottom to put in the last little bit.
The final step is the stripe edging. Make sure all your paint is dry before taping.
As you can see- I used just the gold for the inner stripe, and gold and brown for the outer stripe. The difference between the stripe and the edging is subtle and looks really good.
My daughter is thrilled with the case, and even my son said it looks neat. I think he plans to pinstripe a case for himself using the same colors. The finishes are so nice looking.
Want a LOT of great project ideas? Check out these links.
Check out The Plaid Palette blog
Sign up for their newsletter
Follow on Pinterest
Like Plaid on Facebook
Follow on Instagram
Follow on Twitter
Watch Plaid on YouTube
Follow Plaid on Google+
Sunday, September 14, 2014
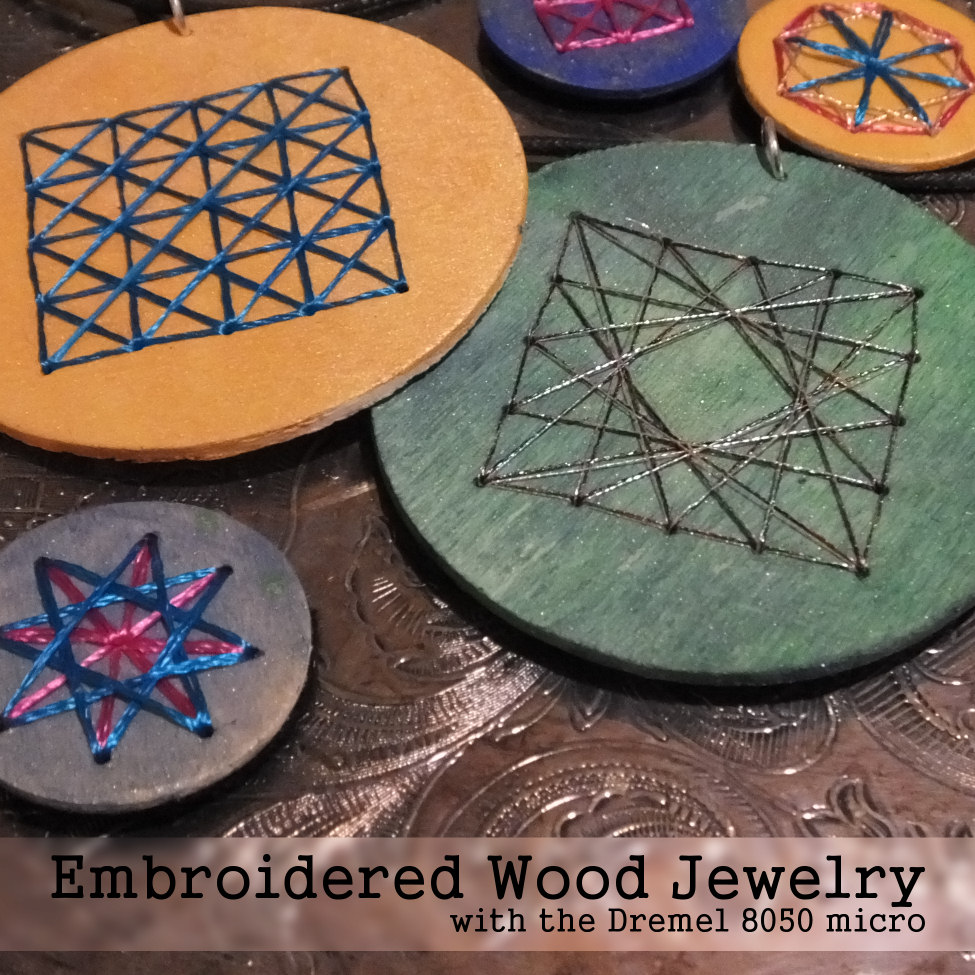
Embroidered Wood Jewelry using the new Dremel Micro 8050 (and why I LOVE this Dremel)
It looks like this, and it's available in all the usual places. Home Depot, Amazon, and it's 89 dollars USD.
So what makes it the perfect tool for hobbyists?
- It works with standard Dremel bits, grinders, burrs and collets
- Lots of power in a cordless that can be left on the charger until needed- it automatically stops charging when the battery is full.
- Light weight and ergonomic design is easy to hold and control
- TASK LIGHT! When it's in use, it has a little directed LED that shines right on the project to really see what you're doing.
- It does everything you expect from your Dremel Rotary tool, it drills, grinds, sands, sharpens, engraves and carves
In fact, the only thing that's not perfect about it in my family is that we have only one. We plan to remedy that soon. My daughter loves it for making hard wood knitting needles. She whittles down to the basic shape for the point, then uses a sanding drum to finish shaping for a nice taper. My husband thinks it's the best thing in the world with a small collet and drill bit to put nice neat holes in leather without having to line up punches. Using the 8050 Micro, he can mark where the holes need to be then zip zip zip and they are done. My son likes engraving glass.
It's designed to fit well into small areas, and to work on small projects.
Check out Dremel on Twitter, Facebook and Pinterest for lots of ideas and projects.
It's designed to fit well into small areas, and to work on small projects.
Check out Dremel on Twitter, Facebook and Pinterest for lots of ideas and projects.
To make the jewelry shown, you'll need a Dremel 8050 Micro, a collet and 1/8th inch drill bit- both are available from Dremel, and if you want to bevel the edges, a sanding drum.
You will also need:
Wood disks, embroidery floss- this is a great use for specialty floss, paint, glue, needle to fit the floss, and jewelry findings.
This is a good project for craft nights and if you pre-drill, a fantastic project to do with children because there are so many ways to embroider designs and paint the disks.
Plan your holes. I went with a couple layouts for the small disks, and one layout for the large pendant disks- I made marks on one of the wood disks.
Then instead of marking each disk, I taped a few together- these are fairly thin disks of wood.
Then drilled the holes. So fast, so easy.
Now, you paint them. Remember to contrast the paint with the floss so the floss shows up well, and start stitching. The fun part is that the same hole layout can be used in different ways.
Spread a layer of glue on the back to seal all the knots and thread. You can back the disks with paper, felt or even another disk. Then attach all your findings. I'm going to glue the small ones to barrettes and ring blanks. The large ones are fun pendants.
Dremel wants to celebrate its fans’ brilliant projects, work and ideas! Now through October 12, share, tweet or post photos on Facebook, Twitter and Instagram that depict your brilliant ideas using the hashtag#MyBrilliantIdeaSweeps for the chance to win weekly prizes, including free tools and handmade gifts, or the grand prize: a custom-engraved Honda scooter and a Micro 8050. Visit www.facebook.com/dremel for rules and to learn more.
I was selected for this opportunity as a member of Clever Girls Collective and the content and opinions expressed here are all my own.
Friday, August 15, 2014
It's so easy being green- tomatoes, jars and salsa (with a giveaway!)
You already know that we are big fans of Ball® jars and food preservation products. We use them for everything. Drinking glasses with their new lids, canning!! making yogurt and more recently making chia pudding.
Ball® sent me some really cool things to review, use and enjoy AND they are going to give away the same things to one lucky reader!
The Ball Blue Book® Guide is THE go to guide for food preservation. Between this book and a good extension service, you have a wealth of information ready to go for preserving your garden and summer market finds for the year.
The Ball® Heritage Green Jars are my favorite. It's hard to choose, because the Elite jars are so stylish, and last year's blue jars are my daughter's favorite color- but green is my favorite. Look how pretty that color is! This year they come in two sizes- pints and quarts.
The Herb Series
The Ball® Dry Herb Jars are really nice. If you grow herbs (and you should, it's so easy and can be done in containers)- all you do is hang them to dry, then after they are completely dry, put them in the jars. I like the jars because they are nice, wide and easy to fill compared to using standard spice jars and a funnel. They also have shaker tops. Those are the jars with the black lids, the green flips up to reveal generously sized holes for shaking crushed herbs into your recipes.
The Ball® 5 Blade Herb Scissors are really helpful for fresh herbs. If you look on top of the sheath for them, you can see some chives that I've chopped into nice small rings. Already to go into all sorts of summer recipes, they also work fantastically well for leafy herbs like cilantro.
At the end of this post, I'll tell you how you can win all these things, plus a Fresh Herb Keeper, and Ball® Frozen Herb Starters. The Ball® Fresh Herb Keeper is the ideal way to keep things like cilantro fresh in your fridge for a couple of days. Those leafy herbs that tend to wilt too quickly stay fresh and pretty enough to use for a garnish in the keeper, and the Frozen Herb Starters are silicone trays with lids that you can make frozen cubes that are ready for recipes. Put your favorite soup seasonings stock or water and freeze for fresh flavor that's ready to go, or you can use olive oil and other fats as well.
Ball® Canning and International Can-It-Forward-Day
Tomorrow, August 16th, there will be events across the Ball® Canning social channels. They are pretty nifty. A live webcast canning demonstration by Chef Hugh Acheson, a demonstration of how to make Pepper Jelly using the Ball® FreshTECH Automatic Jam and Jelly Maker (I have one, and love it, my daughter loves it even more), crafts, even more canning and recipes- check the link above for a complete schedule and follow Ball® on their social channels-
@BallCanning on Twitter, Follow BallCanning on Pinterest, like on BallCanning on Facebook
Did you see the little tomatoes in the photo above?
I have 8 beautiful tomato plants, and so far have had 2 red tomatoes. There are a lot of flowers, and a lot of green tomatoes. A quick search on FreshPreserving.com yielded this recipe for a salsa verde that uses the Ball® FreshTECH Automatic Jam and Jelly Maker. So easy, we have the cilantro and tomatoes in our garden, the rest of the fresh ingredients can be gotten at a farmer's market, and it will look gorgeous in those green jars.
So do you want to win everything I mentioned?
- Ball Blue Book® Guide
- Ball® Heritage Green Jars pint and quart size
- Ball® Dry Herb Jars
- Ball® 5 Blade Herb Scissors
- Ball®Fresh Herb Keeper
- Ball® Frozen Herb Starters
Leave a comment here or on my Facebook post
a Rafflecopter giveaway
Wednesday, August 6, 2014
Designing a quote bracelet with Cricut Explore
Recently I got a Cricut Explore to review and wow- I love this machine. What I like about it is how easy it is to use with my own graphics. I'm not limited by cartridges, and you don't have to use a vector program to design your own projects. Work in whatever program you're most comfortable in then create your project in the cloud based Design Space application.
The Cricut Explore will make very fine cuts easily. There is a huge library of shapes so if you don't want to draw your own, you can create projects using the shapes available. An inexpensive monthly membership gives you access to a lot of it, but I haven't really looked yet because yay! It cuts my own art easily.
So to make a bracelet using the Cricut, you will need a few things-
- the inner diameter measurement of a bangle bracelet that you like the fit of- in my case, I prefer larger, looser bangles that slide partway down my hand.
- graphics program
- 3 sheets of 12x12 card stock with at least 1 in high contrast
- cutting mat
- glue
- Mod Podge
- Cricut Explore!
- Internet connection to use Design Space
So if you have those things, you'll open your graphics program and start putting together your quote bracelet.
Start by drawing a circle that's the same size as you want the inner diameter of your bangle, then decide how thick you want your bracelet to be. Double that number and add it to the inner diameter to figure out the outer diameter.
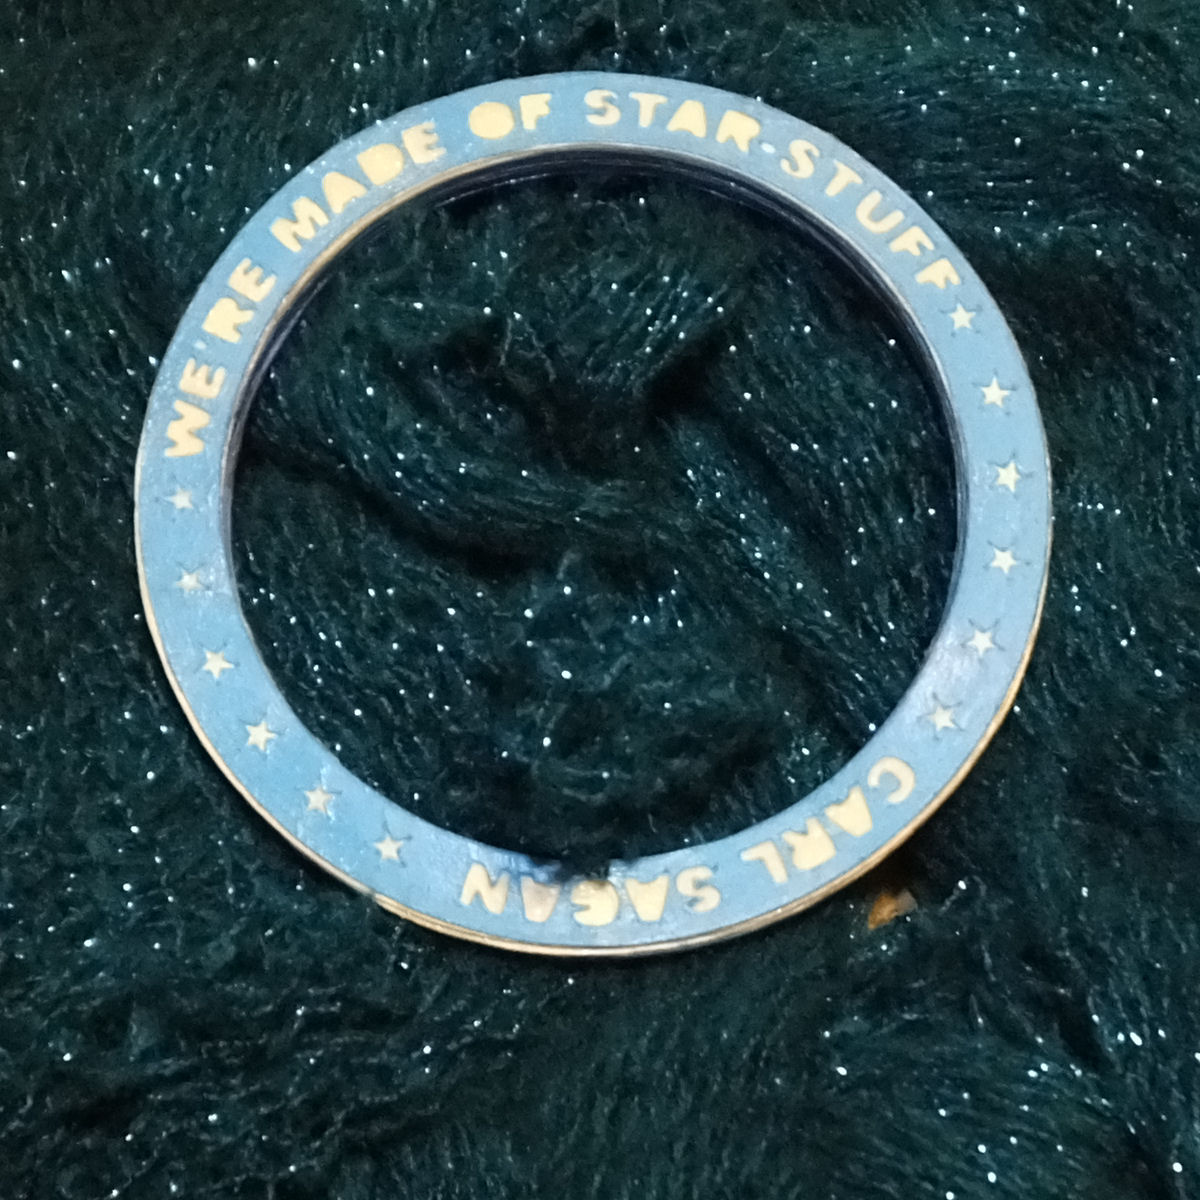
Then you're going to start placing your letters for the bracelet. I chose a short quote " We're made of star-stuff" with Carl Sagan's name at the bottom edge. You'll notice my guide lines in blue for centering the letters.
The little islands are going to be eliminated because it just adds to the cutting time and they won't be in the final project. I also added some stars.
So now it's time to create the rest of the pieces. The outside pieces are the ones with the quote, the rest are solid. So this is what my final layout looks like. It's a transparent PNG with pixel clean lines.
So then you upload it to Design Space, get it sized on the canvas, and cut it out of 3 sheets of card stock (and wind up with lots of circles that can be used in other projects)- Cricut has a bunch of YouTube videos that show exactly how to use Design Space.
After it's all cut out, you start gluing it together. This is what my final edge looks like with all the stacked layers. Use thin layers of glue to prevent warping!
After the glue is dry, cover it in Mod Podge and let the Mod Podge dry completely.
I'm having entirely too much fun with my Cricut Explore. Remember that wand and wizard hat mandala that I posted the other day? I used the components to make a decal for my husband's laptop.
Review item provided at no cost, this is my honest experience and opinion.
Wednesday, July 2, 2014
No-bake cultured cream parfait AND TG's rhubarb lemonade recipe
I know what we consider hot weather here is what a lot of you consider a nice day. But it's 70 today and that's a bit warmer than is comfortable. Baking on the 4th of July is NOT going to happen. But no bake desserts in jars? That's easy, cute and transports well.
So starting from the left- those are no-bake parfaits. There are a lot more berries than it appears and it's two of my favorites- strawberries and blueberries.
For 4 pint jars you will need:
To culture the cream:
1 pint of heavy cream
2 Tbsps plain yogurt- make sure it's just milk and cultures
A warm day- or a warm water bath
Put the yogurt and cream in a 1 qt jar, screw on the lid, shake once, then set in a warm place overnight. After about 12 hours the cream will be very thick when you tilt the jar. Put it in the fridge to chill.
Making the parfait:
Graham cracker crumble:
Melt 1/2 cup butter in the microwave if you absolutely can not stand the idea of turning on the stove (like me, seriously, 70 degrees is really warm for Anchorage)
Mix with 1 cup graham cracker crumbs (about 1 sleeve, crushed fine)
Rinse the strawberries and blueberries. I got a quart of strawberries and a pint of blueberries, there was some leftover for about a minute. Slice the strawberries.Put berries in the fridge until the cream is whipped.
Mix the chilled cream with 1/4 cup super fine sugar, 1 tsp vanilla and if you have it, 1 tsp Grand Marnier.
Whip the cream! With cultured creams, I've found my cream whipper does not work well, even if they are really cold. Whipping by hand with a whisk works great and an electric mixer would probably work too. I prefer the whisk because it's quiet and quick.
Put a few spoonfuls of the crumb mixture in the bottom of each of your jars, then put in a 1/2 inch layer of strawberries, add cream, add blueberries, add cream, continue alternating until it's nearly full, then top with more graham cracker. A nice addition is to fancy slice a strawberry so you can fan it out on top before putting the lid on.
Culturing the cream adds a delicious tangy flavor, and makes for a smooth, silk like cream. The crumbs and berries provide texture and flavor. My daughter likes to whip in some cocoa powder as well for hers because everything is better with chocolate.
Speaking of my daughter, she made lemonade and measured this time. For those of you living where you can consistently get good lemons, LUCKY!! We use lemon juice because it's more consistent.
Yes, I have jar love. I also have some of the newest products from Ball Canning to show off.
Using a 1 pint jar because Ball® jars are wonderful. They have measuring lines which makes it all so easy-
Put in 2 Tbsp of sugar
Pour in lemon juice to the first line,
Fill with cold water to the top line. Lid, shake well.
Now in your big 24 oz Ball® Mason Jar mug (you have one right? They are huge and nicely made!)
Slice up a 4 inch piece of rhubarb, add whatever other fruits sound good. She did! Then lots of ice. Pour the lemonade over the fruit and ice, and use a Sip and Straw lid and a wide mouth jar band.
The nice thing about doing it this way is that she can customize the drinks a bit. Like her dad likes it just like that, but she likes it more sour so she makes hers with more lemon, and a touch more sugar.
Another new product, like the Mason Drinking Jars, and the Sip and Straw Lid that's just really neat is the infuser.
This works with wide mouth jars- like the big Ball® Mason Drinking Jar (they do have a regular sized version of the drinking jar as well) or the tall Ball jars you use for things like asparagus. I love this. The Sip and Straw lids are NICE. They have reusable thick straws, perfect for smoothies and shakes. The infuser lid though, that's perfect for people like me that try to stay hydrated but like a little flavor. Shown above, it has rhubarb, blueberries and strawberries in it, but soon it will be raspberries from my yard. Yum. It has a drinking hole on top, and has a gasket for a tight seal. The basket is big enough for a nice amount of goodies.
The jars, the mugs, the drink lids are all available on their site- and it's been re-designed to be more mobile friendly.
The lids, jars and mugs were provided to me at no cost. No other compensation was given, and my love for Ball® Canning products is real.
Sunday, February 2, 2014
Yogurt and the Pretty Green Jar
![]() |
| I rigged up a white background to show off the green! |
If you've liked Ball® Canning and Recipes on Facebook (and you should!)- then you've seen the announcement that while the limited run of blue jars is ending, they are starting to make GREEN jars. Even better? These come in both pint and quart sizes and really are just that pretty. They are Heritage Collection jars, and inspired by the Ball Perfection Jars. The are manufactured to the normal high quality of Ball jars and absolutely gorgeous. The color is fantastic, the lid sizes are also standard so the rings, plastic caps and accessories you have will work with these jars.
Pre-order Spring Green Jars
I love the Heritage Blue jars and blue is my daughter's favorite color. Green is my favorite color, so I'm just thrilled with the new release. If you really love the blue, you have a limited window to buy more before they are gone.
The jars shown are the quart sized Heritage Collection green jar and the Ball Collection Elite half-pint. The yogurt shown is Viili.
Viili is:
mesophilic- which means that it sets at room temperature, no heat necessary
heirloom- which means that the culture itself can be reused and shared indefinitely.
Ball® pint and quart jars are perfect for making yogurt using heirloom cultures. Why? Because it makes it even easier. My son uses a Heritage blue pint jar for his yogurt. He makes a batch, puts it in a bowl, washes the jar, then puts back in two spoonfuls of yogurt. He tops that with milk and then puts a plastic cap on it to shake it up and mix in the yogurt. Takes off the cap and puts a coffee filter on top of the jar, and then adds a canning band to hold that in place. Sets it out on his counter top until it's set and fixes two 1 cup servings of yogurt for himself. He uses the yogurt both sweet with fruit or extracts, or adds savory spices to use it as a dip or topping.
Using the quart jar, you'd put in a 1/2 cup of your finished yogurt to start your next batch. When it gets low, I measure what's left in a measuring cup, wash the jar and start the next batch. I like plastic caps for jars after they are opened. It saves wear and tear on rings to store them properly, and the caps are inexpensive, washable and reusable.
There are a few kinds of mesophilic cultures, so it's about finding the one you like best. Piima is lovely in smoothies and has a cream cheese flavor that works well with cream added to the milk. Matsoni/Caspian Sea yogurt is very tart, Viili is mild with a neat ropey/jelly like texture, Filmjolk is the yogurt I recommend to people who don't really like yogurt. It's very mild, and excellent for desserts.
The piima works so well for smoothies that I've never tried thickening it, but for the rest, adding in some cream and some instant dry milk with the milk/starter mix makes a thicker yogurt without having to add anything that's not milk.
For flavoring- my family uses all sorts of stuff. Homemade jellies and jams, frozen fruit, sugar, maple syrup, homemade caramel sauce, cocoa powder- the important thing to remember is that you need to keep some yogurt completely plain to culture your next batch. We've found the easiest is just to have all the yogurt plain in the fridge then flavor individual servings.
Ball® sent me the green jars for review purposes. The Elite jar is from my personal collection and my personal choice for packed lunches and yogurt servings because of the shape of the jar and the wide mouth.
Monday, September 23, 2013
Product Review- My Image Button Maker
As you all know, I'm a big fan of stuff from My Friendship Factory. They started with a friendship bracelet maker that replaced tape on counters or pins on jeans, was truly portable and made it possible to make very complex patterns by keeping the strands separate.
The My Circle of Creativity is kumihimo made easy and is sturdy with lots of storage for flosses, and you can use it to weave lanyards.
My Image Button Maker is the quality and attention to detail that you'd expect from this company. A sturdy plastic box with 2 drawers holds the things you'll need to make either buttons or magnets.
It also comes with photo cards that have 6 designs each that are funny, cute, or messages. But if you want to make you're own design you can go to MyPhotoSizer.com or download the free app on iTunes. Then print your images yourself or take them to a photo center to get them printed.
The top part of the My Image Button Maker is a die cutter to perfectly cut out the image to use on the button. You could use all sorts of images. Pages from magazines, comics or your own images. This example is my daughter's Turnip Girl logo.
Center the image, push the lever on the right hand side, and the image pops right out. Then you place it face down into one of the covers and decide if you're going to make a pin or a magnet, following the instruction leaflets instructions. Pop it all together with your fingers, and you have a button!
So this is absolutely a hit in my home. My daughter can make instant buttons to celebrate her fandoms or to share with friends. It's easy to use and the sky is the limit for design possibilities. Refill kits are available.
Learn more at My Friendship Factory. Like Choose Friendship on Facebook for ideas, quotes and projects.
The products reviewed in this article were provided to me at no cost for the purposes of review. I received no other compensation, and my review is my honest opinion of the product.
Thursday, September 12, 2013
Alligators, King Tut, coloring books and other things that are keeping me busy
I'm sure some of you have noticed that I haven't been updating as frequently lately. The last month got very, very busy.
There was the state fair, I wasn't a vendor, but did win tickets. The photo above is from a great educational exhibit about reptiles. As you can see, William and TATG had exactly opposite reactions to having a live alligator in their laps. TATG was tickled and amused. William was considerably more cautious and nervous.
The fair also had an exhibit of King Tut replicas. It was educational and interesting, and they both read every single placard in the exhibit that explained something. I took a whole bunch of photos, including one of a crook and flail for TG to turn into a cosplay item. My favorite is this one.
Big news? I recently signed a contract to do a mandala coloring book. The theme is paisley mandalas. It's a lot of fun drawing the mandalas. I hope you all enjoy it when it comes out!
Other huge, wonderful news is that my husband is finally out of the hospitality industry. He's still doing the same job- running a housekeeping department, but for a company that he can really believe in. I don't know about other places, but executive level management in hotels can be a horrible, high stress, lots of hours job. His new job, he's working hard, but he's working a 40 hour week instead of 50-60 in the off season and up to 80 in tourist season. His boss seems to appreciate him, and he's liking the job quite a bit. I'm loving having him home more.
Also I have a couple product recommendations if you're looking for a good pomade or good suspenders. I'm not affiliated with these companies except for being a very happy customer-
First- pomade- My husband had a military cut for years after leaving the Army, but he grew out his hair for me. For him, long hair means still military short around the ears and neck, but the top is a couple inches long. It makes him nuts at work so he slicks it back with pomade. Except about 3 years ago the company that made the pomade he liked stopped making it. In those 3 years, we've used so many different products trying to find a good substitute.
Lockhart's Light Hold is perfect. It slicks his hair back and can be combed throughout the day to keep his straight, fine, thick hair in place. It smells great too, and it's non-drying and because it's a pomade, it doesn't flake. A little bit of Lockhart's Medium Hold works great on my hair for very sleek pony tails.
Suspenders- HoldUp Suspender Company- This has been a favorite of mine for years. My son needs suspenders and Michael prefers them to belts. They have the wide widths both of them of them prefer and in years of use, they have never had a problem with the suspenders coming undone. The clasps have a tiny pin in them to lock them into the pants. If you know someone who needs suspenders, but doesn't want to put buttons in their pants for a really good hold- this is the best option I've found. My son likes the "under ups" which are almost like an ace bandage, very soft and fairly stretchy. He can wear them under his Hawaiian shirts or tee shirts. Michael prefers the 2 inch wide ones. Both take the extra long ones because they are both so tall. They've been using the same sets regularly for years and it was only yesterday that I had to order more for them and a new clip for one set. Because they are so secure, I also ordered some clips to turn into sock garters for OTK socks for myself.
It's been busy, but it's been grand. TATG has made many jars of jelly and jam. I'm working on a scarf for William. It's pretty simple, basket weave crochet. I'll post the pattern when I'm done. At this point it's about 4 feet long and it needs to be at least 6 feet long. So it's almost there.
Friday, August 16, 2013
3rd National Can It Forward Day- Super Easy Jelly Making
Tomorrow is National Can-It-Forward Day! YAY! A lot of my readers are enthusiastic canners, and a lot have never canned before. Tomorrow I'll be posting video links AND a giveaway! Be sure to come back for that.
My daughter, before this year, had never canned before. She enjoys homemade jellies and jams made by me, and by some of our family friends. But it was kind of intimidating for her. Part of National Can-It-Forward is encouraging people to try it.
Ball® sent me a current Ball® Blue Book, a Ball® Home Canning Discovery Kit, a case of the gorgeous Heritage blue jars, labels, pectin and a Ball® FreshTech Automatic Jam and Jelly Maker free for review purposes. The Ball Blue Book and Canning Discovery Kit are reviewed here.
So why can your own jelly and jams? Well, the most obvious answer is that if you grow berries and other things, you may want to preserve your harvest to enjoy through the winter. But even if you don't, there are still good reasons to can. You have absolute control over the ingredients. You can pick the flavors and types of things you want to can, your home canned goods won't contain high fructose corn syrup or other ingredients that are used to cut costs commercially. You can save money by canning too. The jars and bands are reusable. The only thing you need to replace every time is the lids themselves. That's because the compound on them to seal your jars is one use only.
All of those were made by The Amazing Turnip Girl. From left to right are stewed rhubarb (rhubarb from our garden), raspberries (also from our garden, and jelly made from store bought juice.
Yes. Store bought juice. Because jelly making can be ridiculously easy. So easy you'll wonder why you ever bought jelly. She used the FreshTech Jam and Jelly Maker to make everything but the rhubarb.
Using the FreshTech Automatic Jam and Jelly Maker, you can go from fruit juice, pectin and sugar to jelly in a half hour in only a few steps. You add your juice and pectin, then when it beeps, add in sugar. It will make 4 cups of jelly at a time. So you can make 1 pint jars, 4 half pints, or 8 little 4 ounce jars to give as gifts. It has a non-stick surface and cleans easily. It got TG's seal of approval, she's just thrilled with it. Use your favorite 100% juice, it can be made from concentrate, or canned juice. She chose Juicy Juice Fruit Punch for her first jelly.
You can freeze or can the jelly to preserve it. For my family, we go through about a pint a month. Because this is so easy, with no standing and stirring time, I asked her if she wanted to make jelly regularly that way. She said "Oh yes!" and started considering other juice flavors.
So I broke out my pencil and paper and worked out the cost. Remember, Alaska is a little more expensive than that lower 48 states, so chances are good you can make your own jelly even more thriftily.
The recipe in the included booklet calls for 3 cups of juice, 4 tablespoons of pectin, 3 1/3 cups of sugar and a 1/2 tsp of butter.
Costs are rounded up.
Bottle juice at 4 dollars a bottle- 64 ounces= .0625 per ounce, a cup is 8 ozs, 3 cups is 24 oz= 1.50
Sugar- 4 lb bag is 3.49, 8 cups per bag- .44 cents per cup = 1.45
Jar of Flex-batch Real Fruit Classic Pectin is 4.49 regular price (it's on sale this week at my local Fred Meyer for 3.69)- One jar will make 4 batches- 1.13 per batch
Butter= .20 per tablespoon
So at premium prices for the sugar and juice instead of buying frozen concentrates or canned juice, and getting a name brand juice- it's 4.28 to make 32 oz of jelly! Can't beat that for something you know is the flavor you want and made without high fructose corn syrup or any of the other things that might be hiding in a jar of store bought jelly. You can make savory jellies to use as glazes.
If you've ever made jelly the old-fashioned way, with the mashing, milling, straining, standing, cooking, etc, you can appreciate that it's a wonderful way to make jelly, but it's time consuming. Using fruit juice will cut a lot of time from it.
When I mentioned it on Facebook, how much fun she was having making jelly- my friends came up with a whole bunch of suggestions including seasoned cider jellies to use on pork, pom/cran for poultry, and cranberry to use with cream cheese for the best ever turkey sandwiches.
So did we like the FreshTech Automatic Jam and Jelly Maker? Absolutely. We are planning to put up a lot more batches of jelly, and she's looking forward to giving some of her friends jelly. Now, mine turned out super easy because I didn't have to do even open a bottle of juice. But that's because TG took over very enthusiastically. Your experience probably won't be quite that easy, but it will still be easy.
I recommend it to people who haven't made jams or jellies before because it's so easy for small batches, but I also really recommend it for people like me who just can't stand to stir anymore. It takes a lot of the standing time out of the process.
Tuesday, August 13, 2013
Diamond Candles review and giveaway
Diamond Candles recently asked me if I'd be willing to do a review of their candles, with a giveaway for Don't Eat the Paste readers. I love candles. They don't need a special surprise for me to love them, candle light, and a nice scent is going to be enough. The surprise though? That's kind of like being a kid with a box of cereal and a toy surprise except better. All the photos in the collection above were taken by me.
They sent me a code to get a free candle for the review. I talked to my daughter, and she chose Cupcake scent. The candles are soy candles, which mean very little soot, and a nice clean burn. Plus soy candles can handle a heavier fragrance load than standard paraffin candles and are more environmental friendly. Because soy is a soft wax, it's perfect for container candles.
The candle itself- it has a warm, baked vanilla sugar scent. Nothing too sweet, it's more grown up than that. A very homey scent, with a great throw (how far the fragrance travels while the candle is burning). I could smell this one from 12 feet away. Not a strong smack you in the face scent like room spray can be. Just comfortable.
The container- Diamond Candles has a Pinterest board of craft ideas for empty containers. The containers are very nice. All glass with a label that can be removed with a bit of work and a tight fitting lid. Their fans buy candles regularly enough that some have had some very clever ideas for re-use. Mine will probably wind up on either my Dad's or husband's desk at work holding wrapped candy or small things they need at their jobs. They can also be repurposed to hold things like cotton swabs and such in a bathroom, decorated all sorts of ways.
The ring- Were you one of those people who dumped out the whole box of cereal to get to the toy surprise? Or did you patiently serve up bowls waiting to get to it? There are people who just can't wait and dig for the ring. It's placement is marked with a foil disk on the inside of the container. You can also just let the candle burn. We opted to let it burn. Soy wax has a fairly low melt temperature, so when it got down far enough, I pulled the little foil pack with a pair of long tweezers. The ring is in a zip baggie wrapped in foil and won't be all encrusted with wax.
They have rings worth anywhere from 10-5000 dollars in the candles. Obviously, most of them will be fashion rings worth about 10 dollars retail, but there are more expensive rings put in at random. The company would rather spend advertising money that way then on lots of ads. It works for them, they have a trading post where people can trade for the rings they would prefer, or trade with other people who got rings too big or too small. I'm not trading the ring I got, it was a 10 dollar fashion ring, but it just happens to be just the right size for my daughter, and it's her birthstone.
It's a lot of fun! I already have the coupon code for the winner to get one free candle. So go enter! Part of entering is liking Diamond Candles on Facebook and they also have regular giveaways there for their candles.
a Rafflecopter giveaway
[The product reviewed was provided to me at no cost for the purposes of review. I received no other compensation, and my review is my honest opinion of the product.]
Tuesday, June 11, 2013
Product review- My Lanyard Maker
It's summer, which means it's time for summer fun things like camping, fishing, hiking, day camps, crafts and lanyard making!
My Lanyard Maker is a loom for lanyard making. It makes it very easy to knot flat plastic or round plastic lacing without that "I don't have enough hands" frustration. In my photo above, I have a basic box weave lanyard key ring, and the enclosed instructions cover two very basic weaves including the box weave.
The loom has 4 sides with 8 slots per side to arrange your lacing or cord in. Each of the slots is labeled with an embossed letter/number designation for following patterns. Just past one side is a clip so you can use it in a different layout for some designs. For weaves like the box weave, instead of the clip you would use the center piece which holds the key ring or small carabiner. The weave works up in the middle of the loom and you can drop out the center piece to continue weaving as it gets longer.
This also has a drawer to hold supplies, and it comes with some split ring key rings, plastic key rings, pony beads to decorate, and both round and flat lacing to get started. Like all of the line of products from this company, it's great crafting fun that is well thought out.
The products from the My Friendship line of products are well made, and well thought out, but hands down my favorite thing about the company is their interaction online. The webpage has several downloadable PDFs that are free which give instructions for many more projects to make with their makers, they post on their Facebook page- Choose Friendship, daily with quotes, happy thoughts and inspiration.
You can find My Lanyard Maker at The Friendship Factory .
The products reviewed in this post were provided to me at no cost for the purposes of review. I received no other compensation, and my review is my honest opinion of the product.You can read more about my review policy here.
Monday, June 18, 2012
Shoplet Esselte Office Products Review
This is my first review for Shoplet office supplies blogger review program. It was pretty exciting getting the first package which had file folders and a project planner.
First up, some hanging folders- I'll be honest, my file cabinet is has drawers labelled "Stuff" and "More Stuff" and has bottles, mechanical pencils, composition notebooks and journals in it rather than anything resembling a hanging folder. I was still impressed with the design of these and showed them to my husband who does use hanging folders extensively in his job. He thought it was a really good idea compared to "a tab on one side, and you fold it the other way to put the tab on the other side".
Pendaflex Ready-Tab Lift Tab Reinforced Hanging Folders have sturdy hooks and are sized for US letter paper. Across the top inside the folder is a pocket with 5 slits in it that have a white tab in each one. You can pull the tabs up and use either labels or a pen to mark the contents. Because they come in 5 color assortments, you could separate files easily by color and still have the tabs staggered for easy reading.
It's just a wonderful idea for offices that use a lot of files to keep things very well organized.
The other file folder is the Pendaflex Divide it Up File Folder, this is a great one for paper artists. It has tabbed separators to keep things organized. For office use, you could keep receipts in one section, notes in another and photos in the last one. For paper artists, you could separate ephemera for specific projects in this, keeping favorite palettes together for easy cards and pages. Nice heavy paper and they come in bright cheery colors.
The Ampad Project Planner is spiral bound with a card stock cover and a heavier cardboard back so you can turn back pages in it easily to have it open to a specific page. The cover shown tears off, and cover under it has a nice irregular pink horizontal stripe with a small ribbon in the lower right hand corner. The pages are micro-perforated to pull out easily and divided into sections for Author/Date, project name, project action notes (or supplies or ingredients if you're a crafter or cook!) and project planning notes which makes a nice space for instructions. The paper is nice quality but a bit on the thin side so I recommend using pencils. It could also be used like a daily planner with times written in the side column.
My husband will be using the hanging file folders. I've already got project notes for a crocheted coin purse in the planner.
The products reviewed in this article were provided to me at no cost for the purposes of review. I received no other compensation, and my review is my honest opinion of the product.
Subscribe to:
Posts (Atom)