Printing Tips

Check out my printing tips if you're having problems printing to the right size
If you'd like to support this site and all the free things I post- please check out my Don't Eat the Paste Mandala collection coloring book for 9.99 at Amazon.

Thursday, November 29, 2012

Sharpie Recycled Ornaments- I love Sharpie

This is a Sponsored post written by me on behalf of Sharpie® for SocialSpark. All opinions are 100% mine.

Sharpie® fan girl alert! But that's most crafters isn't it? We love Sharpie® in so many ways, all the tips and types.

My personal favorite Sharpie® pens are the brush tip pens. I use them on fabric and paper to color in designs like this fabric print. I love their 12 packs! It's a great way to get a nice palette for projects and drawings. 

Sharpie brush tip on fabric

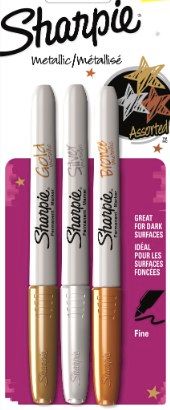
After that, for the holiday season, I'm wild for Sharpie® Metallic permanent markers and paint markers. They can be used on lots of different surfaces, and show well on dark or light backgrounds. There are some great new colors for the metallic markers.

Photobucket

I used them on these ornaments, which are very simple to make if you have a die cutting machine that can use embossing folders, and only slightly more difficult if you're embossing by hand. I used the paint markers for these, but the regular permanent markers will work as well.

Eco-craft ornaments with Sharpie

You will need:

  • Empty aluminum soda cans
  • embossing supplies for hand embossing or a machine that will emboss
  • Sharpie Metallic Markers- fine or extra fine point
  • 2 inch circle punch
  • 1/4 inch hole punch
  • wire
  • beads

Start by opening up the can to get a sheet of aluminum. I actually do this fairly regularly with my cans and keep the sheets in a shoebox so they are on hand. Scraps from the project can be put into a recycling bin with other aluminum cans.

Emboss or deboss the sheet. If you're using a die cutting machine, it's really easy, just put it in the folder and run it through your machine.

If you're hand embossing, or doing this with children, I recommend folding masking tape over the edges to make it safer for children to handle. Then decide if you want to emboss or deboss the design. The rose copper one is debossed, so the design is recessed in the surface. The 2 gold designs are embossed, so the designs are raised from the surface. Flatten the can a bit gently with a mallet or hammer. If you want to deboss, you'll put it with the metal side up. Emboss will be design side up. Put it on a newspaper or mousepad and use a blunt tipped tool to create your design. I like using pens without ink and the backs of crochet hooks. Go over the design until the debossing or embossing is at the depth you want it. Turn it over and make the lines clearer by outlining it from the other side with your embossing tools. 

After the designs are made, use the 2 inch circle punch to fussy cut your favorite parts of the design, and then put a hole in the top using the hole punch. Then the fun part! Color it in using the Sharpie® markers! Create a hanger with wire and beads. 

This effect also works well on aluminum foil, which can be used in other projects. To attach aluminum foil to things, I like using a spray on adhesive. 

Find lots of other great Sharpie® craft ideas on their Holiday Happenings Pin board.

Visit Sponsor's Site

Book Review- Connect the Shapes Crochet Motifs

Connect the Shapes Crochet Motifs by Edie Eckman

Connect the Shapes Crochet Motifs- Creative Techniques for Joining Motifs of All Shapes by Edie Eckman is both a crochet techniques book and a motif pattern book.

In the first part of the book, the author goes over the basics about how to read international crochet notation or charted patterns and combine that with a text pattern for very clear instruction on how to work the pattern. She discusses color theory and balance, then gets into the techniques. Joining motifs, especially those with picots, mesh or lace edging can be tricky. With a solid edge, you can just slip stitch, sew or single crochet the motifs together. Join as you go or JAYGo edgings can be more difficult. She walks you through, step by step with clear instructions and good photographs with bright yarn that's easy to see how to do those  joins in a few different methods. Advanced beginning and intermediate crocheters will appreciate the clear instructions. I learned a few things that make for smoother, nicer joins. She also discusses ways to adapt a pattern to a bulky yarn, or for a different effect. Some threads for example would make picots too tiny to join with the chain 3, so she suggests up sizing those picots. For bulky yarns and bigger motifs, they can become distorted, for those, she suggests ways to reshape the corners for less distortion.

My favorite crochet books aren't full of patterns for finished projects, they are stitch techniques and motifs for creating my own projects. This book is going on that shelf. The one with the stitch guides and  motifs that I refer to when starting a new shawl or another project. My favorite motifs are the kind that tessellate together nicely which means 3, 4 or 6 sides. There are a lot of them in this book. In fact, as the cover says, there are 101 total motifs and most of them are tessellating motifs that can be joined directly together. The motifs cover a wide range of stitch techniques.This includes some of my favorites like front post stitches where you work the stitch around the post of another stitch rather than into the chain top. This creates a nice dimensional effect, and worked in a different color than the previous round also makes lines of a different color on top of the previous colors. There are lots of intricate looking laces that are really easy to make and a few that are super easy to memorize. Make a couple at home, then carry yarn and a hook to continue making more while you're out doing other things. Each motif also has tips specific to that motif for adapting the joins if necessary.

After that, there are a few patterns that use motifs, such as a curved pillow that takes advantage of a distortion in a triangle motif. The distortion can be eliminated with different stitch counts for things that you want to lay flat, but for the pillow, the doming is perfect. Several patterns show some of the versatility of the motifs. My favorite is the flower garland which has a lovely, soft spring look.

At the end of the book is a chart to refer to if you are having any issues with understanding the stitch symbols. It's a nice complete chart that will work for all the patterns in the book. There is also an index of motif patterns that's laid out with images of the finished motifs. You can browse through the images to find just the right shape and look for your pattern.

If you love motifs for making shawls, afghans or even fashion scarves, or if you've had problems understanding how to read a charted pattern, this book is a great choice. Spiral bound in a hard cover to lay flat while crocheting.

Published by Storey Publishing

I received a complimentary copy of this book to review, I received no other compensation, and my review is my honest opinion of the book. You can read more about my review policy here.


Tuesday, November 27, 2012

Peppermint Mandala

Peppermint Mandala
Katie W. requested a peppermint mandala after the peppermint printables the other day. I hope she likes this one. TG likes it quite a bit.

Click on the images for larger versions.

Small JPG version:
Peppermint Mandala to Color

Large Transparent PNG version:
Peppermint Mandala to color- transparent PNG

Lots more mandalas to color

Sunday, November 25, 2012

Peppermint Printables!

Peppermint Hot Chocolate Recipe

I could probably modify the recipe above into a good jar gift for people like the Turnip Girl (also known as Dea occasionally) who look forward to this time of year just for all the places that have peppermint chocolate things. More about that in a minute. First, a printable peppermint themed gift box, and some blank printable cards you can use as recipe cards, gift tags or just as very festive note cards!
Click on the images for the larger version, print on card stock. For the box, cut, score, fold, glue. For the cards, cut them apart using the crop marks as guides.
More peppermint printables

Printable Peppermint Cards

Printable peppermint gift box


The Turnip Girl has peppermint in common with her great-grandma. Grandma always had peppermint candies on hand. TG may be 17, but peppermint chocolate love goes back years for her. As far as cocoa goes, she loves the stuff, but only drinks instant very occasionally. She has a definite preference for homemade. She also always wants to whip the cream for it herself. She'd rather I make the cocoa, but whipped cream is her domain. She uses either a whisk or an old-fashioned hand operated egg beater. We have a stand mixer, and it gets used only very rarely. She suggests adding in the sugar and peppermint near the end, that way, if you accidentally break the cream, you have a good plain butter that just needs to be washed and have salt added.  In the winter, she chills her bowl and whisk by putting them out on the porch for a few minutes. BRR!
She requested more peppermint printables after seeing 1D on a peppermint stage recently on TV. She's not a 1D fan really. She kind of likes their music, but she loved that peppermint stage.

Saturday, November 24, 2012

Cherry Pork Chops with CherryMan Cherries


Now this recipe needs a little explanation and back story.

It starts simply enough. I hate pork chops. My husband on the other hand likes them. So every so often, I'd cook them for him, using shake and coat methods and other people's recipes and generally winding up with a nice little pork hockey puck for him. It never worked out well.

One day, I was considering, and had this flash! Cherry soda! That might work. So I grabbed a bottle of Cheerwine which is a sugar sweetened cherry soda (look for the glass bottles) and started experimenting.
When the pork chops were served that night, they were moist, not noticeably sweet, a gorgeous reddish-pink color on the outside and an absolute hit with my whole family. Except me. I appreciated that they weren't dried out tough chewy pucks but still coated them in apple sauce to eat them.

So this is one of those rare recipes where it's not one of my favorites because I still hate pork chops. But the rest of my family thinks they are the best pork chops ever. They are certainly made with love.

Cherry Pork Chops
You will need:

  • 1 jar of CherryMan maraschino cherries- I used Jumbo Cherries with Stems, but the rest of the varieties will work too
  • olive oil
  • 1/2 yellow onion- chopped fine
  • 3 cloves of garlic- minced or 1 tsp. garlic powder
  • 4-6 pork chops- I use top loin boneless chops
  • salt
  • pepper
  • 12 ounce bottle or can cherry soda- cherry cola will work in a pinch
Put a couple tablespoons of olive oil in a large skillet and add the onion, garlic and saute until golden and the onions are translucent. Salt and pepper the pork chops, and add them to the pan. Brown the pork chops on both sides. 
After they are brown, put 2 cherries on each pork chop, and then pour 1 cup of soda around the chops, bring to a boil, cover and let simmer for 30 minutes, 40 minutes for thicker cuts. While doing this, pour the remaining 4 ounces of soda in a glass and add a cherry. Yum. You deserve a treat.

Serve with 2 cherries for each chop, the cherries aren't as sweet after cooking, but the tart and sweet flavor tastes lovely with them. My husband likes the liquid with the soda and pork juices over potatoes or to dip bread. 

CherryMan provided the cherries to me for review purposes. CherryMan cherries don't use high fructose corn syrup, and have the classic maraschino flavor that is the perfect topping for desserts or to use in baking. The Jumbo Cherries with Stems are large and delicious and um.. I just had one. Because darnit, I'm a grown up, if I want a maraschino cherry first thing in the morning I can have one. (Michael had a leftover pork chop. Did I mention he really loves that recipe?)


Check out CherryMan on FB and follow them on Twitter here.

You can also like my page on FB - Shala's Beadwork and Printables

Thursday, November 22, 2012

Thankful, with a printable quote

Thankful to the people who rekindle the inner spirit
"In everyone's life, at some time, our inner fire goes out. It is then burst into flame by an encounter with another human being. We should all be thankful for those people who rekindle the inner spirit."
-Albert Schweitzer

The image above can be shared on FB- it's posted to the Shala's Beadwork and Printables Page.

Click the image below for a larger printable version to frame and hang or to give to a friend.

This year, I'm thankful for my friends, family, and for all of the readers who make this page so much fun to do. The nice comments, encouraging emails and the people who use projects I post for acts of charity and kindness. Thank you all.
The last year has been full of a lot of grief and fear, but it's also been full of amazing moments and several of those amazing moments were from reader's comments and emails.

Thank you.

Wednesday, November 21, 2012

Baked With Love Mandala to color


It's that time of the year. The time for baking lots of cookies! I hope you enjoy this baking themed mandala to color. Click on the images for larger versions, print, color!

Small JPG version:
Baking Mandala

Large transparent PNG version:


Tuesday, November 20, 2012

Owls Duck Tape??


Yes! Owls Duck Tape! Coming out sometime in 2013!

Thank you everyone who voted for me and encouraged me.

YAY! Haven't stopped smiling. Normal postings will resume soon.

Sunday, November 18, 2012

A long, exciting week

Margaret Atwood Quote with Superball

The photo above is of one of the Superballs I set free in the wild. That's what my family calls it. Occasionally I buy handfuls of them from vending machines, then leave them in odd, unexpected places for other people to find, to play with. I took that photo a couple years ago.

This week has been full of "Superballs". Random good things, surprises and interesting moments. Maybe it hasn't been exciting by a lot of people's standards, my excitement is generally pretty quiet stuff. But it's been good.

The big thing of course, the Duck Tape contest. Still waiting to find out who won, and all week I was pretty obsessed with it, I want to win it so much, but now voting is done, there is nothing more I can do, and feel pretty good about at least making it into the finals. Winning would be a great thing for this little blog, because Duck Tape said they might post a URL to the winner's webpage.

I'm getting a Fiskars Fuse Creativity System! YAY! It will be here tomorrow and it's really too nifty! If you haven't heard of them yet, it's a upper end home crafting die cut system that will emboss, letter press and cut. You can buy an adapter kit to use dies and folders from other systems with it, and it has a very large area so it will work with larger dies like the Big Shot dies. I've been wanting one since they came out, so it's pretty nifty. I've been looking at information about making my own letter press plates using photo polymer plates, and talking to my husband about building a small breakdown portable exposure unit to burn the plates.

Since I've been considering self-publishing a zine full of dandelion recipes, I can do a letter pressed cover for it! It will be a small run at this point, but I'll also do it in e-book format. That's something I plan to start working on seriously as soon as dandelions come up in spring. My son said he would help with it.

Yesterday was my best friend's birthday. It's hard to believe it's been over a year since she passed. I miss her daily. Last year for her birthday, when it was still all very raw, we donated food to our local soup kitchen. This year we did the same thing, checking their website for the wishlist and buying them stuff off of that.
After we dropped that off, we went to a local craft show. I managed mostly to stick to my plan. One new cup from one of my favorite local potters, Hot and Spicy Reindeer Sausage from Indian Valley Meats and a few other little things.
Then we met Dad and William at Peggy's for pie. Peggy's is an Anchorage institution, it's been there since the 40s, and they make the best pie. We had lunch and pie, and watched planes and helicopters landing and taking off from Merrill Field, a small private plane airport.

There were a lot of little moments of happiness and joy this whole week, and the total excitement of the Duck Tape contest. I think they will probably announce the winner tomorrow.

Friday, November 16, 2012

Snowflakes Gift Boxes


You may recognize the background here from the snowflake coloring page I posted recently. I liked the way that looked and decided it would make a cute box. So here's the box in 3 different colors. There will be gift tags later to match.

Click on the images for larger versions, print on card stock, cut out, score, fold, glue!


Still waiting to see who won the Duck Tape MyDesign contest. Thank you everyone for your kind comments, votes, encouragement and support. This has been a crazy week full of wild hoping and happiness.

Tuesday, November 13, 2012

Snowflake Coloring Page


It's starting to look a lot like winter! I hope you enjoy this 4 strand snowflake knot to color or use for other crafty purposes. Click on the images for larger version.

Small JPG version:
Snowflake Coloring Page

Large Transparent PNG version:
Snowflake Coloring Page

Only a couple days left to vote in the Duck Tape MyDesign contest! I'm really nervous and really hopeful. Thank you all for your encouragement.


Sunday, November 11, 2012

Book Review- The Daily Cookie

The Daily Cookie - 365  Tempting Treats for the Sweetest Year of Your Life by Anna Ginsberg is wonderful collection of cookie recipes that would make a good gift for yourself or a wonderful birthday or holiday present for the baker in your life.

I was enthused about this cookbook with it's full color photos and all the cookie recipes. Many of those recipes are based on traditional favorites, some are old fashioned cookies, some are based on other classic desserts in a cookie form. Then my daughter saw it, and she loves it even more than I do. She's been reading it for pleasure.

Each day has a specific holiday or event listed, and sometimes the cookie recipes are themed for that holiday. November 11th, Veteran's Day features lemon rosemary shortbread because rosemary is for remembrance. Those sidebars frequently have a bit of information about the holiday, and sometimes other events that happened on that day.  That's the reason I think this book makes a great gift. Those little sidebars with an event for each day are charming and interesting.

The cookie recipes are great, they cover a really wide range of tastes, textures and types. Bar cookies, rolled cookies, shaped cookies and drop cookies. If you're stuck in a cookie rut of using the same recipes over and over (for me it's snickerdoodles and chocolate chip cookies), the variety will inspire you. There are fruity, chocolates, nutty, vanilla, candy, buttery and other flavors.

The other thing that makes this cookbook a stand out single theme cookbook is the various indices in the back of the book which list the cookie recipes by batch size, pan size, cookie type and even how easy they are to make. There is also a more traditional index by recipe name and flavor ingredients. The instructions are written in American style volume measurements, the end of the cookbook does has an equivalency table for people using metric which also includes Fahrenheit t to Celsius conversions and lists British gas marks.

This book does consider brownies to be a type of cookie and there are several brownie recipes for the people who love chocolate.

My daughter is simply charmed by this book, it's not just the cookie recipes, it's also the events and layout. I like the fact it has so many great cookie recipes that can quickly become family favorites, and that the recipes and instructions are well-written and easy to understand and follow.

Published by Andrews McMeel Publishing.
I received a complimentary copy of this book to review, I received no other compensation, and my review is my honest opinion of the book. You can read more about my review policy here.

Friday, November 9, 2012

Printable learning quote and blank chevron page


I liked the chevron box so much that I decided to use the same fill for paper and if there is going to be paper, there will probably be a printable quote.

"Anyone who stops learning is old, whether at twenty or eighty. Anyone who keeps learning stays young. The greatest thing in life is to keep your mind young." - Henry Ford 

Click on the images to download larger versions. Feel free to use the blank page as stationary, in scrapbook layouts (it's 8x10 inches), to add your own quote or in any crafty use. The quote can be printed and framed.
printable paper

printable learning quote

Other stuff- the Duck Tape contest is voting until 11/15. If you haven't voted, you haven't seen the cute mockups they made of how the designs might look on the roll of tape. Here's mine! Isn't that just so cute?

Because my chef skull design has been so popular on Spoonflower, I've decided to do some other design collections in different colors. So sometime in the next week or so, I'll be posting examples. 

Wednesday, November 7, 2012

Chevron Box

I haven't done chevrons in a while. I hope you enjoy this fun, colorful free printable chevron box.

Click on the image for a larger version, print on card stock, cut out, score, fold, glue!
Chevron Printable Box

Please go vote for your favorite design to be made into Duck Tape on Duck Tape's FB page
This is my design entry, which I'm still just so happy made it to the finals (and thank you Kai for you incredibly kind encouragement!) You can vote daily until 11/15/12! 


For people who are having issues with the size of my printables being too big for web printing, I save them in a large size for more detail. If you want to print directly from a browser, Chrome is a good option. It will scale the image to fit a single sheet of paper. Other options include saving it to your hard drive and printing from a graphics program or picking fit to page from your printer dialogue. Since the templates are set up at 8x10 inches, fit to page may come out slightly bigger than my stated measurements on US paper sizes.

Tuesday, November 6, 2012

Exciting news


Duck Tape started a MyDesign contest last month, and picked 20 finalists from all the entries to be voted on by Duck Tape fans. The winning design will be made into Duck Tape that will be available for sale!

Because of Sandy, the voting part of the contest was delayed, and I was notified yesterday that my design made the finals. I'm super honored, the other finalists all have fantastic designs, and they would all make fun tapes to use for crafts.

Of course,if my design gets picked, it means publicity for Don't Eat the Paste. It also means I'll probably do several hours of happy dances, and I told my daughter we would go out to eat at one of my favorite restaurants and I'd let her have two desserts. Because it would be a huge, wonderful, amazing thing.

Vote for the design you like best at Duck Tape on Facebook. I voted for my owls of course, because I would really love seeing that on tape. You can vote daily until the voting period is over.

I've been super excited since being told I was a finalist, and sort of nervous, afraid nobody would like my design, but a lot of the comments are so nice! (Super excited= dancing, laughing, telling my family repeatedly "I'm a finalist!")

Oh, the photo above is an old Captain Hammer messenger bag. I used it for about 3 years, and it was falling apart by the time I finally gave it up. Now it's a home for stickers on the outside and I keep my markers in the bag to keep them easy to find.

Today was the first time my son voted in a presidential election. He was very serious and very careful about his vote. I'm so proud of him for the care and consideration he took.


Monday, November 5, 2012

Vegan, natural Roy Rogers and Shirley Temple jellies


Did you know CherryMan has a new natural maraschino cherry? They don't use high fructose corn syrup in any of their cherries, what makes the natural cherries different is they use natural coloring and all natural ingredients, you can find out more about them here. The flavor is very close to a standard maraschino cherry, a little less sweet, and they taste very fresh and good.

So it made sense to make Roy Rogers and Shirley Temple* jellies out of them. Shirley Temples are lemon-lime soda and grenadine with a maraschino cherry, and Roy Rogers are cola and grenadine with a cherry. Grenadine, the brands you see most in the supermarkets or liquor stores use a lot of high fructose corn syrup. In fact, it's the first ingredient mentioned. So.. to start my jellies, I needed to settle on ingredients.

Grenadine is a pomegranate flavored syrup. To highlight the cherries, I used a Pomegranate/cherry juice. I picked natural sodas for the jellies which can be found in the health food section of any good supermarket. To gel, I used vegan friendly agar.

Agar is a lot of fun, it gels a bit differently than gelatin. That little packet holds enough to gel several cups of liquid and generally it's cheaper at an Asian grocery than it is at a health food store. Generally a packet that size is under 1.50. In fact, I got that packet for 25¢ and use agar a lot as a stabilizer.

Shirley Temple or Roy Rogers Jellies:


You will need:
small saucepan
glass measuring cup with a pouring lip
measuring spoons
stirring spoon
a mold or 8x8 pan- I used the Wilton Brownie Squares Silicone Pan


Ingredients:
1/2 cup 100% cherry/pomegranate juice
1 cup soda- lemon lime for Shirley Temples, cola for Roy Rogers
1.5 tsp. agar powder
CherryMan Farm to Market Maraschinos

Mix the soda and juice in a pan and bring to a simmer, sprinkle in the agar powder, and bring to a boil. Turn it down and let it simmer for 5 minutes. After it's simmered, pour it into the measuring up and pour it into your UNGREASED pan or silicone mold. Place in the cherries, then cover and put it in the fridge for an hour until cool. Unmolding. For a firmer set, more like Jell-o jiggles, use 2 tsps of agar powder. For an 8x8 pan, cut into squares using a ruler to make them very even.

Usually 1 tsp of agar will set 2 cups of liquid, but the reason you use more than that with this recipe is because of how acidic the soda and juice are. Agar needs boiling to activate it then sets firmer and is stable in greater range of temperatures than gelatin. It's also vegan friendly which gelatin is not. Originally I tried to make this a sparkling jelly, but it didn't work out quite the way I envisioned.

They taste really good! The flavors are more complex, fresher and more interesting than just a regular Shirley Temple or Roy Rogers.

Check out CherryMan on Facebook for more recipes and ideas.

*Quick personal story- when I was a kid, I LOVED Shirley Temples, and ordered them every chance I got. One day my Uncle took the family out to dinner, and the restaurant didn't have Shirley Temples! Oh the tragedy of it all. Then my mom told my Uncle "She really just likes the cherries." So he tipped the waitress 10 dollars and she brought me a bowl full of maraschino cherries. I didn't eat them all. Mom made me share with her.


CherryMan provided the Farm to Market Marascinos to me in exchange for a review. The opinions expressed are my own. The jellies are my own too, but I've decided to be nice and share them with my family.


Sunday, November 4, 2012

Rosemary's Jewels Mandala


This mandala was inspired by my friend Rosemary. The resemblance to the underside of an octopus is deliberate, and it's my first mandala to color this month!

Click on the images for a larger version, print and color!

Small JPG version:
Octopus Mandala to color

Large Transparent PNG version:
Octopus Mandala to color


Saturday, November 3, 2012

Marimo Gift Box

Little Marimo
Marimo マリモ  or  are little moss balls that live and grow underwater. They keep their shape by the motion of the water rolling them constantly. They've become a symbol of good luck with domesticated varieties being kept in jars and bowls in the home and office and tiny marimo balls being used in jewelry and as charms for keys and phones. They also don't have cute little faces. But I like putting faces on things!

So here's a printable marimo box. I hope you enjoy it! Click on the image for a larger version. Print on card stock, cut out, score, fold, glue.
Marimo Gift Box

Friday, November 2, 2012

Book Review- Tiny Food Party

I'm going to be completely honest before I start gushing about the cute. I love tiny things, adore tiny foods, and love good food well made. It just delights me, well-made tiny foods are a joy to look at it and to eat.

Tiny Food Party! -Bite Sized Recipes for Miniature Meals by Teri Lyn Fish and Jenny Park is full of tiny, appetizer 1 and 2 bite versions of regular food. While the focus is on making things small, there is also a strong focus on making them well so they are as delicious as they are cute to make for truly impressive appetizers. A lot of the recipes could also be used in bento style lunches, tea party foods, or even a full meal for a dinner party which allows guests to try several different things.

The photographs are wonderful, the colors are bright and cheerful and the instructions are clearly written with American style volume measurements. A few of the recipes use common convenience ingredients, but most of them are made from scratch. The recipes have a nice gourmet/foodie flair with details and flavors like mini churros made with candied bacon in the batter and suggestions for 3 different dipping sauces.

Here's where I start squealing and clapping. Because those recipes? Are fantastic, clever and incredibly tasty. Shallots in a light, perfect batter to make tiny onion rings, perfect mashed potatoes piped in rosettes on tiny Shepard's Pies, miniature eclairs! If you look at the cover, you can see the little Caprese skewers with a Balsamic vinegar glaze. Under that are miniature toaster pastries. That recipe comes with a few suggestions for filling so you could make them to suit almost anyone's tastes.


One of my husband's favorite recipes, except for size (he feels like a giant when he eats tiny food) is the Country-style Eggs Benedict, I love that recipe too because instead of a Hollandaise sauce it uses a cheesy/garlic sauce that's a lot easier to make and that tastes fantastic.

There are also cocktail recipes for the adults. Little tiny mixed drinks served in shot glasses with gourmet twists and details to make them special and not just a miniature version of a grown up drink. Like the Bloody Marys use a Korean rice wine instead of vodka, and the glass is rimmed with bacon bits. It's a flavorful, spicy, gorgeously garnished mini drink. Adults with a sweet tooth will enjoy the Orange Creamsicles drinks with the honey and sugar garnish.

The authors worked small in very clever ways, and this is one of my favorite cookbooks this year. There are menu suggestions for various party themes, and lots of dessert recipes to go with all the main course and side dish recipes. The end of the book includes equivalencies for people using metric, and a good index to find things quickly.

Published by Quirk Books, you can find recipes and templates HERE.

I received a complimentary copy of this book to review, I received no other compensation, and my review is my honest opinion of the book. You can read more about my review policy here.

6 Ws- Boar Bristle Hair Brushes

6 Ws is a new idea I'm trying out, and this is the first one. Inspired by a friend who said that all of us take all these things we know for granted that should be shared. So hopefully at least a few of my friends will do the same thing and share some of the things they know and take for granted.

Why boar bristle hair brushes? Yesterday I was washing my hair brushes and trying to figure out how what looked like yarn bits got into it. The answer will probably remain a mystery, but teaching my daughter how to properly clean one, it seemed like a good idea at the time.

This will cover why use boar bristle hair brushes, how to clean them, and a bit about the different types. I'm not an expert. It's just my opinion.

Who should use boar bristle hair brushes?

If you have straight or wavy hair, boar bristle hair brushes will probably be excellent for you. Some people recommend them only for short or medium length hair, however, they were frequently used in history by women with very long hair. My own hair is waist length and the only hair tools I use frequently are a wide toothed pick to detangle and boar bristle paddle brush.

What is a boar bristle brush?

Basically, it's a brush with bristles made of boar's hair set into a base of some sort. After that, it gets a lot more complicated.
Some have cushions which means there is a soft cushion between the bristles and the base of the brush. Others are just bristles set into a brush base.
The brushes also come in different lengths and softness. Some are harder than others, and some are very soft. As you use different kinds, you'll find the type that works best for you.
The handle/base profile is in part determined by the length of hair you have. For example, the brush above is a large paddle that works well for longer hair. There are some great brushes designed specifically for men's hair which have short bristles and short or no handle at all.
Combination brushes will have two or more types of bristles, nylon and boar bristles is a popular combination.

When should you use it?

Not on wet hair. Ever. If you need to detangle while your hair is wet, use something very smooth with wide set teeth, a lot of people recommend wood or horn combs. I use a plastic hair pick, the same kind my son uses on his very curly hair. If you decide to use plastic, you can sand down molding seam marks by using wet wet/dry sandpaper in a fine size, rinse well and then polish it up with muslin. It seems like a pain, but you only have to do it once for the lifetime of your comb and it will be easier on your hair for taking the time.  Other than that, if your hair is dry, brush it once or twice a day.

Where?

You get what you pay for, there are some decent, inexpensive brushes that come from all over the world. More expensive brushes will last longer and are designed better. English brand Mason Pearson makes wonderful brushes with a rubber pad that helps cut static electricity, but they also cost over 100.00 each.
(okay, I stretched for where)

How to use and care for a boar bristle hair brush:

If you have longer hair, you'll want to get the tangles out before brushing. Brushing with a boar bristle brush is less about detangling and more about styling and finishing. You remember when you were a kid and your mom detangled your hair from the bottom up? That's exactly the opposite of how you should brush with a boar bristle brush. You should do long strokes, root to tip. A hard brush can be hard on your scalp, and a soft brush might be too soft. Find the in-between that works best for you.

To care for a brush-
The Mason-Pearson brushes frequently come with a brush cleaner. Most don't and the brush cleaner only works to pull out strands of hair and dust. It doesn't work on the waxy sebum from your scalp which will get on any brush you use.
Since bristles are hair, you'll clean it much like hair. Use the back of a comb running it back and forth across the bristles and tapping it bristle side down lightly every so often to shake off the residue. If you have hair (or yarn, seriously, why was there yarn in my hair brush?) in your brush, comb through the brush lightly. Don't force it, you don't want to loosen the bristles. Pull it completely off and clean the comb then repeat until all the stuff caught in the bristles is off. Get the bristles wet in warm water, then use a small amount of shampoo, work it into the bristles, and rinse well. Clarifying shampoos are best, they break up oil and hair product well. Then set the brush down somewhere safe to dry completely before using it again.
Do the first method, running the back of the comb across the bristles to shake loose dust daily. Comb out long hair strands weekly, and wash your brush either every 2 weeks or once a month depending on how oily your hair is or how much product you use.

Why use a boar bristle brush?
What boar bristle brushes do better than any other kind of brush is redistribute the oils from your hair. Those oils are vital for healthy hair, but just at the scalp, it looks awful. When the oils are redistributed down the length of your hair, your hair shines. Not an oily shine, but a healthy shine. The brushes also give a very sleek finish. My daughter likes them because they don't pull her curls the same way other brushes do, and she can get her hair well managed by washing it every other day and using a boar bristle brush between washes.  I like them because they do really make my hair very sleek and shiny.

The Spornette DeVille brush is very affordable and works well. The Mason Pearson brushes are better quality and more expensive.

Thursday, November 1, 2012

Little Super Quick Octopus Finger Puppet (crochet)


This octopus barely counts as a project, and I wasn't sure about posting the pattern so I asked on FB if I should. Because it's so easy and so fast. It was one of my little yarn doodles and a fun use of small amounts of worsted weight yarn. It uses mini pony beads worked into the crochet for eyes, and it's a nice method for adding eyes to finger puppets, hats and other things where safety eyes with their pegs may not be the best choice.

You will need:

  • small amount worsted weight yarn- I used Bernat Handicrafter in Pinky Stripes
  • Size F hook
  • yarn needle
  • 2 mini pony beads (4x7 mm)
  • scissors
Abbreviations:
st or sts = stitch or stitches
sc = single crochet
sl st- slip stitch
beaded sc= beaded single crochet- insert hook into stitch, yarn over, pull loop through stitch (2 loops on hook), push bead up, yarn over, pull yarn through loops on hook.
repeat ** = repeat the instructions between the *asterisks* 

Put the 2 pony beads on the yarn. Push them up out of the way until they are needed.
Ch 2 or make magic ring

Round 1- 4 sc in first ch on hook or magic ring. Sl st to join.
Round 2: ch 1, does not count as first stitch, 2 sc in each stitch around, sl st to join (8 sc)
Round 3: ch 1, does not count as first stitch, sc in first st, sc in next sc, sc in next st, beaded sc in next st, sc in next st, beaded sc in next st, sc in next st, sc in last st, sl st to join. 
Round 4: ch 1, does not count as first stitch, sc in each stitch around, sl st to join
Round 5: ch 1, does not count as first stitch, sc in each stitch around, sl st to join

Tentacles:
Round 6: *ch 8, skip last ch, sl st in next 3 sts, skip 4th ch, sl st in last 3 chs, sl st in next st on round 5* repeat ** 7 times working one tentacle in each stitch around. 

Break off yarn, weave in ends.

The skipped chain is what makes the little curve in the tentacle by making one side long then the other. 

Super easy! Because they are worked with a smaller hook and pretty small they also stand up pretty well even without a finger in them, so you could make a handful of them to decorate a curio shelf very quickly. 

I use this method to make eyes for a lot of my crochet figures, especially when working with thread. Beaded eyes are easy and inexpensive. In the example below I used size 8 seed beads with size 10 crochet cotton.