Printing Tips

Check out my printing tips if you're having problems printing to the right size
If you'd like to support this site and all the free things I post- please check out my Don't Eat the Paste Mandala collection coloring book for 9.99 at Amazon.

Thursday, January 30, 2014

Printable Hearts Boxes


I hope you enjoy this pair of hearts themed boxes. After making the design I thought "You know, this might look really good in camouflage colors." So I'm going to try that tomorrow!

These printable gift boxes are 2x2x2 inches and 3x3x1 inches. Click on image for larger version, print on card stock, cut out, score folds, fold, glue! I think they would be nice filled with candy or other small gifts for Valentine's day.

Printable hearts box - 2 sizes available (cube) #papercrafts #printables #giftbox

Printable hearts box- 2 sizes available #papercrafts #printables #giftbox


Tuesday, January 28, 2014

Duck Tape® Kisses

This is a Sponsored post written by me on behalf of Duck Brand provided by ShurTech Brands, LLC. All opinions are 100% mine.
Duck Kisses Valentine
Well, you all know I'm wild for Duck Brand® Tape Crafts, and so is my daughter. This holder for candy kisses is very easy to make using Duck Tape® in colors and patterns, or even the shiny metallics and some scrap plastic.
Duck Kisses supplies
What is scrap plastic? It's the stuff from blister packs, or the sides of milk jugs. I cut down a lot to useable flat peices that are stored in a drawer for when they would be handy, then recycle the scraps in the usual way. If you don't have a spare blister pack or an empty plastic milk jug- plastic needle point canvas would work as well.
Duck Tape® has designs for a lot of holidays, for Valentine's Day there are Cheetah Kisses which is the pattern I used in my project and Wild Hearts which my daughter used very well in a project of her own (photo at the end of the tutorial of her project!). The patterns inspire Valentine’s Day craft ideas.
First you'll need to cut 3 squares from the plastic. At least 1.5 inch squares. Mine were a bit bigger and my Kiss holds a lot of candy kisses. Just work with the plastic you have available and how big or small you want the finished project to be.
Cover those squares with tape on both sides.
Duck Kisses tutorial- covered squares
Now cut 2 lengths of tape long enough to cover one side of a square. Cut those two pieces in half lengthwise (like a hotdog!) and tape up 2 edges on 2 squares.
Duck Kisses tutorial- taped edges
Trim tape edges neatly if you have any overhang. Cut 2 more strips and cut them in half lengthwise. Now it's time to put in the back/bottom piece.
The first piece tapes in very easily. You'll tape the untaped edges of one square to the edges of the backing square.
Duck Kisses- taping it all together
To finish, you'll tape the last piece into place on the backing square. The plastic will give enough for you to be able to do it.
To open, just squeeze the corners where the two open pieces meet the back piece. In larger sizes, there maybe a noticeable gap, but it does hold the candy kisses nicely.
Duck Kisses closed
Follow @TheDuckBrand on Twitter for so lots of great ideas, links and new product information.
Do you have a favorite Valentine project? Pin it and share it with Duck Tape® fans around the world using #DuckValentine
This is what my daughter made using Duck Tape® for Valentine's Day. She used a water bottle as a mandrel to create the quiver.
The Amazing Turnip Girl's Duck Tape Quiver and Arrows for Valentine's Day #DuckValentine
Visit Sponsor's Site

Sunday, January 26, 2014

Rainbow Links Printable Box


This printable box with a geometric rainbow design was a lot of fun to make, and may become a coloring page soon. I hope you enjoy it as much as I do.

Click on the image below for a larger version to print and make. Print on card stock, cut out, score folds, fold and glue!
Printable rainbow gift box- print and make!

Friday, January 24, 2014

Heart knot coloring page and embroidery pattern

Heart knot

This is a fairly simple 3 strand knot, but I hope you enjoy it! There is a version to color, and one to print and use for an embroidery pattern.

Click on the image for the larger version.
Small JPG version:
Heart knot to print and color

Large transparent PNG version:
Heart knot to print and color or use as a digital stamp

Embroidery pattern:
Heart knot embroidery pattern


Tuesday, January 21, 2014

Stained Glass Rose Box

Stained Glass Rose art

Since people liked the mandala with the roses and forget-me-nots, I thought it would be nice to do a box using the same rose. Even though the spiral would be horrible to try to cut out of glass- I thought it looked good using a stained glass effect. I hope you enjoy it.
More Stained Glass Effect Printable Boxes

Click the image below for the larger version, print on card stock, cut out, score folds, fold, glue!

Stained glass rose printable box #papercrafts #giftbox #favors #boxes


Monday, January 20, 2014

Crochet bow pattern

Make this easy crochet bow for your own hair!

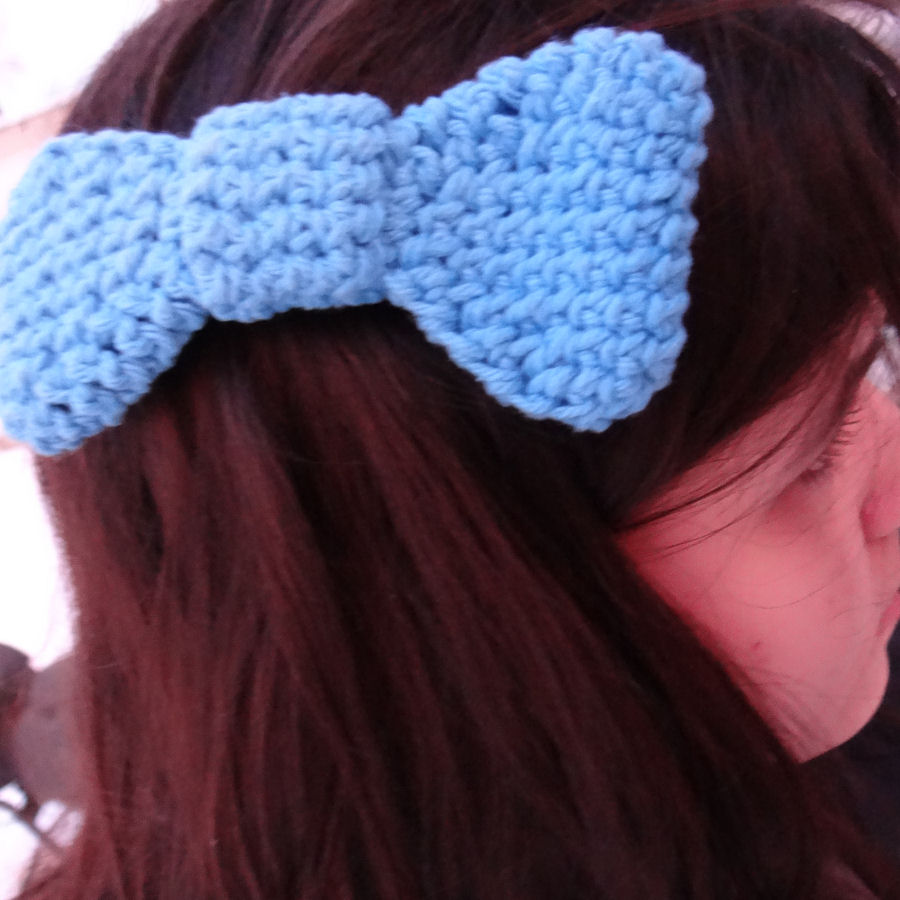
This hair bow is crocheted to lay flat by using chains on the edges instead of working single crochets all the way around. I was trying for a rounded Hello Kitty effect. It's made in 3 parts which are stitched together then stitched to a hair clip.

You will need:
Worsted weight yarn- I used Lily Sugar 'N Cream in  Light Blue
Size F hook
Yarn needle

American terminology
Ch=chain
Sc=single crochet
dec sc= decrease over 2 stitches in single crochet
sl st= slip stitch
st or sts= stitch or stitches

Make 2:
Ch 8 (ch 7 plus 1 to turn)
Round 1: Sc in front loop of each stitch of the starting chain, ch 2, turn chain and sc in opposite loop of starting chain, ch 2, sl st to starting sc to join (7 sts on each side, 2 ch 2 spaces)
Round 2: Ch 1 to turn, (does not count as first stitch), 2 sc in first stitch, sc in next 5 sts, 2 sc next st, ch 2, skip ch 2 space, 2 sc in next st, sc in next 5 sts, 2 sc in next st, ch 2, skip ch 2 space, sl st to starting chain to join. (9 sts on each side, 2 ch 2 spaces)
Round 3: Ch 1 to turn, (does not count as first stitch), sc in first stitch, sc in next 8 stitches, ch 2, skip ch 2 space, sc in next 9 stitches, ch 2, skip ch 2 space, sl st to starting sc to join (9 sts on each side, 2 ch 2 spaces)
Round 4: Ch 1 to turn, (does not count as first stitch), dec sc , sc in next 5 stitches, dec sc, ch 2, skip ch 2 space,  dec sc , sc in next 5 stitches, dec sc, ch 2, sl st to first sc to join (7 sts on each side, 2 ch 2 spaces)
Round 5: Ch 1 to turn, (does not count as first stitch), sc in first stitch, sc in next 6 stitches, ch 2, skip ch 2 space, sc in next 7 stitches, ch 2, skip ch 2 space, sl st to starting sc to join (7 sts on each side, 2 ch 2 spaces)
Round 6: Ch 1 to turn, (does not count as first stitch), dec sc , sc in next 3 stitches, dec sc, ch 2, skip ch 2 space,  dec sc , sc in next 3 stitches, dec sc, ch 2, sl st to first sc to join (5 sts on each side, 2 ch 2 spaces)
Round 7:  Ch 1 to turn, (does not count as first stitch), sc in first stitch, sc in next 4 stitches, ch 2, skip ch 2 space, sc in next 5 stitches, ch 2, skip ch 2 space, sl st to starting sc to join (5 sts on each side, 2 ch 2 spaces)
Round 8: Ch 1 to turn, (does not count as first stitch), dec sc , sc in next stitch, dec sc, ch 2, skip ch 2 space,  dec sc , sc in next stitch, dec sc, ch 2, sl st to first sc to join (3 sts on each side, 2 ch 2 spaces)
Round 9-10:  Ch 1 to turn, (does not count as first stitch), sc in first stitch, sc in next 2 stitches, ch 2, skip ch 2 space, sc in next  3stitches, ch 2, skip ch 2 space, sl st to starting sc to join (3 sts on each side, 2 ch 2 spaces)

Break off end. Sew the two pieces together on the narrow ends.

Middle:
Ch 11 loosely
Row 1: Sc in second ch from hook, sc in each stitch across ch 1 to turn.
Row 2-4: sc in each stitch across, ch 1 to turn

Break off ends, wrap it around the narrow section of the bow and stitch ends together and secure to bow. Then stitch the bow on to a barrette, comb or hair slide!

You can also start with a chain 5, increase to 7 stitches and decrease from there to make a smaller bow. But I like this size!

Check out the gorgeous sunrise we had this morning!

Thursday, January 16, 2014

A Straight Line printable quote


A straight line may be the shortest distance between two points, but it is by no means the most interesting.
-The Doctor

I asked The Amazing Turnip Girl before putting in the quote "Should I put that it was the 3rd Doctor who said it, the author or just attribute The Doctor?" She replied "It's all the same Doctor." So there it is. But there is more information after the clickable and printable image! The version above is on my FB page if you want to share it.

The quote is from the first episode of the 11th season, written by Robert Holmes. That was also the very first Sarah Jane episode, and the first appearance of the Sontarans. So it was a very nifty episode in the history of Doctor Who, plus, that's just a really great quote. I hope you like my illustrated version.
If you're interested in seeing it, you can order the DVD from Amazon below. This is an affiliate link and using my affiliate links to buy things from Amazon helps support my site and my book addiction.
Thank you.

Monday, January 13, 2014

Roses and Forget-me-nots mandala to color

Roses and forget-me-nots mandala to color #papercrafts #scrapbooking #Valentine
Sorry I didn't take the time to color in an example. I do hope you enjoy this simple mandala to color for Valentine's Day!

The image above is the small jpg version, the one below is the larger transparent PNG. Click on the images for larger versions to print and color.

Roses and forget-me-nots mandala to color #digitalstamp #scrapbooking #Valentine


Wednesday, January 8, 2014

An easier, less expensive way to make yogurt

So lately, in between drawing lots of what are hopefully very groovy mandalas (another preview at the end of this)- I've been thinking of my hippie mom a lot and started making yogurt again.

Now I've always made yogurt just like she did. A bit of plain yogurt with live cultures from the grocery store or a freeze dried culture. But this time I decided to try something new (old!) for me- mesophilic heirloom cultures.

So why? Heirloom cultures can be used over and over again as long as you keep them happy and fed. They last indefinitely and have all sorts of interesting flavor and texture profiles. Why mesophilic? The cultures I've used before are all thermophilic- which means they needed steady heat to work. Mesophilic cultures work at room temperature. No more messing with a cooler and hot tap water, or filling one side of my sink with hot tap water and keeping track of the temperature over the course of the day. No thinking "It's time to break down and buy a yogurt maker". None of that. For mesophilic cultures- all I need are clean jars, coffee filters, rubber bands and lids.

I got a set of 4 mesophilic yogurt cultures and a live buttermilk culture from Wells of Health on Etsy - no affiliation, just a happy customer. You can also get them from Cultures for Health. I chose the seller I did based on a combination of factors- they had a ropey viili was one, another was shipping cost.

The cultures arrived- about a tablespoon of each one to mix with a cup of plain milk to make a mother culture from. So I set them all up and out by putting them in mason jars with a coffee filter rubber banded over the top. I placed them all over the house so the cultures wouldn't cross each other and would stay pure. Several feet apart is sufficient, but it also gave me a chance to figure out where the best place to culture was going to be. (turned out not to be the kitchen but in my laundry room!)

The next day, my daughter and I tried teaspoons of each culture. The flavors were fantastic and different. We put the lids on them, and put them on the fridge. To make yogurt- you mix 1 part yogurt culture with 8 parts milk or milk and cream mixed, then cover with something permeable like fabric or coffee filters and set out for 8-16 hours until set. You can tell it's set by tipping the jar and seeing if the yogurt moves like a liquid, or if it moves as a mass. If it moves as a mass, it's set and ready to be properly capped and put in the fridge. Reserve some of that batch to make your next, and flavor and eat the rest!

The viili is wonderful. The consistency is about like that of thinned glue or honey. It forms gorgeous long ropes off the spoon and it's entirely too much fun to play with- the flavor is pretty mild.
My personal favorite for flavor is the matsoni- it's a tart flavor that is going to be just grand frozen or with sweet berries and honey or dates added for sweetness
The piima is the perfect smoothie yogurt, and I think with the viili will be good as a frozen yogurt with a more ice cream type flavor profile. It's a bit like a drinkable cream cheese and another possible use is cheesecake flavored smoothies adding a bit of the matsoni. Will try later.
Fil mjolk seems to be the best bet for ice cream type froyo and it's the yogurt I'd suggest for people who don't much like yogurt. It's extremely mild and it's my personal choice for trying whipped first. I think it would be a good topping.

I use a little bit of cream when culturing, and also thicken the milk a bit with powdered milk for everything but the piima. The viili was William's favorite just because it's fun. My second culture of that turned out very ropey and reminded me of hot cheese on a pizza except that it was cold and yogurt-y! The Amazing Turnip Girl loved the Matsoni/Caspian Sea yogurt. But thinks the viili is good mixed with a bit of her homemade jam. She also agreed the texture made it a really fun yogurt. I plan to try that one with matcha to make a green Nickelodeon-like slime yogurt! But just a bit of vanilla and raw sugar tastes good mixed into the finished yogurts too.

I'm sold. I love these yogurts so much. It's so easy to make and share. I'm giving some of it with instructions for making to a friend of my mom's- so if anything does happen to my cultures, she'll have a backup for me!

I also talked to my favorite local potter about making yogurt cups. She's going to make me a set of 4 10-12 oz cups with lids that I can keep in the fridge, so my morning yogurt will be in something pretty. It deserves to be. Hopefully it's going to be a family heirloom.

As promised- another sneak preview of what I'm working on for the coloring book.


Saturday, January 4, 2014

Smiley Box

Groovy Happy Face #haveaniceday
Happy Happy New Year! Several days late. But I got fairly close on that deadline. Didn't quite make it, and asked for an extension and have my fingers crossed now. After doing lots of groovy things- I'm still enjoying it, so you all get a printable tie dye and smiley button effect box!
Click on the image for the larger version, print on card stock, cut out, score, fold, glue!
Smiley printable box by Don't Eat the Paste #printable #paper #groovy


I also celebrated my son's birthday- he was born on NYE. That was big fun. He made something with Alaskan snow crab and cream cheese that was pretty fantastic. He's going to fine tune the recipe and then I'll post it because it's that good. The 3rd was my deadline (EEP!), my anniversary, and the anniversary of Alaska becoming a state and of the day my dad arrived in Anchorage- exactly one year after Alaska became a state.

I'm also going to post a pattern soon for a crocheted bow and some book reviews!

Have a NICE day!