Printing Tips

Check out my printing tips if you're having problems printing to the right size
If you'd like to support this site and all the free things I post- please check out my Don't Eat the Paste Mandala collection coloring book for 9.99 at Amazon.
Showing posts with label recipe. Show all posts

Friday, July 14, 2023

The Amazing Turnip Girl's Very Special Birthday Cake


Oh that's a mess isn't it? It's also very delicious. 

See, for the Amazing Turnip Girl's birthday, being in July, we do either ice box cakes or ice cream treats. 

This year has been well, interesting. To say the absolute least. 

She asked for a "Twinkie Cherry Cheesecake". And I was going to give her whatever she wanted. 

So that meant coming up with a recipe for an icebox Twinkie Cherry Cheesecake.

Recipe first! Then all the story. 

TG's Twinkie Cherry Cheesecake


  • 1 box of Twinkies, sliced in half across the top, lengthwise. (so both sides have the round top and flat bottom and creamy filling) 
  • 1 can cherry pie filling
  • 1 can tart cherries packed in water (drained
  • 1 box cheesecake flavored instant pudding
  • 1 8 oz brick cream cheese
  • 1.5 cups of milk
  • whipped topping or whipped cream
Mix cherries. 
Blend together milk, instant pudding and cream cheese. 
In a 9x13x2 inch pan, put a layer of twinkies, cream side up. 
Spread cherries on top. 
Second layer of Twinkies
Spread cheesecake layer on that.  

Cover and put in the fridge for at least 4 hour. Serve with a spoon and add whipped topping as you like. 

It's honestly just that simple. No cooking involved. 

So icebox cakes, as per the name, started before refrigerators were affordable and common. Most recipes are teeth achingly sweet though. Which makes sense. When it's very warm, we want sugar for the energy rush, or at least that's the theory. 

That said, I definitely needed this cake to not be too sweet, which is why I added the can of tart water packed cherries to the pie filling layer and the whole brick of cream cheese to the cheesecake layer. That helped balance out the sweetness of the Twinkies. 

Honestly, it was DELICIOUS. I was kind of impressed. TG was thrilled of course, and the rest of my family enjoyed it a lot. 

Friday, August 16, 2019

Classic Alaskan Russian Tea Mix Recipe

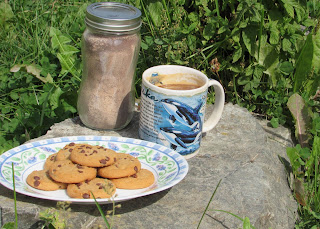
Russian tea mix, tea and cookies

I asked my daughter where we should stage this photo. She really loves this rock in our yard for photos for how much sun is in that area.

There are a lot of lasting influences of Russian colonization in Alaska. One of them is an enjoyment of hot fruity teas.

One of the most popular Russian teas is to add jam made from berries collected over the fall to brewed black tea.

The most popular though, hands down, is made with various drink mixes and spices and used as an instant tea.

My mother was a jam in tea sort, so the first time I had the drink mix kind was in summer camp as child. I loved it and came home with the recipe. My mother, the hippie, was absolutely appalled. The only other time I saw her that shocked over my tastes was when I came home from a slumber party insisting the other young woman's mother had made the best mac and cheese ever. Mom called for the recipe and found out it was Kraft.

Anyway, this is my recipe. It's less sweet and more tea then a lot of the mix recipes. I hope you enjoy it.

American measurements used. The parenthesis are the product I used and link to Amazon**.

Russian Tea Mix Recipe


Mix ingredients well, put into a pretty jar.

To mix, start with 3 Tbsp of mix. My coffee cups are mostly 10 oz. Put in the mix, top with hot or boiling water. Let cool enough to taste, add more mix or sugar

to taste.

As a gift, include a note with mixing instructions.

I do plan to re-do this post later with pretty  printable recipes and tags.

There are stories about this kind of tea being served to musher's on the Iditarod trail. Tang is so popular that to make a recipe that was actually measured out and not just me doing it by eye meant going to 3 stores and finding the one can left on the shelf in the back of the shelf at the last store.

As an adult, I prefer jam in tea, but TG and William both really like this version for it's convenience.

**this post contains Amazon affliate links which pay me a small commission when you use them to make purchases. **

Tuesday, February 5, 2019

Homesteader's Honey


My memories on FB popped up this photo. It's from the 1990s. The man in the photo is my brother and the boy is my son. The handwriting is my mom's and it says "Adam and Wm picking clover and fireweed for me to make honey" The side note says (*Enlarge?)

I may well do just that. It would be a gorgeous print.

She got her recipe from the local cooperative extension service. Here it is:

Homesteader's Honey

6 cups sugar
3 cups boiling water
30 white clover blossoms
18 red clover blossoms
18 fireweed blossoms
Sterilize canning jars and prepare lids. Boil together
sugar and water for 10 minutes; maintain steady
boil on low heat without stirring. Remove from
heat. Add blossoms and let steep for 15 minutes.

Strain mixture through cheesecloth and immediately
pour into hot canning jars, leaving ¼ inch headspace.
Wipe jar rims and add prepared two-piece
lids. Process 5 minutes in a boiling water canner.
Note: Sugar syrup can be tricky. If it crystallizes before
canning, return it to the pan, add 2 tablespoons
water per cup of honey and heat.

My mom used to make so many jars of this as a present.

I hope you enjoy the memory. It made me smile to see it in my memories today.

Tuesday, June 20, 2017

Rhubarb-Orange Marmalade


So this marmalade came into being because we have a LOT of rhubarb. Last year, at the beginning of spring, my husband and I split our plant into 8 smaller plants. We gave away 4 of them, and kept 4. Those divisions were fairly large and now I have 4 huge plants.

My rhubarb is green. It's a Victoria-type that's very sweet, very tender and tends to have thinner stalks that get very long. The bottoms are red, but the lengths are a celery green.

Those oranges are fairly large oranges.

There are a lot of recipes for orange-rhubarb marmalade on the internet. They call for various cooking methods and varying amounts of the ingredients. Sometimes they have nuts or spices in them. Our recipe is fairly simple, but it's really tasty. My daughter did the cooking. I did the harvesting and gave her the recipe.

Rhubarb-Orange Marmalade- makes 3 pints of marmalade

You will need:

7 cups of  rhubarb  (12-15 stalks)
2 large navel oranges
6 cups of sugar
2 cups of water

Wash your fruits. Anything that you grow yourself and you know what gets on it, you can decide how best to wash it. For oranges from the store, wash with a bit of soap and water. For store bought rhubarb, dunk it in 1:4 vinegar water mix, scrub lightly, then rinse.

Zest the oranges into a bowl using a paring knife, microplane or vegetable peeler. After that, cut the orange into quarters, and cut off the peel and pith. Then cut the quarters in smaller pieces and put them in the bowl.

Cut the rhubarb into half inch pieces. This might require cutting them in half length-wise then chopping them into smaller pieces.

Put the rhubarb, oranges, sugar and water into a heavy bottomed 5 quart pan and bring to a boil. Turn it down and let it simmer for about an hour stirring frequently. It will thicken. Check it by lifting the spoon, when it sheets off the spoon, it's ready.

While you're doing that, prepare your jars. We used a combination of 4 oz jars and those gorgeous Ball Canning Elite Jelly Jars that are in the photo.

Fill the jars leaving a 1/4 inch headroom, remove bubbles, wipe rims and process jars (hot water method) for 10 minutes.

This makes a lovely, tart and sweet marmalade that is delicious on pancakes according to my daughter who is eating some just that way right this moment. Me? It's hard not eating it just by the spoonful, but I'm looking forward to trying it on chocolate ice cream.

Wednesday, February 10, 2016

Easiest Ever Non- Dairy Fudge

Vegan fudge
So this fudge is pretty much a non-recipe.

You need:
1 can sweetened condensed coconut milk (I used Nature's Charm)
1 bag of semi-sweet chocolate chips (I used Guittard Extra Dark Chocolate Chips*)
pinch of sea salt
1tsp vanilla extract
1 8x8 pan, "buttered" with coconut oil
1 jar of maraschino cherries (I used Tillen brand Merry Cherries)

Heat the milk in a heavy sauce pan on medium heat, stir in the chocolate chips and pinch of sea salt. Stir until the chips are melted and everything is well mixed. Take off the heat and stir in the vanilla extract. Spoon into 8x8 pan. Dot the top with the cherries and cover and chill until set.

*Guittard Extra Dark Chocolate Chips are prepared on the same equipment they make their milk chocolate on so there may be a trace of milk in them. There are good completely vegan chips available. I used the Guittard because I love the flavor of them.

So I whipped this up, and handed the pan off to my children because apparently you never get too old to "slick the pot" and TG said "This is really good chocolate!" Since she's the chocolate fiend in the family, that is a great endorsement. She wound up sitting there with a bag of open potato chips scraping out the last of the fudge from the pan.

Last night, my husband tried a piece and declared it was delicious.
I said "TG saw me make it."
"Well, that might be dangerous." he responded.
From the back corner of the living room we hear her say happily "Yup."

I suspect she's going to make a batch with potato chips on top.

Disclaimer- I got the Nature's Charm Sweetened Condensed Coconut Milk for free to review. I was not compensated or asked to provide a recipe or review on Don't Eat the Paste. I'm sharing the recipe because it's really, really good and I wanted to.

Saturday, July 5, 2014

Raspberry White Chocolate Mocha MILKSHAKES!

Raspberry white chocolate mocha milkshake recipe

So the first thing that I thought of when I saw the Ball® Sip and Straw lids is "Those straws are big enough for thick shakes!"

Then discussed with The Turnip Girl the best kind of shake to make. She's wild for frozen coffee drinks, ice cream and as you know, anything chocolate. We talked about the popularity of Raspberry White Chocolate Mochas, so there it was. The perfect shake.

She used a BELLA 13984 Rocket Extract Pro Personal Blender .

You will need:
1 oz of white chocolate- or 7 squares of a Lindt White Chocolate Classic Recipe bar (those are the ones that break into 30 pieces)
3/4 cup cold milk
2 Tbs. instant espresso powder- I like Medaglia D'Oro Instant Espresso Coffee , and keep a jar for adding to baking and other things.

Put those in your blender and blend until the chocolate pieces are completely broken up. If you're using a Rocket Extract Pro, this happens really quickly

Add in 1 cup of vanilla ice cream, 1/4 cup frozen raspberries and blend for a few seconds more to incorporate it.

Pour into a cup and serve.

Soo good! The espresso powder makes the coffee flavor nice and strong, and the frozen raspberries taste so much better than raspberry flavored syrups.

The photo above was taken by the Turnip Girl, the flower in the photo is one that a little girl in the neighborhood gave her, and she decided it should be in the picture. Isn't it pretty?


Like Ball® Canning & Recipes  on Facebook for lots of recipe ideas and links.

Wednesday, June 11, 2014

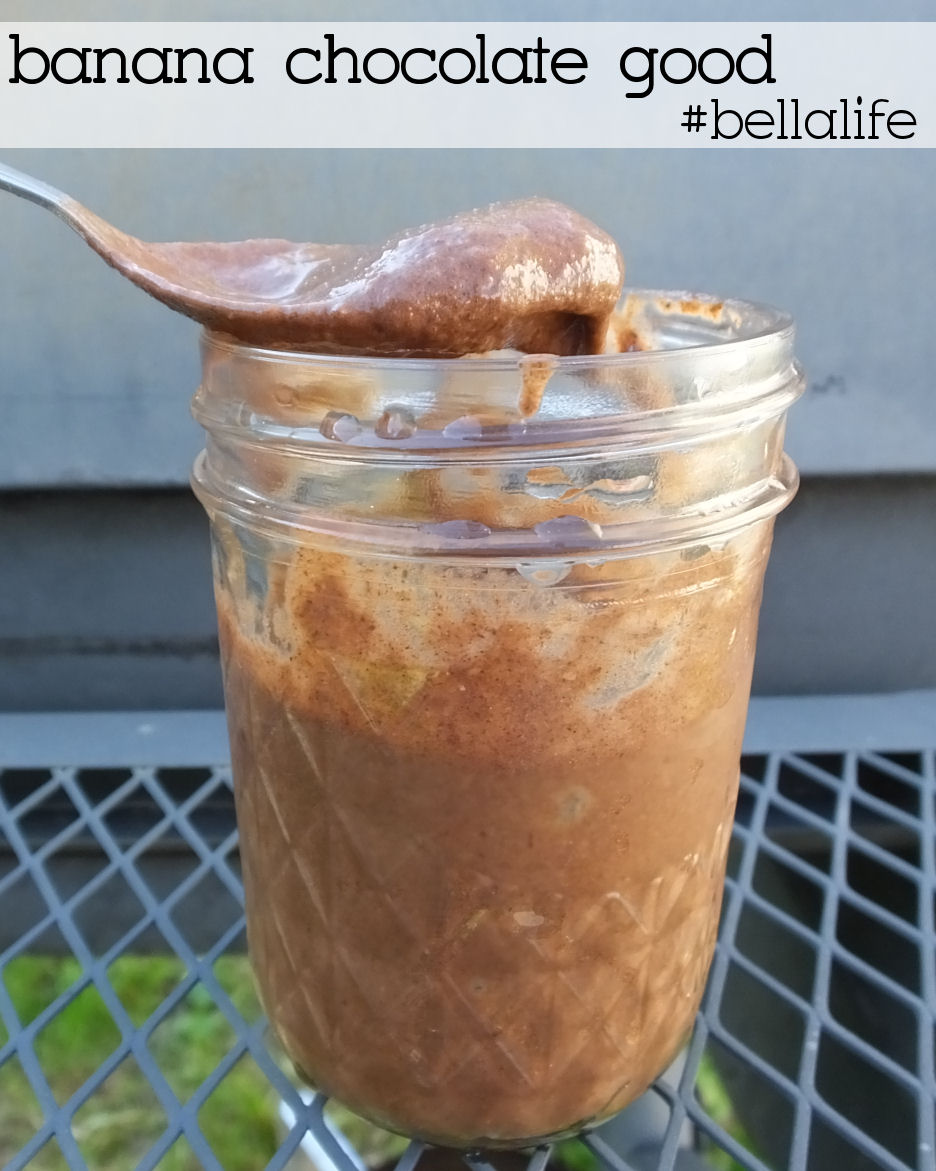
Banana Chocolate Good

Frozen chocolate blended treat #BellaLife #recipes #avocados #bananas #healthy

The name of this is because TG and I couldn't agree if it was more like a frozen pudding or a soft serve ice "cream". We did both agree it is FANTASTIC. The hashtag? Because we used a Bella Rocket Extract Pro to make it. We kind of love this blender. It has a 700w motor, and when we got it, one of the first things my daughter did was throw coffee beans in it. I screamed "STOP!" and she stopped the blender. I was convinced she might have broken it because coffee beans in a blender? In that couple of seconds between her starting the blender and me figuring out why it was so noisy- the coffee beans were ground to a espresso fineness.

So for this treat? No problem.

This can be made vegan easily by using a non-dairy milk. We used regular milk.
Banana Chocolate Goodness
Makes 2 servings
You will need:
2 1/2 frozen bananas- we just peel them, cut them half, and freeze them on cookie sheets, then put them in a zipper bag in the freezer
1/2 of a frozen ripe avocado- same thing as above
1/2 cup milk
1 Tbsp. sweetener of choice if you like it sweet- we used organic cane sugar
1 pinch of salt- we used French grey
3 Tbs unsweetened cocoa powder- Oh the antioxidant goodness! We used a raw cocoa powder, but use whatever kind you like

Just put it all in your blender and blend until smooth. The photo above isn't quite as smooth as the one I'm eating right now- because TG blended my serving just a second or two longer.
It's all full of nice healthy things, but it's absolutely a treat.

Thursday, July 18, 2013

Mint Matcha Ice Tea Pops- Recipe

Mint Matcha Tea Ice Pops

The green ice pops in my review of Stars Wars Ice Sabers Cookbook? Those were a wild idea I had recently. I was thinking of making a mint tea ice pop for the super refreshing and cool taste of mint. But I wanted them to be green, but naturally green. Which made me think of matcha green tea.

Matcha is a finely ground green tea that has a few varieties available. For things like this, you are looking for culinary grade. It adds nice flavor, and a great green color. The much more expensive ceremony grade matcha should be appreciated properly on it's own, and not as an ingredient. Check your local Asian grocery or if your supermarket is very well stocked, it might be available there. 

The ice pop mold I used has cavities that take about 2 tablespoons of liquid. Check the volume of your mold, and adjust recipe to fit.

You will need:
1/4 cup fresh mint OR a mint tea bag- I used fresh mint from my garden
1 Tbs honey! That's why they have kind of a murky- Yoda like color. The honey I used is a local produced darker honey that I love.
1 cup boiling water
1 or 2 pinches of matcha tea

In a medium sized bowl-
Bruise the mint with a spoon, or put in the tea bag. Then add 1 cup of boiling water and the tablespoon of honey. Mix the honey in well until it dissolves completely. Cover the bowl with a plate and let the tea steep for 5-10 minutes. (I like it strong so I went 10 minutes)

Strain out the mint, or take out the tea bag. Apply pressure to the leaves or tea bag to get out as much liquid as possible.

Add a pinch of matcha powder, and using a small whisk, whisk it well. If you want it a little greener, add another pinch of matcha. 

Use a funnel to pour the liquid into your molds, and freeze until solid.

It's an unusual flavor, but it's really good and just as refreshing as F5!

I do recommend planting mint. Even if you have the blackest thumb in creation, it's hard to kill mint. I have a little corner of my yard that's dedicated to mint. Mint likes to take over so it's best to plant it in containers, or have it walled in someway. 

Tuesday, March 26, 2013

Cookie and Milk Chocolate Candies

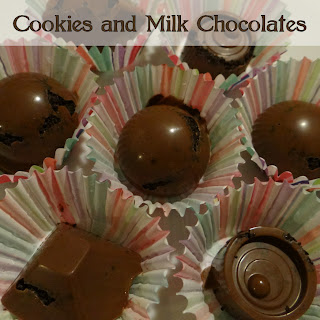
Cookies and Milk Chocolate Candies

Aren't those pretty with their strata of cookie crumbs? The Amazing Turnip Girl made them for her grandfather keeping in mind his tastes the entire time. Dad's a chocolate with more chocolate sort of person, so these were perfect. He also prefers milk chocolate to dark chocolate, so these instructions use that. You can absolutely use dark chocolate.

You will need:

  • 7-8 ounces of good quality chocolate*
  • 8-10 Oreos- crushed
  • Coconut oil
You will also need:
  • Double boiler or a heat-proof bowl (I use a glass mixing bowl) and a sauce pan
  • spoons!
  • knife
  • silicone candy mold
  • cookie sheet
  • wax paper
*I've said this before- but good chocolate is one that's only a few ingredients. If you see a bunch of kinds of oils, or see any chemical names other than lecithin- put it down and pick a different chocolate. I don't know how those types of chocolate, or chocolate candy will work in my recipes. We used Godiva because it was on sale and I know my Dad likes Godiva chocolate. 

You can crush the Oreos in a food processor, in a heavy duty zipper type freezer bag or just using a spoon and some muscle in a good mixing bowl. The second 2 methods are fun for kids. 

Put 2 inches of water in the bottom pan of the double boiler or your improvised version of one, and then set the top or bowl on top of it. Cut chocolate bars into small chunks using a sharp knife. Bring water to a simmer over low heat, and add chocolate and 1 tsp. of coconut oil to the top bowl. Melt chocolate. As it starts to melt, stir it to incorporate unmelted pieces and just keep stirring, it melts pretty quickly. Using the coconut oil makes for shiny chocolates without having to temper the chocolate (which is another skill set and a bit more work with more tools) but the chocolate WILL have to be kept chilled because it hasn't been properly tempered and milk chocolate likes to melt.

Get your clean and completely dry mold set on a wax paper lined cookie sheet. This helps keep any accidents off your counter tops! 

Spoon a small amount of chocolate into each mold, and then a small amount of cookie crumbs using separate spoons, after you've done that in the mold cavities, fill each cavity with more chocolate.  

Then you just set it in the freezer or fridge to chill until hardened, and unmold the chocolates. The reason I like silicone molds is that you can pop them out from the bottom by pushing up on the bottom of the mold and they come unmolded beautifully. If you want to, you can put them in candy papers or mini-cupcake papers, and chill until you're ready to serve them or give them as a gift.

The flavor is wonderful, since they used a good chocolate as a base and the cookies add a nice crunch. Her Grandpa will probably love them since they combine 2 of his favorite things. Chocolate candy and chocolate cookies. You can use different cookies in them if you prefer. Ginger, vanilla, even graham crackers.

T

Monday, November 5, 2012

Vegan, natural Roy Rogers and Shirley Temple jellies


Did you know CherryMan has a new natural maraschino cherry? They don't use high fructose corn syrup in any of their cherries, what makes the natural cherries different is they use natural coloring and all natural ingredients, you can find out more about them here. The flavor is very close to a standard maraschino cherry, a little less sweet, and they taste very fresh and good.

So it made sense to make Roy Rogers and Shirley Temple* jellies out of them. Shirley Temples are lemon-lime soda and grenadine with a maraschino cherry, and Roy Rogers are cola and grenadine with a cherry. Grenadine, the brands you see most in the supermarkets or liquor stores use a lot of high fructose corn syrup. In fact, it's the first ingredient mentioned. So.. to start my jellies, I needed to settle on ingredients.

Grenadine is a pomegranate flavored syrup. To highlight the cherries, I used a Pomegranate/cherry juice. I picked natural sodas for the jellies which can be found in the health food section of any good supermarket. To gel, I used vegan friendly agar.

Agar is a lot of fun, it gels a bit differently than gelatin. That little packet holds enough to gel several cups of liquid and generally it's cheaper at an Asian grocery than it is at a health food store. Generally a packet that size is under 1.50. In fact, I got that packet for 25¢ and use agar a lot as a stabilizer.

Shirley Temple or Roy Rogers Jellies:


You will need:
small saucepan
glass measuring cup with a pouring lip
measuring spoons
stirring spoon
a mold or 8x8 pan- I used the Wilton Brownie Squares Silicone Pan


Ingredients:
1/2 cup 100% cherry/pomegranate juice
1 cup soda- lemon lime for Shirley Temples, cola for Roy Rogers
1.5 tsp. agar powder
CherryMan Farm to Market Maraschinos

Mix the soda and juice in a pan and bring to a simmer, sprinkle in the agar powder, and bring to a boil. Turn it down and let it simmer for 5 minutes. After it's simmered, pour it into the measuring up and pour it into your UNGREASED pan or silicone mold. Place in the cherries, then cover and put it in the fridge for an hour until cool. Unmolding. For a firmer set, more like Jell-o jiggles, use 2 tsps of agar powder. For an 8x8 pan, cut into squares using a ruler to make them very even.

Usually 1 tsp of agar will set 2 cups of liquid, but the reason you use more than that with this recipe is because of how acidic the soda and juice are. Agar needs boiling to activate it then sets firmer and is stable in greater range of temperatures than gelatin. It's also vegan friendly which gelatin is not. Originally I tried to make this a sparkling jelly, but it didn't work out quite the way I envisioned.

They taste really good! The flavors are more complex, fresher and more interesting than just a regular Shirley Temple or Roy Rogers.

Check out CherryMan on Facebook for more recipes and ideas.

*Quick personal story- when I was a kid, I LOVED Shirley Temples, and ordered them every chance I got. One day my Uncle took the family out to dinner, and the restaurant didn't have Shirley Temples! Oh the tragedy of it all. Then my mom told my Uncle "She really just likes the cherries." So he tipped the waitress 10 dollars and she brought me a bowl full of maraschino cherries. I didn't eat them all. Mom made me share with her.


CherryMan provided the Farm to Market Marascinos to me in exchange for a review. The opinions expressed are my own. The jellies are my own too, but I've decided to be nice and share them with my family.


Monday, October 15, 2012

Chocolate Cream Cheese and Whey Bread

This is from my old blog. Originally posted July 2008.

I was too impatient to try baking bread with whey to wait the amount of time it takes to make a sourdough starter without yeast, so I went ahead and made up some bread today. It turned out good. E is planning to have some tomorrow with strawberry jam and the chocolate cheese we made.

Chocolate Cheese
Okay, this is fun to do with kids because of how it works. Milk has a lot of protein, sugar and fat solids in it, and the protein is resistant to acids, so when you add an acid to milk which is heated up so the molecules are less tightly together, the acid mixes fine into some of the sugars and liquid of the milk, but not into the proteins, which causes the proteins to separate from the rest. It winds up looking curdled, with solid curds and liquid whey. Most recipes call for a gallon of milk, but I had, like I said, a half gallon of organic milk.Measurements are American, I apologize, worse, we cook by volume, not weight. There are a lot of sites with conversions though.
Sauce pan, one big enough for a half gallon of milk, plus a couple inches head room, spoon, I have a wood angled flat stirrer I use, strainer, bowl (to drain the whey into), cheese cloth, a container to put the finished cheese in, some jars for the whey, spoon, hand blender or food processor (I don't HAVE a food processor, I do have a hand blender)
1 half gallon of milk
3 Tbs white vinegar
1/2 tsp salt (I use sea salt)
1/4-1/2 cup cocoa powder
3/4 cup sugar, or sugar to taste
1 tsp vanilla
1/4 cup of milk
Line the strainer with a couple layers of cheese cloth, and set it over the bowl. 
Bring the milk to a simmer, about 185° F, or until bubbles are just forming on the sides, stir frequently to keep from burning the milk. Add in the vinegar, you'll see curds start to form immediately, keep cooking and stirring over a low flame or low heat if you have electric pulling the pan off occasionally to keep it from boiling over. Lots more curds will form. After 10 minutes, pull it off the heat and pour the whey and curds into the strainer. You'll probably have to take the strainer off before you get it all poured to pour some of the whey into a jar, so do that, then set the strainer back over the bowl and finish pouring. Take the sides of the cheese cloth and fold them over the top of the solid curds, and push down with your spoon to express a bit more of the whey out, then put a cloth over the top, and set it all some place cool for a couple hours to finish draining.
After a couple hours, take the stainer off the bowl, pour the whey into the jars, close them, and put it in the fridge to use for baking later, it can be used for the liquid in almost anything. Rinse the bowl out, and turn out the cheese into the bowl, add in the other ingredients, blend well. The extra little bit of milk helps make this very creamy and spreadable. I think with a bit of powdered sugar, not too much, this would make an amazing not too sweet frosting for cupcakes. I'm thinking a bit of chocolate ganache, and a dollop of this cheese on top of devil's food. Oh yeah! That's what I'm forgetting, put the cheese into your container for it. I love my Lock&Locks!

Whey Bread
Recipe makes two loaves of bread.
big bowl, wooden spoon*, oil/fat of some sort to grease the pans and the dough while it's rising, 2 bread pans
Proofing the yeast
1/4 cup warm water in the bowl
1 tsp sugar or sweetener**
4 tsp yeast or 2 packets.*** 
Proof the yeast, which means mix the sugar into the water, then sprinkle in the yeast. Give one stir with the wooden spoon. 
Let it set for 10 minutes, if it's foamy looking at 10 minutes, your yeast is living and you're good to go.

Mixing the Dough
2 cups of whey
3 Tbs butter or other fat
6-8 cups of flour, I used an unbleached, organic all-purpose flour, if you are using a dark flour, you might need a bit more.
1 Tbs salt
2 Tbs sugar
Preparing the liquid parts of the bread
My old Betty Crocker cookbook from the 60s calls for scalding milk, but microwaves make it so easy.
Put cup and a half of your whey mix into a microwave safe cup, I use my Pyrex measuring cup, add 3 Tbs of butter, zap it for a minute. Stir in a half cup of cold whey to cool it down to "won't kill happy little yeast" temperature. Pour into your yeast mixture.
Put 2 cups of flour, the salt, and the sugar, and stir it in the liquids. 
Keep stirring in the rest of the flour a cup at a time until you can't stir anymore, then flour your hands, and get in and start kneading in more flour. After you've added most of the rest of your flour (I've never needed all of it before I can't add more) keep kneading until it gets smooth and elastic. Kneading develops glutens, which creates the chemical reaction that turns your mix of whey and flour into a big mass of nice smooth uniform bread dough. I love this process. Now, most people turn it out onto a counter top, with a working surface of some sort put on to it, I just knead in the bowl, less clean up. When it's all a nice big smooth uniform ball of dough, oil the dough ball all over, and cover the bowl with a clean towel, and let it rise for an hour in a warm place. 
Baking the bread
After an hour, grease your bread pans then check to make sure the dough doubled by pushing down with a fingertip, if the indention doesn't rise back up out of it, it's doubled. Punch it down, and knead again. Divide it into two balls, form loaves, and put it into the pans. Lightly grease or butter the tops, cover again, and set someplace to rise again. After it's risen the second time, put in the oven at 425°F for 45 minutes. After 45 minutes, check by thumping the bread, if it just goes *thud* it needs a couple minutes more, if it sounds hollow, it's done. Let it set for as long as your family will let you. Which in my case was less then 10 minutes, then E was finding my bread knife. I think it's a hint I don't make bread often enough. She had a big slice off the heel of buttered bread fresh out of the oven.
The bread turned out a bit sweet, whey has a lot of milk sugars in it, and it rose a bit more then my usual recipe rises. It's a lovely bread.

*Yeast can be reactive with metal, and slow down or even stop the process, so I always use my big glass bowl, and a wooden spoon, it does make a difference in how much rise you get.
**NOT a no sugar sweetener, yeast won't grow on Nutrasweet. Honey, molasses, cane sugar, raw sugar, organic cane sugar, maple sugar, or birch syrup is fine. Something with sugars in it for the yeast.
*** Since E loves making pizza, we always buy jarred yeast, but if you only make bread occasionally, packets are the more economical choice since you won't risk it going bad waiting for next time. My ex-husband never saw the point of proofing the yeast until a batch failed on him. He wound up making cinnamon-cayenne crackers (also unintentional, he meant to make cayenne savory and cinnamon sweet) which were good, and an excellent reuse of failed bread, but really, it only take 10 minutes to proof.

This recipe, and several more yeast bread recipes are available in my Kindle e-book.