Printing Tips

Check out my printing tips if you're having problems printing to the right size
If you'd like to support this site and all the free things I post- please check out my Don't Eat the Paste Mandala collection coloring book for 9.99 at Amazon.
Showing posts with label hand sewing. Show all posts

Saturday, December 5, 2015

Easy hand sewn hair bow tie clips

How to make these adorable hand sewn hair bows

I love this project. I hand sewed mine, but you could absolutely use a machine and make them even faster.

You will need:

  • a 8.5 inch wide by 5 inch tall piece of fabric (if it's directional- otherwise just 8.5x 5 inches)
  • pinking shears
  • sewing needle
  • thread
  • pins
  • 2 tapestry needles
  • embroidery floss
  • buttons


You will also need some sort of clips. I used plastic clips for mine that didn't have sewing holes. If you prefer to sew on the clips, use a different type. I used E-6000 glue to glue my bows to the clips.

If you use a knit fabric- regular scissors will work. Pinking shears are recommended for woven fabrics or you can seal the edges with a very light coat of either watered down PVA glue or Fray Check.

Cut 2 strips, 8.5 x 2.5 inches

Fold and finger press one end a half inch to the back.

Now you're going to do the trickiest part. Fold the fabric right sides together with the folded edge centered on the back on the inside and the other edge overlapping that. Pin it.

Now stitch the two long edges.
When you turn it right side out, making sure the corners are completely turned using something like a chopstick or a pen it will look sort of like a pillow sham with the folded edge on the outside of the back.

I marked the stitches to gather the center with pins since I was using black thread. If the fabric is fairly thin, 6 evenly spaced stitches works. For a thicker fabric like the knit I used- 4 stitches worked, sectioning the gathers into 3 different gathers. Top, 1/3 down, 2/3s down, bottom, starting from the front. 

Pull stitches tight to gather. 

To put on the button, I threaded 2 tapestry needles with one length of 3 strands of embroidery floss, then pushed both needles through, and tied in knot on the back. 

Because the fabric was thick, it needed extra gathering. Since the gathers were set by the stitches, I wrapped them tighter with the tails of the embroidery floss, bringing each end in opposite directions around the bow, under the button, then tying tightly. 
Then glued the bows on the clips! If you're using a directional fabric, make sure you face the clips in opposite directions. 

I love these, they are simple to make with scraps of fabric- or making them a little smaller, they can be made with Spoonflower swatches, which is what I used for my prototypes. 
This fabric is available for sale in my Spoonflower shop

Wednesday, November 11, 2015

Book Review- Cuter Stuff by Aranzi Aronzo

Cuter Stuff by Aranzi Aronzo

I'm wild for Aranzi Aronzo's books- especially the craft books. I love Japanese felt mascots and crafts and they are always well done.

Vertical Inc. publishes English translations of Japanese books and they are well translated so they make sense. Their cookbooks and craft books are among my favorites for that reason. This book is a translation of Feruto No Komono.

When you open the book, you'll find pages of instructions. Sweetly illustrated, it explains the supplies you'll need,  stitch techniques and abbreviations, tips for keeping things in place while you're working and how to trace or copy the patterns. The instructions are clear enough that a complete novice at hand sewing can follow them.

The projects are great. My favorite thing about felt sewing is that it's a great way to learn basic hand sewing skills very inexpensively and making some great things. For people who are more experienced, it's instant gratification. These trendy, cute projects are something that nearly anyone would enjoy making.

Projects include pencil cases, pen covers, key cases, jar or can covers, little soft trays with appliques, magnets, coasters, flowers,coin cases and card cases. All made with totally cute characters, and easily personalized. They show how easy it is to change an expression by how you make the mouth and how you can use simple shapes to personalize everything.

My own felt crafting tip- use sharp sharp scissors. I have a pair set aside specifically for felt. You could make a felt mascot to mark the handles of your felt scissors!

Stitches used are running stitch, straight stitches, whip stitch (which they call overlock), French knots, back stitch, Supplies are inexpensive. You can use eco-craft felt, or if you want to splurge, use wool felt.

It's hard picking a favorite project out of the book, but if I have to- it's the face magnets. It's a very simple project that makes a great gift.

There are also tips for using the patterns and techniques in different projects- like doing an applique on a shirt or using two coasters sewn and stuffed for an ornament.

Fun book, and one I happily recommend for anyone 9 years old and up.

This book will be released on November 24, 2015 and it's available for pre-order on Amazon now.

Facebook links-
Vertical Inc.
Aranzi Aronzo Official (in Japanese)
Don't Eat the Paste


I received a complimentary copy of this book to review, I received no other compensation, and my review is my honest opinion of the book. You can read more about my review policy here.


Sunday, April 13, 2014

Book Review- More Felt Friends from Japan

Congratulations to Susan, the winner of the Origami Flowers giveaway. I hope you're enjoying the book!

More Felt Friends from Japan- review and giveaway #sewing


Kodansha is a Japanese publisher with a US division for great translations and I'll get back to this review in a second, I'm kind of lost in their website.... Oh, I need The Decorative Art of Japanese Food Carving, and my husband might like one of the sword books, and my kids love manga.. oh SHINY! Clothes, embroidery and textile.. need to get back to the review... 

Ok, I'm back now, it's just awfully distracting. How long did it take you to stop browsing the link and come back to read the review?

Felt mascots, toys appliques and accessories, all of them super cute. The projects are wonderfully photographed. Like a lot of Japanese craft books, the first part of the book is photos of items, with the instructions in the back of the book. Page numbers are given on the photos to find the instructions.

The photos are adorable. They are captioned and done on good backgrounds to show them at their best. It takes minimal supplies to make them. Craft felt for beginning sewers is an economical choice, then switching to wool felt for a higher quality finished item when you're comfortable with the hand stitching.

So with this book, before you start a project, read the tips at the END of the book. They will show

  • how to do the stitches including the embroidery accents
  • tell you what kind of supplies to use
  • how to use a wire armature, 
  • how to use the patterns
  • how to stuff the toys
The projects are good for a wide range of skills. There are some very easy applique projects, coasters and pouches which are perfect for beginners. They are whimsical and sweet. The Happy Coasters include a fish, a frog face and a chick, with easy embroidered accents. You might like to make the pouches and eyeglass cases as gifts.

A little more complicated are the lightly stuffed but still mostly flat Face Brooches, which are a bunch of cute animals and can be made with small scraps, the finger puppets and the charms which are strung with beads into darling hanging curtains.  My favorite of those types of projects is the Little Forest Birds charms because it reminds me of the felt ornaments my Great-Aunt Elizabeth made. 

The most complicated are the fully dimensional stuffed toys. These are more of a challenge because it's a small scale, but they are made using the same basic stitches, just more parts to create things like a giraffe, elephant or posable retro dolls that look like they came right off the set of an old stop motion movie. There are also dolls like Miss Kitty from the cover that have a full wardrobe you can sew for them. 

Some of the patterns you'll copy out of the book, the more involved patterns are printed on the inside of the dust jacket. 

The diagrams in the instructions are clear and show how to put the items together. 

This is a lovely book, and a must for anyone who really enjoys Japanese crafts.

Kodansha USA gave me an extra copy to give to one of my readers! Giveaway is open to people in the USA only because of shipping costs.
  a Rafflecopter giveaway
I received a complimentary copy of this book to review, I received no other compensation, and my review is my honest opinion of the book. You can read more about my review policy here.

Friday, June 21, 2013

Cute Little Zip Case- hand sewing project


This little zipper case may seem a little complicated, but it's really, really not. Best part of it is that it's made from scraps and recycled materials, and it's good hand sewing practice. Unfortunately, I didn't take photos while making it because I made it a few months ago after getting proofs of some of my Spoonflower fabrics. I didn't really plan to post the project, but TG asked "Why not? It's cute!" This case is inspired by Japanese macaron purses, but instead of using a domed plastic shape for the sides, it uses milk jug plastic with felt to soften the top.

So you will need:

  • fabric- 4 pieces, they can be different patterns, but at least 6x6 inches if you are using a 7 inch zipper. 
  • zipper- this can be recycled if you pick out the stitches from the tape carefully and the tape is intact
  • clean empty plastic milk jug- I love milk jug plastic
  • ribbon- a 1/4- 3/8th inch satin ribbon is a good choice, just a few inches
  • needle
  • thread to match the zipper
  • a 6 inch piece of craft felt (if you are using a 7 inch zipper)
  • glue- tacky glue works well.
  • scissors- one pair for plastic, one pair to cut fabric. Please don't use your fabric scissors on plastic.
To start, overlap the ends of the closed zipper, and stitch them together. Stitch across the top bar of the zipper where it separates to close it securely at the top. Knot off thread on the right side of the zipper. It's going to get covered with ribbon so the knot doesn't show.


Make a small loop with part of the ribbon and sew it on so it goes the same direction as the zipper pull.

Now take another piece of ribbon and wrap the overlap with and sew it into place keeping the zipper flat. Don't let it gather or bunch up!

See how it's sewn? Also the open photo will hopefully help make the following instructions clearer.
So now that you've got your zipper loop, cut out 2 pieces of plastic in a circle that's about 1/2 inch smaller than the zipper loop. Which would be about a 1/4 inch all the way around.

Set the plastic pieces aside for a minute. Now it's time to gather up the zipper. Close to the edge, make basting stitches on one side and leave ends to pull. Repeat on the other side. Then pull to gather.
Now you'll make the inside. For that, cut 2 circles of fabric that are twice as big as the plastic. Stitch a running basting stitch all the way around, put the plastic in the middle on the wrong side of the fabric. Pull stitches tight around the plastic and knot off.
So now the insides are ready to be stitched to the inside of the case. Since the whole thing is going to be covered, you do want your stitches to be strong, but don't worry about how the knots look. Open the zipper, which should have a clamshell look with the gathering. Set one fabric covered plastic piece inside one side of the "clam shell" with the gathered sides together. Stitch it into place. Repeat on the other side.

Now it's time to make the top. For this side, you want it just the same size as the zipper loop. Cut 2 circles from the milk jug plastic the same size as the zipper loop, then 2 pieces of felt that are 1/4 inch bigger all the way around. Glue the felt to the plastic pieces. 
Cut 2 pieces of fabric in circles twice the diameter of the plastic circle. Do a basting stitch all the way around, then set the plastic circles on the wrong side of the fabric with the felt sandwiched between the fabric and plastic. Pull to gather the stitches. Knot securely.

Now all you have to do is stitch the outsides to the rest of the case, and it's done! 

These are so easy to make, and are super cute. Because the inside is very flat, it won't hold a lot of change, but it will hold a couple small treasures or keepsakes. 

Friday, February 8, 2013

Book Review- Jeaneology


Jeaneology by Nancy Flynn is written for teens and has projects for recycling torn or old jeans into new things. Since my teenage daughter is a big fan of upcycling and sewing, it seemed like something she would enjoy.

I was right. It's written at a close to beginners level. The author does assume at least basic hand sewing skills, and that was my first very pleasant surprise about this book. We have a lot of sewing books, but most modern books focus strongly on machine sewing. They never seem to take into account young sewers like my daughter who can use a sewing machine but honestly prefers to sew by hand. The instructions are written so they can be used by both hand sewers and machine sewers. The beginning section includes useful information like explaining about bias tape and other tools you may need and how to pick the right hand sewing or machine sewing needles for working with denim.

The layout is image heavy with clear illustrations, and spiral bound with a heavy paper cover so it can lie flat. There is a full color photo of every project, and interspersed throughout the book are trivia, facts and tips about jeans. This was one of my daughter's favorite parts of the book.

The projects are well organized, starting with clothing in a chapter called Rocking Rags. Converting jeans into a maxi skirt or a mini skirt, making shorts and a great set of tips for distressing or customizing an existing pair of jeans. I absolutely loved the photo of the star stenciled jeans that were discharged using a bleach pen.

Mean Jean Accessories has headbands, gadget pockets and the nice big purse that's pictured on the cover as well as some great casual jewelry projects for making the most of even small scraps. This was my favorite chapter because it's a good way to use jeans your family gives you that are torn or stained.

Blues You Can Use has gift ideas and projects that are functional. This chapter had my daughter's favorite project, an oven mitt. It also has projects like coasters, place mats and a cute little key fob.

As a crafter, I love the ideas in this book for upcycling and using jeans. My daughter loved it just as much. The projects are a good mix of things to do with whole intact pairs of jeans and pairs that have seen better days. 25 projects total, all very well illustrated with good text instructions.

Published by Zest Books - Teen Reads with a Twist.


I received a complimentary copy of this book to review, I received no other compensation, and my review is my honest opinion of the book. You can read more about my review policy here.

Thursday, December 13, 2012

Sewing Cubes and Tetrahedrons

Tetrahedron and Cube- Hand sewn

Yay for Platonic solids! Platonic solids are polyhedral shapes made of regular, symmetrical shapes, and there are only 5 of them. If you play or love someone who plays tabletop RPGs, you're very familiar with them. They make up the dice for those games. Cubes and tetrahedrons are very easy to sew, especially if you start with a fabric that has tessellating squares or triangles. The above models were sewn using swatches from a new collection I have up at Spoonflower. Any square or triangle fabric will work, or you could do them in patchwork shapes pretty easily too with a few more seams.

I did these with hand stitching because of their size.
Sewing the tetrahedron- 
A tetrahedron is the shape you might know as a 4 sided die, 4 equilateral triangles that form an almost pyramid like shape. It's the shape used in pyramid tea bags as well.

If you're making a large one with various fabrics, you'll cut 4 triangles at the right size plus seam allowances. If you're handstitching a little one like me, you'll cut out your fabric like this-

First, find your 4 triangles, you want a multi-directional design if there is a design in them, and you'll be cutting out a strip with 60 degree angles on the sides.

Add your seam allowance. For me, it was about 1/3 of an inch since they are hand stitched. Chalk in that line, or use a permanent marker, they will be inside the seam so it won't show.

Cut out including seam allowance, trim the corners to reduce bulk.
See the arrow? That's where you start stitching. But you'll need to pin it first because the second seam can be kind of a pain. With the right sides facing each other, pin A to be, C to F and E to D on the corners and in the middle. It's going to look a bit screwy because of that odd direction seam, it will work though. Starting at the arrow, stitch the A-B seam, then the F-C seam, take out all the pins and turn it right side out. Stuff it as firmly as you prefer. I used polyfil to stuff mine. Then slip stitch that last seam to close. 

If you're using separate triangles, you'll make a strip as shown above, then stitch that final seam as described, leaving a gap for turning, then slip stitching that closed after stuffing. Tie knot in thread, and bury the thread end in the finished shape.

Sewing the Cube-
This is a lot easier, especially for anyone who is a regular reader of my blog! Because it goes together a lot like a box but with closed seams.

In my fabric, the knotwork squares are set up on a diagonal, so finding my base shape looked kind of like this-

Add seam allowances, cut out including seam allowances and clip corners.
Now it's time to stitch it. This will be done in a couple stages because you'll need to knot off the thread and start sewing from a different place.
So starting on the inside corner: A-B, C-J, D-E, which brings you to the bottom corner of D-E. Knot off thread and cut. Then from the inside corner, G-H, I-F, knot off thread and cut. From the inside corner, L-M- turn right side out and stuff, then slip stitch K-N to close. 

These can be used as ornaments, toys, a little bigger than my models, juggling balls. 


Sunday, July 22, 2012

Some tips for hand sewing dolls

I'm not an expert on doll sewing, or on hand sewing. It's something that my daughter and I both enjoy quite a bit though and these are some tips that came up while I was showing my son how to make something recently.
Kokeshi Style Fabric Dolls
Swatch Dolls- my design on Spoonflower printed Kona cotton.
You can find the swatches for sale here.


I have sewing machines, enough to qualify as a collection and to make my husband steer me right past any we see at garage sales. But the reason I like hand sewing is that it's a quiet thing to do on evenings my family is watching television together. It's the same reason I knit with wood needles. My daughter just loves hand sewing. She can use a sewing machine, but prefers working in her room on hand sewn dolls and other things. Mostly dolls, she's been making dolls since she was about 3 or 4. They get more and more complex as time goes on.
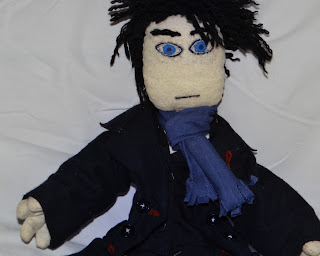
Sherlock Holmes Doll
Sherlock Holmes- Designed by The Amazing Turnip Girl
I've been suggesting for years that The Amazing Turnip Girl start a blog for her dolls. A lot of them are fan based. She's done Doctors, comic book characters and video game characters. The doll above her most recent, Sherlock Holmes from the BBC series. I asked her if she ever draws patterns or if she just starts cutting. She says "Sometimes I make a pattern, but it's usually just a T shape." She's incredibly clever about the fabrics she uses, they come from thrift stores, old clothes and remnant bins.

My dolls are less interesting, as shown above. They are basically cookie cutter dolls printed on Spoonflower swatches. 
Stitching:
Generally, you'll use one of strand of thread and the smallest needle comfortable. You can used doubled threads but it makes a heavier seam and bigger holes in the fabric. My preference is a glazed cotton thread. It's smooth and easy to work with, try different threads and see what you like best. For hand sewing needles, my favorite are Clover Gold Eye sharps or quilting needles. 
Originally, I used back stitching for all my dolls, and TG used a running stitch. 
I've realized that while back stitch makes a sturdier seam, TG's dolls hold up just fine for her uses. Running stitch takes less time, but the problem is, it can be prone to gathering. So now I use a combination stitch. I start with a back stitch, and use a back stitch at every corner so my needle comes out at just the right place and the corners are reinforced. I also do a back stitch about every 5 stitches, which locks the thread so it doesn't gather.

It's very important for neat stitching and making sure everything lines up in small scale NOT to do a few stitches on the needle at a time. Put the needle in and pull the thread for each stitch. It makes neater stitches, and for small scale things, the little bit of extra time makes a neater finished product. For bigger things, there is more room for adjusting the slack. 

Clipping Curves and Corners:
Clipping curves and corners helps a lot when you're turning the doll inside out. For outside curves, it allows the seam allowance to spread a bit instead of gathering and puckering. For inside curves, it reduces bulk in the curve. For corners, it works the same way. You clip the seam carefully after sewing. For outside curves, you just need to make snips in the fabric. For inner curves and corners, you should actually cut out a wedge. Examples of good cuts are shown below in red. You'd continue clipping the seam all the way around.

Stuffing:
There are lots of kinds of stuffing. The most environmentally minded is using scrap fabric of course. If you're going to do this, cut the fabric up very fine to keep it from bulging or lumping up in one area.

My daughter likes regular, old fashioned polyester fill stuffings. You know the kind that look like a big cotton ball that you pull off bits of to stuff? She likes it because it stuffs more firmly, and it's neat and tidy to use it so she doesn't wind up with lots of stuffing bits on her bed where she sews. It's easy to wash and dry.

I prefer cluster stuffing. It's also made of polyester, but it acts sort of like down filling. The individual clusters shift around and have lots of room for air making very soft stuffed toys. It's easy to wash and dry, but like washing down filled coats and comforters, a tennis ball in the dryer helps distribute the fluff. TG doesn't like cluster fill because "It's messier."

Cotton batting has the advantage of being easily cold water washable and you can scent it easily with fragrance oils. It's a good choice for something like sachet type dolls that can be scented and put in a lingerie drawer or scented pin dolls.

Little plastic pellets are available for a bean bag type filling. A lot of people also use them in amigurumi to weight the bottom. I use polyester fill and high density plastic pellets for air guns in my amigurumi. 

Wool batting needs to be laundered a bit more carefully, but it's a really superior stuffing for heirloom toys. 

For the dolls above, since I don't plan to wash them, just wipe them occasionally with a wet cloth if necessary, I sewed tiny sachets filled with lavender and put it in with the stuffing. 

I use a long pairs of tweezers to fill nooks and crannies. A knitting needle will also help get stuffing into small areas.

You can buy the swatches for the dolls at the top from my swatch toy page on Spoonflower. Swatches are 5.00 each, but occasionally they go on sale, and once a year, Spoonflower has a free swatch day.

Friday, June 8, 2012

Rain Cloud Felt Pin

This isn't a step by step how to, more an overview.

I made this pin last night. The bead/pendant hanging from the bottom is from Cousin Corporations Jewelry Basics Acrylic series. It's a bit over an inch long.

You will need:

  • White craft felt
  • Embroidery floss
  • colored sequins 
  • 2 small seed beads for the center of the eyes
  • tear drop shaped bead or pendant
  • large seed beads- those are from an E bead mix
  • a scrap of plastic (milk jugs are great for that!)
  • pin back
  • small amount of stuffing
  • scissors
  • thread
Take a piece of white craft felt about 6x2 inches, fold it in half so the 2 inch sides meet and cut out a rain cloud shape. I just freehanded a rounded shape. 

I'm not a fan of big bulky knots for small projects like this to keep the thread from pulling through the felt, so what I do is tie the end of my thread in a knot big enough to keep it from pulling through a light colored sequn, and use light sequins on the back where the knots will be. 

Embroider the face and finish off the embroidery with another sequin on the back. I also used two blue sequins that matched my thread for the eyes, held in place by seed beads.

On the back, stitch the little drop with the beads and tear drop, then make a running stitch to where you want the pin back to be. Cut a small rectangle of felt that will fit over the center bar of the pin back, and stitch it in place over the pin back.


Cut a small piece of plastic to sandwich between the two layers of felt. Stitch the felt pieces together with a blanket stitch around the plastic stopping about 3/4s of the way around to very lightly stuff it on the front side. Finish stitching.

Super easy! And you have a cute little rain cloud pin.

Sunday, June 3, 2012

Super easy hand sewn fleece fingerless mitts tutorial

These are a great "sitting watching tv" project, they are inexpensive, easily personalized, and make nice gifts. The pair above was made from a scrap of fleece that I got in a bag of scraps from the thrift store.

You will need:

  • Fleece
  • Chenille or embroidery needle- size 20-22
  • Sharp scissors
  • Ruler
  • 1 skein Embroidery floss 
About fleece- It's a knit so it won't fray, which is why it's used for knotted blankets. It will have more stretch in one direction than the other, so check the stretch, you want the greatest amount of stretch to wrap around your hands, not in length of the mitts. The greatest amount of stretch is usually selvage to selvage (finished edges).  The mitts, as shown above, take 2 pieces of fleece 7x9 inches with the stretch along the 9 inch side. A 1/4 yard of fleece is 9 inches wide and about 60 inches long so you could make 3 pairs off a quarter yard of fabric. Since fleece goes on sale frequently, this makes it a very inexpensive project.

The reason I like the chenille or embroidery needles in that size for working with fleeces is that they are sharp enough to go through easily, and the eyes are the right size for 5-6 strands of embroidery floss. Because of how thick fleece is, using all the strands on a skein works well. 

Start by cutting 2 pieces of fleece that are 9 x 7 (8x7 for smaller hands) inches, making sure the greatest amount of stretch is on the 9 inch edges. Fold each piece in half, wrong sides together, and make 3/4 inch cut in the fold 1 inch from the top of the fabric. Make sure the cut is mirrored on the other piece so when they are laid together with the folds facing each other the slits and edges match up.

Unfold the pieces.

Test the thumb hole to see if you need to make the slit a little bigger. Cut only a little bit at a time.
The rest is very simple hand sewing in blanket or buttonhole stitch stitch. For the stitching, I make small knots and pull it through one layer then then stitch the two layers together to sandwich the knot and tail between the layers. For the single layer parts, I make small knots on the side, then stitch over the tail to keep it neat.

First, stitch up edges of the slit, because you want it to be a bit stretchy, leave some slack in your stitch. Take a couple stitches on each side of the slit to secure that edge and keep it from stretching too much.

Fold in half, and blanket stitch the 7 inch sides together. 

Now stitch around the top and the bottom, single layer, to make a finished edge tube. Make sure to leave some slack for stretching when you put them on.


The first pair I tried to make, I put the stitched edge on the inside with a thumb hole. My daughter liked the way they looked, but I didn't like the feel of the seam there. This pair is also a bit shorter. They can be shorter or longer, or have a strip of another fleece inset for decoration.


Today we went to our local renaissance fair. My daughter brought along the TARDIS she made out of duct tape so we could get lots of photos. Did you know that when you bring a TARDIS to something like a ren fair, lots of people will stop to talk to you about it? The basic shape was made from cereal box cardboard, then covered in duct tape. The windows are cut out of clear packaging plastic.


Wednesday, May 16, 2012

Little Monster Necklace- easy sewing


A little monster necklace is silly, but it made me smile.

You will need:

  • 5x5 inch approximate scrap of plush fabric
  • Stuffing
  • Cord or ribbon
  • safety eyes
  • needle
  • thread
  • scissors
The shape of the necklace actually starts with an equilateral triangle. Here are a pair of templates, one is 3 inches tall, the other is 4. Click on the images for full sized 100 dpi jpgs. Cut the triangle out of the plush fur, and cut a piece of ribbon or cord that's 6 inches long and a second piece as long as you want the chain to be, I made mine long enough to go over my head with slipknots to adjust the length. Fold the 6 inch piece in half and tie an overhand knot about a half inch away from the fold for the bail.
3 inch-
4 inch-

Thread your needle with a doubled length of thread. This is hand stitched together using an overcast stitch. Since all the stitches are on the back and the fabric is plush, it's worked from the outside instead of inside out and turned. Flip the triangle so it's pointing down, and fold the bottom point up to the center middle. Flip it so you're looking at the back of large side of the triangle and make two small marks for eye placement. Cut two small holes and set the safety eyes so they are on the outside of the plush fabric.

Now you'll fold the corners in to make the squashed pentagon shape. 

Put the bail piece into the top middle, and stitch it into place with the knot on the inside. Stitch down seam, then the open seam on the side. Knot off securely, and stuff it now. Then stitch the other side.


You can add other features with felt. If you think the stems on your safety eyes are too long, you can cut or file off part of them before stitching. Mine were fine without having to shorten them. I like the origami like folds of the piece. 

My husband thought it was a very strange necklace. My teenage daughter was delighted and wants one of her own, and my son just thought it was cute and different.