Printing Tips

Check out my printing tips if you're having problems printing to the right size
If you'd like to support this site and all the free things I post- please check out my Don't Eat the Paste Mandala collection coloring book for 9.99 at Amazon.
Showing posts with label necklace. Show all posts

Monday, July 6, 2015

Faultlessly crisp gorgeous creases with Faultless Premium

This is a sponsored post written by me on behalf of Faultless/Bon Ami Company    for IZEA. All opinions are 100% mine.
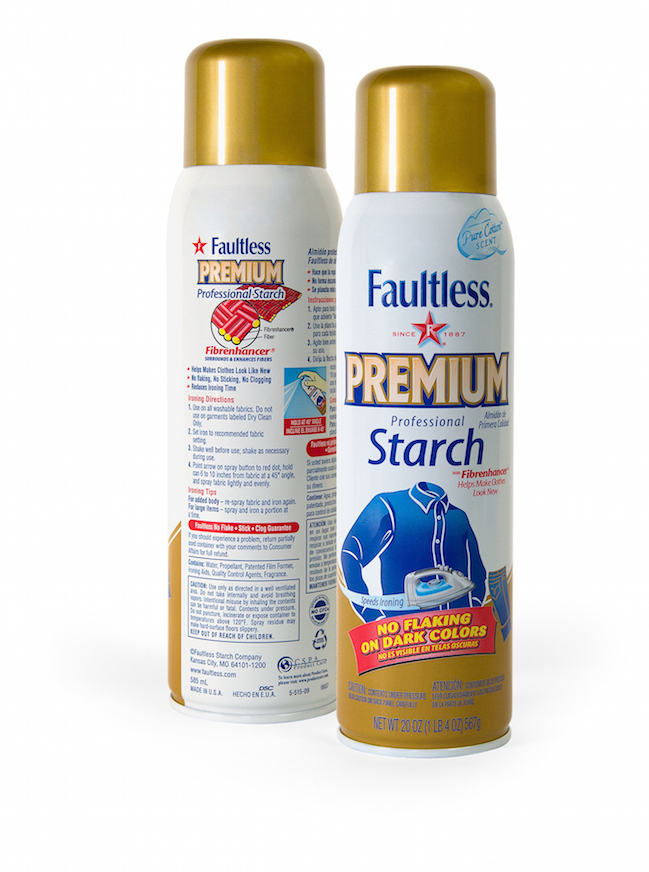
Faultless Spray Starch

I remember my mother ironing her cotton dresses with Faultless Spray Starch when I was a kid. Those beautiful dresses always came out looking so crisp and gorgeous, the skirts were beautifully full with perfect pleats, the collars were smooth and sharp. She looked so gorgeous and made it look so effortless.

My daughter doesn't wear tailored cotton dresses, but she does wear button down shirts. She wants them just as crisp and clean though, with nice creases down the arms. The shirt above is a cotton sateen shirt that's dark enough that flakes would show if Faultless left flakes. It doesn't though. Check out this sleeve!
Ironed, starched sleeve.

It's easy to use, keeps clothing looking new and sharp, it doesn't clog and it absolutely won't leave flakes on your clothing. Spray, press, and wear. The little bit of extra time to make sure your pleats are pleated and your creases are sharp and your clothes look their best helps you feel like you look great and you're ready to do your best to impress. It's also easy to find, fabric stores, drug stores, grocery stores, a lot of major retailers carry Faultless Premium.

Just gorgeous! It's really easy to use, and comes in convenient sizes, including a good travel size. The large can is the one I used, and it's lightly scented with a clean cotton scent. It's easy to find a store that carries Faultless Premium Spray Starch, and they have a coupon available to download- Faultless Premium Coupon 

Faultless Premium can also be used in crafts. One of my favorites is super quick, bright summery necklaces. All you need is some lace that can be cut into motifs, some jump rings, some cord and Faultless Premium.

Lace Motifs

Spray lightly, iron, flip, spray lightly, iron, flip, repeat a couple times. It won't get super stiff, it will get crisp. Attach a jump ring, then string it on a cord.
Lace necklace
undefined
Faultless Premium Starch is giving away $1,000 along with a year’s supply of Faultless Premium! It's easy to enter to win  the Faultless Starch Giveaway  for this fantastic prize package. 
  • Visit the Faultless Starch Giveaway  page
  • Watch the video of Ironing Board Sam singing the “Wrinkle Blues”
  • Enter your information
  • Share this link with your friends: http://bit.ly/1FP5Up4


Follow Faultless on Facebook for lots of tips, tricks and ideas.

Is Faultless a part of your wardrobe routine? I love how my tailored clothes look when they are starched and like to starch my hair ribbons as well. I think they tie into bows better that way. My daughter likes having knife sharp creases for some of her shirts. How do you use Faultless Starch?
 
Visit Sponsors Site

Saturday, January 19, 2013

DIY Glitter Photo Pendant


Tutorial- glitter photo pendant

This little pendant is kind of like a locket, except it doesn't lock, and it's pretty quick to make except for curing time. Mine has photos of my kids in it.


You will need:

  • Wood shapes- I used hearts!
  • drill with a 1/8 inch drill bit and something safe to drill on
  • 220 grit sandpaper
  • optional- painter's tape
  • paint
  • fine glitter
  • decoupage medium
  • foam brushes
  • Photos or pictures for the inside
  • 1/8 inch hole punch
  • scissors
  • ribbon
  • large jump ring- either handmade or commercial
Quick notes- I used my Fiskars Craft Drill, it's hand powered, quiet and easy to use. The glitter is Martha Stewart -Garnet, and the jump ring is made from 18 gauge copper using a knitting needle as a mandrel. The hearts were from a mixed bag of heart wood shapes.

You'll need two shapes the same size and shape, so if you have a bag of shapes, sort through and pick out 2 the size you want to make the pendant.

Then it's time to drill them. I used painter's tape to wrap them securely together. That let me drill both pieces at once to have the holes in the right place, plus wrapping them in tape helped keep the soft wood from splitting. You can also drill one, then use it to mark the other one to drill it.
Now take them apart if you've taped them together, and sand both hearts smooth. Then you'll paint them. They need to be painted and glittered in mirror image to each other so there is a front and back. Let the paint dry, then put on a coat of decoupage medium and GLITTER!
After the decoupage glue has dried, add another coat to seal the glitter so the finished pendant isn't leaving glitter everywhere. Let dry.

Then it's time to start with the photos. Measure your hearts to resize photos to fit, or draw little pictures on paper or cut images from a magazine. It's your choice, it's your necklace. Trace the hearts on the image, paying attention to where the holes will be so you don't accidentally wind up with a hole in the wrong place. Cut out just inside the outlines using the scissors. Place the heart over the image, and mark where the hole is to punch it. Repeat for the other image remembering they need to be mirror images for hole placement.

Decoupage the unglittered sides of the heart with the images.  Make sure the holes are clear using some sort of needle type tool.


Let the hearts cure,  Over night should do it.

Then you just need to connect them with the jump ring and hang from a ribbon!

You aren't limited to just hearts of course, stars will work. If you wanted, you could make a mini book by cutting pages to fit, punching holes and using a bigger jump ring. 

The cups in the photos are made by Silverbear Sundries. 

Friday, May 25, 2012

Recycled thread wrapped donut pendants

Recycled Thread Wrapped Donut Pendant

We don't have a Target locally anymore, and my medicine doesn't come with these nifty personal identification rings. A friend of mine who knows how much I love to craft with reclaimed things sent me a bag of them. 

They seem to be made of silicone, so the rings have some give. The base ring for the pendant above is blue. It's thread wrapped and color blocked, two popular trends. 

You will need:
A medicine personal identification ring
Embroidery floss in the colors you want
tapestry needle with an eye big enough for 6 strands of floss
scissors
cord

Cut a strand of floss that's at least 2 feet long, and tie it loosely around the ring.

Start wrapped the floss around the ring. You want to lay the wraps right against each other so they cover the ring completely. When you've finished the area you want to wrap, thread the needle with the floss, and then slide the needle between the floss wraps and the ring. Pull the floss under to lock it into place. Trim thread close, then tie the next color loosely on.
For the smaller wrap areas, rather than trying to neatly end off a small area, I added floss into one of the longer sections, holding a 2 foot length of floss and wrapping over it, then letting the end dangle until I finished the main color blocking.
After the ring was covered, I put the needle on the strand of floss and wrapped over a small section, then passed the needle between the floss and ring to come out in the next area I wanted a small wrap section.

It looks neater if you always go backwards through the section just wrapped, so that floss went back and forth a few times. The silicone has enough give that it worked well and didn't show very much.


Add a cord. The one I used has a simple overhand knot over the donut and sliding knots for adjustable length.


Wednesday, May 16, 2012

Little Monster Necklace- easy sewing


A little monster necklace is silly, but it made me smile.

You will need:

  • 5x5 inch approximate scrap of plush fabric
  • Stuffing
  • Cord or ribbon
  • safety eyes
  • needle
  • thread
  • scissors
The shape of the necklace actually starts with an equilateral triangle. Here are a pair of templates, one is 3 inches tall, the other is 4. Click on the images for full sized 100 dpi jpgs. Cut the triangle out of the plush fur, and cut a piece of ribbon or cord that's 6 inches long and a second piece as long as you want the chain to be, I made mine long enough to go over my head with slipknots to adjust the length. Fold the 6 inch piece in half and tie an overhand knot about a half inch away from the fold for the bail.
3 inch-
4 inch-

Thread your needle with a doubled length of thread. This is hand stitched together using an overcast stitch. Since all the stitches are on the back and the fabric is plush, it's worked from the outside instead of inside out and turned. Flip the triangle so it's pointing down, and fold the bottom point up to the center middle. Flip it so you're looking at the back of large side of the triangle and make two small marks for eye placement. Cut two small holes and set the safety eyes so they are on the outside of the plush fabric.

Now you'll fold the corners in to make the squashed pentagon shape. 

Put the bail piece into the top middle, and stitch it into place with the knot on the inside. Stitch down seam, then the open seam on the side. Knot off securely, and stuff it now. Then stitch the other side.


You can add other features with felt. If you think the stems on your safety eyes are too long, you can cut or file off part of them before stitching. Mine were fine without having to shorten them. I like the origami like folds of the piece. 

My husband thought it was a very strange necklace. My teenage daughter was delighted and wants one of her own, and my son just thought it was cute and different. 

Saturday, May 5, 2012

Egyptian style broad collar to color

I hope you enjoy this coloring page. The book signing today put Egypt in my thoughts, and inspired this mandala like broad collar to color. Click on the images for larger versions.

Small JPG

Large transparent PNG format


Wednesday, February 1, 2012

Crocheted Pendant Pouch- pattern


This is a pendant pouch that I made for my son. The rocks in it are supposed to encourage creativity- the set was put together by my friend Cat. She works the stone department at my local bead store, Black Elk Leather, Beads and Stones. They do mail order, and she puts together sets for various things. They are inexpensive (the set above was 2.25) . You can call the store and ask to speak to Cat, if she's not too busy, she'll tell you what she has available and how much it will cost. If you're in Alaska, go in and say hi to her next time your in Anchorage! (The stones are on the far left from the entrance. You'll have to pass Teri in beads, so say hi to her as well, and check out any beadwork she has on display.)

The pouch, made for my texture loving son, has a very simple spiraled texture, you can see the ridges on the photo above.

Crochet Pendant Pouch Pattern
American terminology used.
You will need:
Size 10 thread
Size 7 hook
Tapestry needle with a big enough eye for the thread to weave in ends
Scissors

Stitches:
ch=chain
sc=single crochet
dc=double crochet
hdc=half double crochet
sl st= slip stitch
st= stitch

Where it says "repeat ** around" that means repeat the instructions between the *asterisks* for the round until you reach the first stitch. It's a common instruction you'll find in a lot of crochet patterns.

Each round starts with a tight chain that does not count as the first stitch. I've found it makes a neater seam for me. If you prefer to start rounds with chains that count as the first stitch, do that.

Ch 2 or magic ring and ch 1
Round 1: 6 sc in first ch or magic ring, sl st to join (6 sts)
Round 2: (ch 1) 2 sc in each stitch around, sl st to join (12 sts)
Round 3: (ch 1) sc in first st, 2 sc in next st, *sc in next st, 2 sc in next st* - repeat ** around, sl st to join (18 sts)
Round 4: (ch 1) sc in first st, sc in next st, 2 sc in next st, *sc in next st, sc in next st, 2 sc in next st*- repeat ** around, sl st to join (24 sts)
Round 5: (ch 1) sc in first st, sc in next st, sc in next st, 2 sc in next st, *sc in next st, sc in next st, sc in next st, 2 sc in next st*  repeat ** around, sl st to join (30 sts)
Round 6: (ch 1) sc in first st, sc in next st, sc in next st, sc in next st, 2 sc in next st, *sc in next st, sc in next st, sc in next st, sc in next st, 2 sc in next st* , repeat ** around, sl st to join (36 sts)
(base done)

Round 7: (ch 1) sc in first st, double crochet in next st, sc in next st, *sc in next st, dc in next st, sc in next st,* repeat ** around, sl st to join
Round 8: (ch 1) sc in first st, sc in next st, dc in next st, *sc in next st, sc in next st, dc in next st*, repeat ** around, sl st to join
Round 9: (ch 1) dc in first sc, sc in next st, sc in next st, *dc in next st, sc in next st, sc in next st*, repeat ** around, sl st to join

Round 10: Repeat Round 7
Round 11: Repeat Round 8
Round 12: Repeat Round 9

Round 13: Repeat Round 7
Round 14: Repeat Round 8
Round 15: Repeat Round 9

Round 16: Repeat Round 7
Round 17: Repeat Round 8
Round 18: Repeat Round 9

Round 19: Repeat Round 7
Round 20: Repeat Round 8
Round 21: Repeat Round 9

Round 22: Repeat Round 7
Round 23: (ch 1) hdc in st, ch 1, skip stitch *hdc in next st, ch 1, skip stitch*, repeat ** around, sl st to join.

Break off thread and weave in ends.

To make the strap, I single crocheted a length long enough to fit over his head with a couple inches to spare, then slip stitches down the length of the strap, wove it through the ch 1 spaces on the pouch, and then put one end on the needle and pulled it through the other end, tied a firm knot in the ends, and wove in both ends.

If you want to make a smaller pouch, start the pattern at round 6 instead of round 7, and work less rounds for the pattern.

I hope you enjoy this pattern!

Tuesday, February 22, 2011

Turquoise Donut Necklace


I love turquoise. It's the alternate birthstone for December which when my son was born. The greenish blue color of it goes with jeans, to the office and with some dressier clothes. It's down to earth. 
Auntie's Beads sent me these to use for a project. They have a wonderful selection of gemstone beads in all sorts of colors and shapes. The beads used for this project are 

I also have to admit right now, I have a weakness for grab bags. The wonderful surprises in them. This one had 2 donuts, a pink pendant, a cross, and a blue round pendant. The round pendant has a bail on it that I made from wire for part of another project.

Instructions assume basic wireworking skill like wrapped links and making simple bails.
You will also need chain,  10 inches fine chain and 20 inches of heavier chain, sterling was used in the example. 22 gauge wire, headpins and a clasp. I used a toggle.
Cut 1.5 inches off the heavier chain.
If you take a look at the example above, I attached the clasp in the front of the necklace making it a design element, as well as having it in a place it won't get tangled in my hair. The clasp is attached with wrapped links  to the long chain ends. One side on each end. Then the smaller piece of chain is attached to the jump ring that came with the toggle to the circle part of the toggle. I like the asymmetric look of having the polished smooth rondelles on one side and the nugget on the other.,plus it makes it easier to close the toggle. 
Then the fun part. Make a bail for the donut using the wire and attach it to the end of the 1.5 inch chain. Then cut the 10 inch fine chain into 4 equal length. Cut a piece of wire 2 inches long and turn a small spiral on one end. String on one rondelle, 2 of the chains, 1 rondelle, the other 2 chains, 1 rondelle and turn another small spiral on the other end. This can be modified if the center of your donut is larger. Just add more rondelles to the ends. Thread the 4 chains through the donut. Now, add beads on head pins to the ends of all the chains. Because of the size of the nuggets, they won't pull through. I used nuggets on 2 chains, and rondelles on the other 2. 
The holes on these are a nice size, they aren't drilled impossibly small like a lot of gemstone beads are. Which makes them great for stringing and other projects, but if you find the hole is a little big for the headpin, just put a seed beads or a 2mm round bead on the headpin first.
It's done. A nice necklace with a lot of visual and textural interest that's still very wearable.

Friday, August 20, 2010

Wood Necklace Project- super easy and quick


I'm so happy with how this turned out, and they are very easy to make and modify.
You'll need wood shapes, sand paper, paint, a drill, a strand of plastic beads and a couple big jump rings, and Mod Podge
You can also use decoupage, stickers, rhinestones and glitter to decorate.

The shape I picked up was a bat shape. I love Halloween. Really truly. 
First I decided how I wanted it to hang from my strand of beads. Since it's a bat shape and the head is below the wing tips, I drilled holes on the wing tips.


Removed the label, and sanded it smooth on both sides. Then painted one side, then the other with acrylic paint. I used DecoArt Metallic Blue with a bit of a purple mixed in. On the front, I sprinkled glitter on it. 
After that dried, I coated it with a thin coat of Mod Podge and let that dry. Repeat on the other side. I got some Mod Podge in the holes, and just used a scrap of wire to clean the holes back out while it was still wet. 
Then another slightly thicker coat of Mod Podge on the front, and I put the rhinestones on that. The rhinestones have a sticky back, but it didn't seem secure enough. Putting them in the Mod Podge made them a lot more secure. 
After that dried, put the jump rings in the holes and hang it from the strand of beads.
Super easy, super quick. Now I want to get a lot more shapes and make a bunch more of these.

I used my Fiskars craft drill. The craft drill is a nice non-powered option for wood and plastic and I use mine on resin, polymer clay, wood, plastic toys I want to make into beads and other light craft drilling. 
The beads I used were part of my collection of throw beads from Mardi Gras. I have hundreds of strands sent by friends hanging on my bedroom wall. For people who don't have hundreds of strands of Mardi Gras beads, you can get the same sort of beads at party supply places and sometimes at Claire's and other similar accessory stores. If you have lots of Mardi Gras beads you want to get rid of, you can send them to me!
This is another fun project to do with kids. With very young kids, I used to use thick tempera paints with mine. I'd pick 2-3 colors that worked harmoniously together so they wouldn't  turn to mud and I did the sealing. With slightly older kids, decoupage on simple shapes make very fun necklaces that can reflect interests. For tweens, teens and adults, almost any scrapbooking technique for embellishment will work on these sorts of necklaces.