Printing Tips

Check out my printing tips if you're having problems printing to the right size
If you'd like to support this site and all the free things I post- please check out my Don't Eat the Paste Mandala collection coloring book for 9.99 at Amazon.
Showing posts with label basket. Show all posts

Tuesday, October 1, 2024

Quick Basket Decor Craft with Fall Flowers


yarrow accented basket

Oh the crisp cool days of fall! A lot of hustling, last minute garden harvests, berry picking, apple picking. 

And a moment for a bit of simple crafting with one of my favorite plants. See the picture above? The little nosegay off to the side is a bundle of dried yarrow I picked earlier this year and wrapped in pretty yarn and hung to dry. 


Yarrow dries beautifully, means a lot of things to a lot of cultures, has been used as medicine everywhere it grows and I always have a bundle hanging by my door. 

You will need: 

  • An open work basket with an edging big enough to thread flower stems through
  • a plant you like the look of that dries well 
  • a pair of sharp scissors

The basket I used was made by my son. He wasn't really happy with how he finished the edge of this one. That said, any basket with a decorate edge or a bit loose weaving towards the top will work. 


basket, scissors and yarrow

Cut the yarrow so the stems are about 5 inches long, but shorter will work for some sections. You just need them long enough to weave them in a bit. 

Get comfortable, and start weaving the yarrow into the top. Pull it as close to flush with the basket as possible so looks nice and full. 


weaving yarrow into the top of a basket

Weave the ends in a couple inches. As you add more yarrow, you can also weave the ends into the other ends of yarrow and the basket. 

After the edge is completely filled in, go around and snip off any pieces of stem that are too long. 

Hang, and enjoy it while it's drying. 

You can also tie a ribbon or piece of fabric in a bow under it, but if you do that, do it before the yarrow dries so you're not breaking off the yarrow. 

Dried yarrow has stayed nice looking for me for a couple years. Since I'm not sealing this, when it does start fading in a few years, I'll carefully break off the dried yarrow and replace it. If you don't want to do that or if you're giving the basket as a gift, you can use a clear spray sealing spray on it after it dries completely to preserve the colors. 


Tuesday, June 5, 2018

Soft triangle baskets- sewing project

Triangle soft felt baskets sewing project

This is going to be a tutorial with a LOT of photos for a very simple project because the start of learning how to do this is learning how to fold and cut an equilateral triangle for a pattern out of any size rectangle of paper. In the near future there should also be a video made by my daughter.

The angles of any triangle add up to 180°. For an equilateral triangle, that means each angle is 60°. Folding 90 and 45 degree angles is easy, here you will learn how to fold a 60 degree angle. 

The table I'm working on is a small poly table that was originally bought as a side table for sitting outside to put my iced coffee on. It became the surface my daughter used to spray paint all sorts of things for her costumes and projects.

The sheet of paper is a piece of junk mail from an insurance agent. We get so many of them that they get used for shopping lists, paper patterns and all sorts of other scratch paper purposes. Reduce, reuse, recycle!!

This project can be done with felted sweaters, craft felt, even fun foam. Anything that won't ravel and has a bit of body. It makes a fantastic sewing project for kids.

You will need:

  • paper
  • scissors
  • pen
  • felt
  • straight pins
  • size 20 tapestry needles
  • embroidery floss 

To make the pattern:
Start by folding your sheet of paper in half lengthwise- or like a hot dog if you learned it that way! And unfold. 
Folding and cutting an equilateral triangle
Now you're going to take one corner, and fold it into the center, the top edge of the paper from the corner you're folding should be a line down to the other corner. 
Folding and cutting an equilateral triangle
Now fold the other side over the open edge of the angle you just folded. 
Folding and cutting an equilateral triangle

Folding and cutting an equilateral triangle
When you unfold it, you'll have two lines to cut to make the triangle. 

Folding and cutting an equilateral triangle
I used this 60° angle to show the angle you got with your folds. 
Folding and cutting an equilateral triangle

Now trace your shape on your fabric, and cut it out. 
sewing project- soft triangle basket

Now it gets really easy. You're going to cut into the corners bisecting them to make the sides. 
To figure out the depth of your finished box, you'll measure from the center to the edge perpendicular to the center line.
sewing project- soft triangle basket
Measure in from each corner and mark them all the same length. 
sewing project- soft triangle basket
Cut a straight line down each one. 
sewing project- soft triangle basket
Now you'll pin each corner, make sure the outside flaps are all facing in the same direction, and pin the cut edges so they match up with the top of the basket on the facing edge. 
sewing project- soft triangle basket

Now you can choose how you'll stitch it. For the gray basket, I only stitched the top edge. 6 strands of embroidery floss will fit in a size 20 tapestry needle. 

Blanket stitch or whip stitching work for the edge. 

sewing project- soft triangle basket
Here's the finished gray basket. 
sewing project- soft triangle basket

For the cream basket, I stitched the outer corners on the side that showed on the outside, then stitched the top. 

Tuesday, April 15, 2014

Printable Mini Baskets

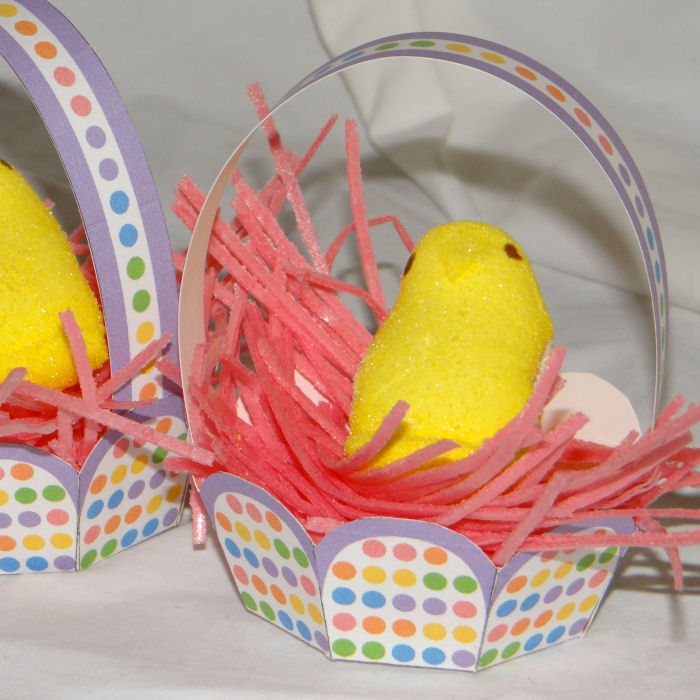
Mini Basket for Easter

These mini baskets print two to a page and easily fit one plastic egg, or a Peep! The grass used in the photo is an edible Easter grass (Kroger brand). I also like using paper grass sometimes.

Click the image below for a large version to print and make. Follow the instructions in the corner to assemble it.


Thursday, March 21, 2013

Cadbury Creme Egg Printable Box Set

Printable box for Cadbury Creme Eggs
I haven't made a creme egg box yet this year! I hope you enjoy this one. Click the images for larger versions, print at 8x10 inches on card stock. Cut out, score all folds. Glue side seams, then glue the bottom tabs of the egg boxes (seriously! those eggs are a bit heavy), fold top lip of base box over and glue to the inside to reinforce. Fill egg boxes and put them in the "basket". You can find more complete instructions and another creme egg box here. Print 2 of the egg box pages, and one of the base box pages.

You can buy the blank template in PNG, JPG or PDF format from my Etsy store (emailed) or in PDF format from Craftsy (instant download on Craftsy!)


Wednesday, April 20, 2011

Tuna Can Baskets


These are so very easy to make. If you're doing them with small children, you'll need to drill or punch the holes in the cans and bend the wire. Lots of ornamentation possible. Get out the button box, plastic beads and stickers! These are plain. 
To make them you'll need empty tuna cans that have been washed well. Hopefully you're already using a safety can opener for all your cans. I love mine so much. The kind that breaks the seal instead of cutting the can so there are no sharp edges?
This will also work with wood brie boxes to make more shallow boxes.

To punch the holes in mine, I used a two hole metal punch, but I also tested with my hand operated craft drill and that went through just fine. A motorized rotary tool will work as well, but as much as possible, I prefer using human powered things. 

You will need:
Tuna can
punch, drill or nails to put holes in the can
paper, fabric, ornaments, braid, anything you want to decorate your can with
scissors
1/8 inch hole punch for paper
glue of some sort- heavier fabrics like the pink paisley do best with hot glue, which my daughter also used as a design detail. A bit of glitter makes it shiny, with the paper version I used PVA glue which adhered fairly well. More on the flowered version in just a bit.
12 inch piece of wire- the kind I used is aluminum 17 gauge wire. (see note at bottom)
wire cutters
pliers
cylinder form of some sort, I used a salt container.

If you're using fabric, you'll wrap it around the can and cut it to fit. 
To put the seam in the back and the wire handle in the middle between the front and the back, you'll fold your fabric to find the right spots. Fold it in half, then fold each side down to meet the fold in the middle. Those second folds are where you want the holes for handles. Mark them, and pierce holes. If you're using a two hole metal punch like I did, make sure the holes aren't too far down for the throat of the punch.

If you're using paper, just print my template. It's 300 dpi and 10.5 inches long, so you need to print it at exactly 300 dpi with 1/4 inch margins. Punch the holes and use it as a guide for your scrapbook or hand stamped papers.

Glue the fabric or paper around the can, then use the holes you punched as guides for where to pierce the can using the drill or metal punch. If you're using a nail to punch the holes, you'll want to punch them before you glue the paper or fabric into place. To do that, wrap the fabric or paper around the can and use a permanent marker to mark where the holes are. Punch the holes then very carefully line up the holes on the paper or the fabric and glue it into place.

To make the handle, curve the middle of the wire around your cylinder form, and turn up the ends of the wire at 90 degree angles about 2 inches from the ends. If you want to add beads, now is the time. Don't bead the whole wire though, you'll need about an inch of bare wire on either side.
Now put the handle into the can, and put the ends of the wire through the holes to the outside. Use the pliers to wrap the wire ends around the wire.

Add whatever decorations you'd like, and I used tulle circles leftover from another project to line the baskets when they were done.
Click the images for the full sized versions. I printed out my example on card stock because it's not as sheer as paper. The first image is the template.

Printable! I could fit 4 on one page easily, so I did. And a black and white version for Liberty, or for anyone who likes the scrolly swirly design but wants to color it themselves.

Notes: The flowered version was the easiest. I used Japanese self adhesive cloth for that one that Abigail from Abigail's Crafts How To sent me a few months ago. I've been hoarding it. The fabric punches easily with hand punches and there are some people on Etsy who sell it. Really awesome stuff. The back is marked with a grid in centimeters which makes it easy to cut very straight, then you peel up the back to apply it.

The wire comes on a 250 foot spool. If that's too much for you, you can usually find smaller spools of different kinds of wire at the hardware store, ask the clerk. However, you may find you use it as much as I do. The stuff is perfect for quick wire crowns or to make bubble wands with. It's also made quick sword holders for costumes, and gets used as armatures in dolls. Plus my husband has a habit of asking me every so often if I have wire he can use for something and aluminum costs a lot less than copper. 


Monday, March 14, 2011

Egg in a Basket boxes

I know eggs are egg shaped, not rectangles. But rectangles are a whole lot easier to fold and glue together. Each of the little eggs when printed at 300 dpi is 2 inches tall by 1.5 inches wide x 1.5 inches deep. The basket box they are sitting in is 1 inch tall by 3.25 inches deep and wide. So you'll need to print 4 eggs to fit the box and there is some waste card stock. What I do with bigger waste pieces is set them aside for notes, white backgrounds for small elements in other projects and use them as paint and glue palettes. Watch for more sets of these in the coming weeks if you like this set, and I will be posting this template in my Etsy store.
As usual, the tabs are large enough to use double stick tape or a glue roller to assemble. 2 sets, the one pictured above and a set that can be colored. Click on the images for the full sized versions.


And just because I liked how they looked, here are 2 basketweave tiles that you can re-color and use in your own craft projects.