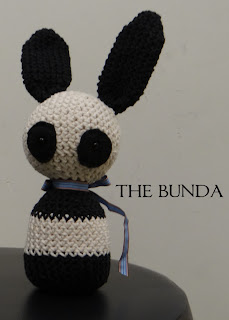
The Bunda is what you get when you simply can not decide if you're making a panda or a bunny.
This little stuffie is a bit bigger than what I usually make because it has an important difference.
It has a music box in it! The music boxes I use are 18 notes and completely encased in plastic, made by Sankyo. They can be found at a lot of hobby stores, but I got mine from
CRSPinner's Variety Store
on Ebay because she had the specific song* I most wanted. She has a great selection of songs and they are listed alphabetically.
The Amazing Turnip Girl helped me with the design. She's the one who decided it should be one of my limbless almost peg like designs, and that it should absolutely have big felt circles around the eyes.
You will need:
- Ecru or white worsted weight yarn- I used Peaches and Cream Ecru (1 ball)
- Black or if you like, a different color! (1 ball)
- Size G hook, if you work loose, use a size F instead
- Yarn needle
- Stuffing
- Weighted stuffing of some sort, some people use plastic pellets. I use high density plastic BB pellets
- scrap of fabric about 3x4 inches
- sewing needle
- sewing thread- black or to match your contrast color
- black felt or felt to match your contrast color
- 2 safety eyes or buttons
- ribbon (optional)
- music box (optional)
Start by hand sewing a little pocket to hold the pellets with the scrap of fabric. I just used 2 rows of a running stitch to make mine. That will keep the pellets in one place inside the stuffing, it can be very plain sewing because it's going to be hidden. I like high density plastic BB pellets because they are very smooth and rounded but they can also be expensive. Other people use plastic pellets that are made for stuffing, they weigh less by volume. One friend uses snippets off of plastic canvas projects, and I've even heard of people using aquarium rocks. Just something that's going to be a little heavy, and that's safe if it gets wet.
Cut 2 eyes out of the felt. This pattern can be printed at 100 dpi, or you can do it by eye to make two rounded tear drop shapes that are about 1.5 inches tall by 1.25 inches wide.
ch= chain
st= stitch
sl st= slip stitch
sc= single crochet
dec sc= insert hook in first stitch, yarn over, pull up loop, insert hook in second stitch, yarn over, pull up loop, yarn over, and pull through the 3 loops on the hook.
Repeat ** means repeat what is between the asterisks.
American terminology
Ears- Make 2:
With black yarn
Magic ring or chain 2
Round 1: Sc 6 times in ring, sl st to join.
Round 2: Ch 1 (doesn't count as first stitch here or throughout) sc in first st, sc in next 2 sts, ch 1, sc in next 3 sts, ch 1, sl st to join.
Round 3: ch 1, 2 sc in first st, sc in next st, 2 sc in next st, ch 1 and skip ch 1 loop, 2 sc in next st, sc in next st, 2 sc in next st, ch 1, sl st to join
Round 4: ch 1, sc in first st, sc in next 4 sts, ch 1, skip ch 1 loop, sc in next 5 sts, ch 1, sl st to join.
Round 5: ch 1, 2 sc in first st, sc in next 3 sts, 2 sc in next st, ch 1, skip ch 1 loop, 2 sc in next st, sc in next 3 sts, 2 sc in next st, ch 1, sl st to join.
Rounds 6-15: ch 1, sc in first st, sc in next 6 stitches, ch 1, skip ch 1 loop, sc in next 7 stitches, ch 1, sl st to join
Round 16: ch 1, dec sc over first and second stitches, sc in next 3 stitches, dec sc over next 2 sts, ch 1, skip ch 1 loop, dec sc over next 2 sts, sc in next 3 sts, dec sc over next 2 sts, ch 1, sl sto to join.
Round 17-18: ch 1, sc in first st, sc in next 4 sts, ch 1, skip ch 1 loop, sc in next 5 sts, ch 1, sl st to join.
Break off yarn leaving a long tail for sewing it to the head. Fold ear in half at base and stitch closed to create a taper.
Head:
With white yarn
Magic ring or ch 2
Round 1: sc 6 times in ring, sl st to join (6 sts)
Round 2: ch 1, 2 sc in first st, 2 sc in each st after, sl st to join. (12 sts)
Round 3: ch 1, sc in first st, 2 sc in next st, *sc in next st, 2 sc in next st*, repeat ** around, sl st to join. (18 sts)
Round 4: ch 1, sc in first st, sc in next st, 2 sc in next st, *sc in next 2 sts, 2 sc in next st*, repeat ** around, sl st to join (24 sts)
Round 5: ch 1, sc in first st, sc in each st around, sl st to join (24 sts)
Round 6: ch 1, sc in first st, sc in next 2 sts, 2 sc in next st, *sc in next 3 sts, 2 sc in next st*, repeat ** around, sl st to join (30 sts)
Round 7: ch 1, sc in first st, sc in next 3 sts, 2 sc in next st, *sc in next 4 sts, 2 sc in next st*, repeat ** around, sl st to join (36 sts)
Round 8: ch 1, sc in first st, sc in each st around, sl st to join (36 sts)
Round 9: ch 1, sc in first st, sc in next 4 sts, 2 sc in next st, *sc in next 5 sts, 2 sc in next st*, sl st to join (42 sts)
Round 10-14: ch 1, sc in first st, sc in each st around, sl st to join (42 sts)
Round 15: ch 1, sc in first st, sc in next 4 sts, dec sc over next 2 sts, *sc in next 5 sts, dec sc over next 2 sts*, repeat ** around, sl st to join (36 sts)
- While the hole is still big enough, it's time to sew on the ears and place the eyes. The ears are sewn into place 5 rows from the center top, one on each side. They need to be sewn at the base, then slightly up the side facing the center to stand up. The image below shows the base in red and the stitching on the side in green. Cut a small hole in the center of each felt circle, and push the safety eye through that, then into the face on round 14 between 2 stitches. The other eye on mine is 10 stitches away. Don't sew down the circles yet!
Round 16: ch 1, sc in first st, sc in next 3 sts, dec sc over next 2 sts, *sc in next 4 sts, dec sec over next 2 sts*, sl st to join (30 sts)
Round 17: ch 1, sc in first st, sc in each st around, sl st to join. (30 sts)
Round 18: ch 1, sc in first st, sc in next 2 sts, dec sc over next 2 sts, *sc in next 3 sts, dec sc over next 2 sts*, repeat ** around, sl st to join (24 sts)
Round 19: ch 1, sc in first st, sc in next st, dec sc over next 2 sts, *sc in next 2 sts, dec sc over next 2 sts*, repeat ** around, sl st to join. (18 sts)
Round 20: ch 1, sc in first st, dec over next 2 sts, *sc in next st, dec sc over next 2 sts*, repeat ** around, sl st to join (12 sts)
Break off yarn, leaving a tail for sewing. Using the thread and needle, stitch the felt into place.
Body:
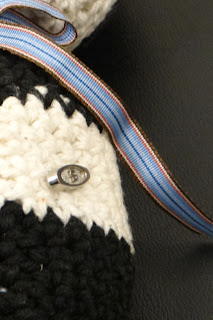
The music box comes in 2 pieces, the box itself, with a winder taped to it. The winder screws into place and it's easy to tell when your done screwing it in because then you're winding it up!
Ch 2 or make a magic ring
With black yarn-
Round 1: 6 sc in ring, sl st to join
Round 2: ch 1, 2 sc in first sc, 2 sc in each st around, sl st to join (12 sts)
Round 3: ch 1, sc in first st, 2 sc in next st, *sc in next st, 2 sc in next st* repeat ** around, sl st to join (18 sts)
Round 4: ch 1, sc in first st, sc in next st, 2 sc in next st, *sc in next 2 sts, 2 sc in next st* repeat ** around, sl st to join (24 sts)
Round 5: ch 1, sc in first st, sc in next 2 sts, 2 sc in next st, *sc in next 3 sts, 2 sc in next st* repeat ** around, sl st to join (30 sts)
Round 6-9: ch 1, sc in each st around, sl st to join (30 sts)
Switch to white yarn
Round 9-10: ch 1, sc in each st around, sl st to join (30 sts)
Round 11: If you are using a music box- otherwise work as for round 9. Ch 1, sc in first st, sc in next 25 sts, ch 1, skip 1 st, sc in next 3 sts, sl st to join- mark ch 1 loop with a scrap of yarn(30 sts)
Round 12-14: ch 1, sc in each st around, sl st to join (30 sts)
Switch to black
Round 15: ch 1, sc in each st around, sl st to join (30 sts)
Place the music box by putting the key through the chain 1 loop, and then putting the music box into the body, line up the key hole with the key and screw the key into place until it starts winding the music box. Put the plastic pellet bag in the other side of the body to keep the weight even.
Round 16: ch 1, sc in first st, sc in next 2 sts, dec sc over next 2 sts, *sc in next 3 sts, dec sc over next 2 sts*, repeat ** around, sl st to join (24 sts)
Round 17: ch 1, sc in first st, sc in each st around, sl st to join (24 sts)
Round 18: ch 1, sc in first st, sc in next st, dec sc over next 2 sts, *sc in next 2 sts, dec sc over next 2 sts*, repeat ** around, sl st to join (18 sts)
Round 19: ch 1, sc in first st, dec sc over next 2 sts, *sc in next st, dec sc over next 2 sts*, repeat ** around, sl st to join.
Round 20: ch 1, sc in each st around, sl st to join, break off yarn.
Stuff the head and body firmly, and pack stuffing around the edges of the music box to round it out some. Use a dowel, back end of a crochet hook or a knitting needle to stuff it around and between the pellet bag and music box. Stitch head to body, adding in more stuffing before doing the last couple of stitches. Tie off securely and pull all ends to the inside of the Bunda. If you pull it tight, then cut close, when you let go, the yarn end disappears into the toy. If the head is still a little floppy, tying a ribbon around the neck will help.
Because of the weighting, this does stand up well even with the over sized head.
* The song is You and Me Against the World, which was one my mom used to sing to me. I'm making a second Bunda with the same song so my kids each have one to someday share with their children.


