Printing Tips

Check out my printing tips if you're having problems printing to the right size
If you'd like to support this site and all the free things I post- please check out my Don't Eat the Paste Mandala collection coloring book for 9.99 at Amazon.
Showing posts with label washcloth. Show all posts

Wednesday, June 11, 2014

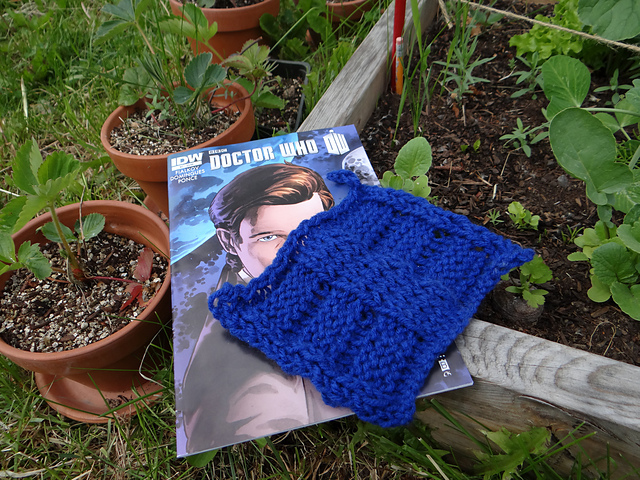
Spoilers Washcloth (knit pattern) by The Amazing Turnip Girl

Spoilers Washcloth

From The Amazing Turnip Girl's Ravelry Page:
just a little scrubbie i made. 
i tried to make it look like river’s diary. 
i took the photos in my family’s garden.
Most of her project instructions are "I just did this until it looked like this" and her knitting instructions are pretty similar. She works without patterns, and usually without taking notes. However, she decided to make a second one of these, so I gave her a piece of graph paper and told her to mark the purl stitches.

The needles she is using are this set that I made her-

Made with 1/4 inch oak dowels, they are just over 6 mm in diameter, or between a size 10 and size 10.5 needle. Either size will work. 

The pattern is mostly garter stitch with some purl stitch panels. If you are a beginning knitter, it's an easy, quick project that will help you get more comfortable with purling. The end result is a nicely textured scrubbie. Using cotton yarn, it will be insanely soft, for a more exfoliating scrub- use acrylic. 

Worsted weight yarn- the open blocks are knit stitches, the dots are purls.


Cast  on 23 stitches
Knit 3 rows
Row 4-7: Knit 3, purl 6, knit 5, purl 6, knit 3
Rows 8-9: Knit across
Rows 10-13: Knit 3, purl 6, knit 5, purl 6, knit 3
Rows 14-15: Knit across
Rows 16-19: Knit 3, purl 6, knit 5, purl 6, knit 3
Rows 20-22: Knit across
Bind off. Weave in ends. 
Make an i-cord to hang it if you'd like. 

Extra bonus Amazing Turnip Girl craft geek:


You can find out more about how she made her Benny the Lego Space Guy costume here on Cut Out and Keep!


Monday, August 20, 2012

Graph Comparison- Transformers in bead, knit and cross stitch charts

I was going through a lot of old files today looking for the graph for a purse I made a few years back. Still haven't found that, but did find these old graphs, done to compare graph types.

Beads- the most popular stitches are brick and peyote. The most popular beads are Delica size 11 cylinder beads. So that's how I planned these graphs. Delicas are slightly smaller from hole to hole then from outside edge to outside edge. When you're working in peyote stitch, generally the holes will line up vertically. Peyote is also offset by half. These graphs are original size, so they don't need to be clicked. Shown shaded and I have no idea now what my reasoning behind that was. Because of the aspect ratio, these are 39 beads wide and 36 beads tall.


Knit stitches, working up from a cast on edge instead side to side, are shorter than they are wide. So if you graph something on a square graph, it might work. But more likely it's going to come out squashed. It varies some, but generally, the ratio is close enough to Delica type beads that a knitting graph will work on loom or square stitch for beads. Click on the images for larger versions. These are meant to be used for smaller washcloths. (but would also look awesome at the bottom of a scarf!) 40 stitches across and 57 rows tall.

Cross stitch is done a straight squared graph, which makes it the easiest. Pixel art works well for cross stitch and that's probably how these were designed. Click on the images for larger versions. 60x60 (roughly, since apparently I didn't square off this graph properly)

I have no idea if that's helpful to anyone, but it was fun finding them! There are tons of different kinds of graph paper available for free on my old classic webpage here.
Oh, this is the purse that got me searching. As soon as I find the graphs, I'll post them!

Monday, April 11, 2011

Ribbed Rows Dishcloth Pattern (crochet)


I had just finished a new cuff that used front post double crochets to create lines along the length when I thought "I wonder how that would look if I did a chain 1 space between each front post double crochet?"
The result was a wonderfully textured fabric that I think would be ideal for dishcloths or washcloths. 
One side of the fabric has ribs, the other side has something like flaps, almost like shades at a 90 degree angle from the ribs. Here's a photo of the shade/flapped side.

Close up of the ribbed side.


It's all done by working back and forth in rows. No embellishment added after, and it's a very simple 2 row repeat after the first 2 rows.

To work this stitch effect, you'll start with an odd number of stitches, and I think longer it would make an interesting scarf or could be used for other projects. 

Here's the  instructions for the dishcloth as shown. I'd love to see anything you did using this technique.

To work a front post double crochet- the post is the stitch, so instead of working the double crochet on the top of the stitch, you work the double crochet AROUND the stitch, so you'll yarn over, insert hook behind the stitch, and finish the double crochet.
I don't ever count my turning chain as a first stitch, if you prefer to do it counting as the first stitch, by all means do.
st -stitch
sc - single crochet
ch -chain
fpdc - front post double crochet
repeat ** means repeat the instructions between the asterisks 


For Ribbed Rows Dishcloth
Size H or 5mm hook
worsted weight cotton yarn- I'm not sure how much, I was working off a stash cone.

Chain 26 loosely
Row 1: sc in each stitch across (25 sts)
Row 2: ch 1 to turn, c in last stitch of previous row,* ch 1, skip st, sc in next st*, repeat ** across
Row 3: ch 1, sc in each stitch across
Row 4: ch 1, c in last stitch of previous row, ch 1, fpdc around sc from row 2, repeat across working a fpdc around each sc in the second row until the last one,  sc in first stitch of previous row to finish row.
Row 5: ch 1, sc in each stitch across
Row 6: ch 1, sc in last stitch of previous row, ch 1, * fpdc around fpdc, ch 1*, repeat ** across, sc in first stitch of previous row to finish row
Row 7: ch 1, sc in each stitch across
Repeat rows 6-7  12 times
Break off, weave in ends, or you can work a single crochet around the whole block and weave in ends.