Printing Tips

Check out my printing tips if you're having problems printing to the right size
If you'd like to support this site and all the free things I post- please check out my Don't Eat the Paste Mandala collection coloring book for 9.99 at Amazon.
Showing posts with label recycled fashion. Show all posts

Tuesday, June 12, 2012

Paper Bangle Bracelets- Tutorial


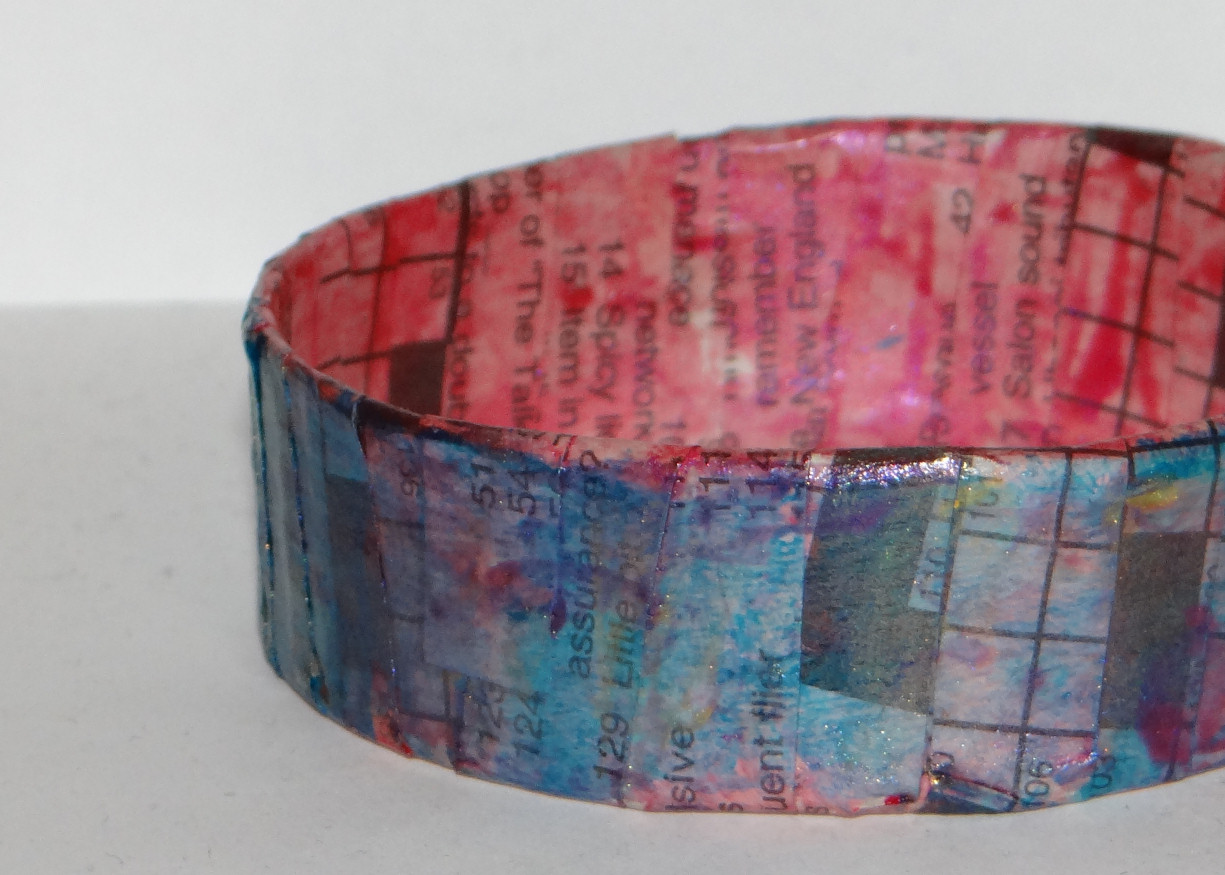
I'm really excited about these super easy upcycled paper bangles because there are so many possibilities for them, using a strip of paper for the outside I could put images or type a quote using one of my typewriters on it. They are made very easily using things would normally be thrown into the recycling bin and a new kind of paint which I won from the weekly drawing at Craft Test Dummies.

Luminarte's Silks Acrylic Glazes makes the perfect paint for these because they are sheer but well pigmented. You can use them wet on wet or wet on dry. I thought of doing stripes or something more ordered, but I really like the look of the layered random effect of the paints.

You will need:

  • Thin cardboard
  • strips of paper- I used newspaper for the one above.
  • White PVA glue- I used Aleene's Tacky Glue 
  • Silks Acrylic Glazes- I used Sky Blue, Watermelon Mist and Solar Gold
  • Acrylic Spray Sealer
  • Scissors
  • Paint Brushes
  • foam brush
This made much like paper mache, but using straight PVA glue instead of a paper mache mix. 
The base of the bracelet is a strip of cardboard from a cereal box or something similar. The easy way to size it is to cut a strip and wrap it around your hand at the widest part, then add an inch for the overlap.
For a quick reference though-
8 inches for a small bracelet (7 inches in circumference, 2.22 inches in diameter)
8.5 inches for a medium bracelet (7.5 inches in circumference, 2.38 inches in diameter)
9 inches for a large bracelet (8 inches in circumference, 2.54 inches in diameter)

Cut the cardboard the width you want the finished bracelet to be, and measure a 1/2 inch in from both ends. Cut slits on both ends to overlap them together on opposite edges.

Glue the overlapping pieces down. Cut lots of 1/4 inch wide strips of your paper. Put a thin layer of glue on the base, an inch at a time, and wrap on a slight diagonal, overlapping the edges. Apply more glue, and keep wrapping. Do at least 3 layers of paper, and set it aside to dry.

After it's dried, decide what you want the outer layer to be, and apply that. You can either cut a strip that's the same width and circumference around, or you can do what I did and cut more 1/4 inch strips to wrap around it. Apply with a thin layer of glue. Let dry.

Then the fun part, painting! The glazes are gorgeously pigmented, and work on a lot of different mediums. I wish I could properly photograph how they look on black rubber! They are very sheer and add a nice sheen of color to the rubber. On paper, they look a lot more like they do in the jar, but in sheer layers. Just paint, have fun layering colors. I put on the pink first, then put the blue on the outside. Let that dry, and added more pink and gold in spots. The end result is a lot of subtle shades of purple and green on the blue.

Let the glaze dry, and spray with an acrylic sealer. The end result is a lightweight, inexpensive bangle bracelet.


Thursday, May 31, 2012

Flower Pins

Last year at our Pride Festival, TG got this flowered lei, this year, for more rainbowed goodness for Pride Week, she decided to make the flowers go further as scatter pins.


We discussed the best way to go about it, since the flowers have unfinished edges, we had to decide if we liked them like that or wanted to seal them. She said she liked the frayed edges. We did experiment with some sealing options. Heating the edges carefully with a lighter worked, so did glue which looked good with glitter added. I do recommend if you're going to use glue and glitter to use a fine applicator and a crystal glitter. Colored glitters can be a bit too much. Nail polish will also work or of course Fray Check.

To make these pins, all you need is fake flower lei like the one shown above, thread, needle, scissors, buttons and pin backs. The pin backs we used were from a thrift store, and safety pins would work too. The buttons were from my button stash. So the only thing we bought new was the thread.

I made one, and was pretty careful about my stitching. I stacked the flowers and tied a knot in the thread and pulled put it through the top of the flowers, around the pin back, back up through the flowers, then added the button. Sewed it carefully in place then hid the knot between the button and flowers. TG decided that the thread ends wouldn't matter very much since it was for her jacket and knotted on the back of the flower.

There are still a lot of flowers left. I'm planning to use smaller buttons and sew them to some hair pins (the U shaped ones) for myself and TG is thinking of other things she can use them on. So far, we've talked about purses and miniature fairy dolls. 

Saturday, April 28, 2012

Book Review- Reinvention


Reinvention : Sewing with Recycled Materials by Maya Donenfeld is a collection of sewing projects that use thrifted and otherwise scavenged materials and turning them into something new.
If you love sewing, and recycled projects, this is a wonderful book. The author writes engagingly about her experiences and life, and gives tips for finding the materials for the projects. The techniques include patchwork, stamping and printing. The sewing is all fairly simple, no fancy or fussy seam techniques or anything like that.
The chapters are separated by fabric type. Each chapter explains the fabric, a bit about the history, how to take care of it, and where the best places are to find it. She also explains the environmental impact of re-using that particular fabric. The chapters have a few projects each and there is good variety between home decorating projects, clothing, and accessories.
Linen- my favorite projects in this chapter are the Story Scarf ,which is a fashion scarf made in patchwork, and the big handy, Reversible Summer Sling purse. My daughter is wild for the Story Scarf, and the Envelope Portfolio which can be customized easily using fabric paint and stencils.
Burlap- I get burlap bags every few months from one of the local coffee roasters. We use them for all sorts of things, and this chapter inspires more uses. The Onion and Garlic Sacks are my favorite. My daughter likes the Inspiration Board project.
Jersey (tee shirt cotton knit)- My daughter likes the Pillow Pals. My favorite project is a toss up between the simple hand sewn Blossom Band with it's two type of flowers, and the Little Forager Skirt. The reason I love the skirt so much is that even now, it's ideal for my daughter. She's always been a forager, with a sharp eye for anything from washers on a street to use in projects to pretty rocks when we are out on hikes in the summer.
Wool - blankets, suits and coats deconstructed to take advantage of the wonderful properties of wool. Great projects in this section. It's my favorite chapter in the book. The Poufs can be filled with scraps from other sewing projects, the insulated lunch bag is something you could use every day, and the Toadstool Cottage is a whimsical alternative to dollhouses.
Denim- My favorite project is the Double Duty Oven Mitt , simple seams, and it's a great housewarming gift. I also love the roomy Indi-Go Bag for shopping. My daughter's favorite is the hammock project.
Mailers, which uses Tyvek envelopes, is my daughter's favorite chapter. She's been a fan of re-using these for years, and is always really happy when I get mail in them. The insides are canvases ready to be colored, and they can be sewn, glued and taped. I like the Notebook project best as a way to make small memory books. Her favorite is the Banner project.
Vintage uses all sorts of vintage textiles, bed sheets, aprons, kitchen towels and table cloths are all used in this chapter. my favorite project is the Traveling Hamper, my daughter loves the Summer Bolster.
Spiral bound with a hard outer cover and gorgeously photographed, this is a lovely and inspirational collection of things to make using recycled fabrics.

Published by Wiley Books, you can get the book from your local bookstore, or by clicking the Amazon.com affiliate link below.


I received a complimentary copy of this book to review, my reviews are always my personal and honest opinion. You can read more about my review policy here.

Wednesday, April 11, 2012

Book Review- Mend It Better with bonus patch templates


Mend It Better: Creative Patching, Darning and Stitching by Kristen Roach is a wonderful resource for mending clothing to keep it wearable, or for buying clothing from thrift stores and garage sales and being able to mend it into something for your wardrobe. Mending is one of the most ecologically sound choices you can make.

It's well thought out, and the instructions are clear enough for beginners. Even experienced sewers may find new things in this volume. There are instructions for doing mending that's meant not to be noticeable, but also ideas for turning your mending into a way to decorate your clothing and make it uniquely your own.

She starts by offering suggestions for when you should mend and when something should just become scrap fabric or rags. Then explains the basic tools you'll want in your mending kit. Then she gets into instruction.

A lot of the mending techniques she suggests are things that can be done by hand. As someone who likes sewing by hand in the evening while watching television with my family, I love her stitch suggestions and mending instructions for doing it by hand. She also talks about machine mending and hemming as well. She explains different stitches well.

The photographs for the mended projects show the new stitches in contrasting colors so it's easy to see how things are done.

The chapters are laid out by types of mending, patches, surface fixes (like snagged threads), seam fixes, straight hems, fixing waist bands of different types including the kind with sewn in place elastic, how to darn a patch and more intriguingly, how to crochet a patch for socks and other knits, fasteners and closures, zippers and the final chapter is decorative accents.

There are some sewing projects in the book, like how to make a mending tool kit, and how to make a mini clutch kit to keep in your office or car.

My favorite mending techniques in the book use shapes and decorative fabrics, colors and stitches to turn a hole into a design feature. With that in mind, here are some templates for patches in star and heart shapes. 100 dpi jpg format.


My daughter is wild for this book. She does all her own mending, as well as a lot of the mending for her older brother. 
Solid techniques and instruction make this a wonderful book for people who are interested in extending the life of their clothes, and a good gift for people just starting out on their own. 

I received a complimentary copy of this book to review, my reviews are always my personal and honest opinion. You can read more about my review policy here.

Saturday, October 29, 2011

Book Review - 101 Tees

101 Tees ; Recycle + Refashion + Revamp by Cathie Filian is a collection of ways to personalize and style tee shirts into fashion statements that reflect who you are.

Unlike other teeshirt revamping books, this one isn't about how to deconstruct or slice up a shirt. The emphasis is instead on ways to decorate and embellish a tee shirt. The results are colorful, unique and fun. Just as importantly, the results are modest and wearable by young ladies.

The techniques include applique, embroidery, printing, painting, stenciling, using iron ons and beads. While there are no illustrations, they are well explained. There are patterns and stencils in the back.

The examples are trendy looking with a DIY vibe. One of my favorites is the hand stamped Giggles shirt. The same technique could be used to set up a shirt with a favorite quote. Other favorites are the two toned dyed shirts. One of the most energizing and lovely ideas through out the book is untypical design placements and elements. Instead of centering motifs and embellishments, they are placed at angles on shoulders, off to the side, or in other places. It's a great design element that's very appealing.

Scattered flowers go up the side of one shirt. Ruffles are used to create both fashion looks in sharp pleats and very girly looks in soft form. The bleach discharged robot shirt is one my son wants to make, but instead of the negative stencil robot, he plans to use gears and bolts. A butterfly design combines painted and appliqued shapes in different sizes. Some shirts show as an example how you can take a shirt already printed with a pattern or design and embellish it in different ways. Screen printing on top of a patterned tee shirt for example, or embroidering details on a shirt with a motif.

A lot of the tee shirts in the book aren't plain tee shirts. They have shaping and details that you might not find in your closet. However, the ideas are workable on a variety of shirts, and it's a great book for ideas to create your style from thrift store shirts. Since most of the techniques don't require expensive or specialty equipment, it's an inspiring collection of ideas for teens. My teen daughter really likes the book, it's one both of us will use and keep in mind when we are at thrift stores. We both have our own style. Mine tends more to the feminine, her's is more funky. The ideas in this book appeal to both of our styles.

You can get this book directly from the publisher, Lark Crafts
My reviews are always my personal and honest opinion. You can read more about my review policy here.