Printing Tips

Check out my printing tips if you're having problems printing to the right size
If you'd like to support this site and all the free things I post- please check out my Don't Eat the Paste Mandala collection coloring book for 9.99 at Amazon.
Showing posts with label beading. Show all posts

Tuesday, May 1, 2018

Peyote stitch graph paper for beaders

A couple months ago, the server for my old site started having problems. According to the server, they've been working on getting them resolved. It does leave a lot of my older content unavailable though.

Sorry about that.


There are some more technical notes at the end of this post, but here's the graph paper. Click the images to print them.

Peyote- cylinder beads graph paper:
Peyote graph paper for cylinder or delica beads

Peyote- seed beads graph paper:
Peyote graph paper- seed beads

Technical notes:

The original graph paper was in gif format at 72 ppi because at that point, 72 ppi was the web standard, and gif format for the colors were very clear and didn't have the artifacting that jpg format can cause. Well, it's 20 years later now from when I originally started posting graph paper. So these are STILL 2 color, but it's PNG format, and it's at 100 ppi which should be printable for everyone. I will offering a higher quality/higher ppi version soon, but this is pretty close to the original. 


Monday, August 20, 2012

Graph Comparison- Transformers in bead, knit and cross stitch charts

I was going through a lot of old files today looking for the graph for a purse I made a few years back. Still haven't found that, but did find these old graphs, done to compare graph types.

Beads- the most popular stitches are brick and peyote. The most popular beads are Delica size 11 cylinder beads. So that's how I planned these graphs. Delicas are slightly smaller from hole to hole then from outside edge to outside edge. When you're working in peyote stitch, generally the holes will line up vertically. Peyote is also offset by half. These graphs are original size, so they don't need to be clicked. Shown shaded and I have no idea now what my reasoning behind that was. Because of the aspect ratio, these are 39 beads wide and 36 beads tall.


Knit stitches, working up from a cast on edge instead side to side, are shorter than they are wide. So if you graph something on a square graph, it might work. But more likely it's going to come out squashed. It varies some, but generally, the ratio is close enough to Delica type beads that a knitting graph will work on loom or square stitch for beads. Click on the images for larger versions. These are meant to be used for smaller washcloths. (but would also look awesome at the bottom of a scarf!) 40 stitches across and 57 rows tall.

Cross stitch is done a straight squared graph, which makes it the easiest. Pixel art works well for cross stitch and that's probably how these were designed. Click on the images for larger versions. 60x60 (roughly, since apparently I didn't square off this graph properly)

I have no idea if that's helpful to anyone, but it was fun finding them! There are tons of different kinds of graph paper available for free on my old classic webpage here.
Oh, this is the purse that got me searching. As soon as I find the graphs, I'll post them!

Friday, June 22, 2012

Crafts, Mistakes and Do Over Moments

As crafters, most of us have moments we wish for an undo button, rewind or a do over. Hopefully you enjoy this slightly painful story about one of my worst crafty "oops!" and the printable quote art about making mistakes which will hopefully help you feel better when you glue your fingers together, cut the paper or fabric just a bit too small or realize when you've done hours of beading that it's just not working.

I love working with porcupine quills in my beadwork. The dramatic look of them with their off-white color and black tips, plus their lightweight is a wonderful look in bead embroidery or earrings. When you buy the quills, or get them from local sources, they come whole. Sharp tips with tiny barbs and a root of sorts on the other end. To use them, you have to snip off the tops and bottoms. Because they are natural, they vary in diameter and markings. So to work with them, they need to be sorted. One day I was sorting a bag full of them, matching them into sets so they were ready to go for my beading. There were a few hundred in a cereal bowl on my desk, and I was pulling out about 20 at a time. This already seems like a recipe for disaster. Of course I knocked it over. My desk at that time faced the living room. It was pretty close to when I had to go to work, so I put a towel over them to remind me to pick them up when I got home and to keep anybody from stepping on them.

My husband washed whites that night. He picked up the towel to wash it. He's pretty used to crafting accidents. To glitter on his clothes, spilled seed beads, all those sorts things. So when he saw the quills, he picked up what he saw, and put them in the bowl on my desk.

The towel went into the laundry with his teeshirts.

The next day at work, he thought for sure he had something wrong, an allergic reaction to his deodorant maybe? Something was causing a lot of pain in his armpits. When he got home, he showed me the scratches. I took a close look at his teeshirt. A couple of quills had worked themselves into the seams. So all my other plans for crafting that evening were set aside so I could through all his freshly laundered teeshirts with a pair of pliers looking for porcupine quills. It was about 3 years until I worked with quills again, and I'm incredibly careful with them now.

Click the image for the larger version of this printable quote. I hope you like it!

  I was compensated for this post as a member of Clever Girls Collective. All the opinions expressed here are my own.

Monday, February 6, 2012

Heart Mandala and new heart bead project


This is a very simple mandala that reminds me of a flower. I hope you enjoy it! 
Click on the image for a larger version to color!

These are super easy to make. Free project instructions here-> Felt Hearts with 3 Bead Picot Edging

Friday, September 16, 2011

Chevron boxes and a chevron chain


Chevron 2x2 printable gift boxes in 4 colorways. I hope you like them. Click on the images for larger versions. Print on card stock, cut, score, fold, glue!


Recently someone left a comment that they weren't able to print out my boxes anymore since I started increasing the DPI on them. If you're printing from a browser with these style boxes, you'll want to set your printer settings to Fit to Page. Most of my single page boxes are set up on an 8x10 page so fit to page will be just right. With the 2 page boxes, it's very important to print both pages at the same DPI, so if it downloads for you at 200 dpi, print both pages at that setting.
I really recommend for printing from a browser, switching to Chrome browser. It's print preview gives you a look at exactly how it's going to print and it's "smart" enough to handle higher DPI settings.

Instructions for this chevron chain are HERE. It's made fairly quickly in one of my favorite bead stitch techniques.


Friday, March 25, 2011

Japanese Seed Beads FTW!


Believe it or not, that's a color photo. Auntie's Beads sent me a wonderful selection of black and white themed seed beads.

I love Japanese seed beads. They are so uniform and have really large holes to work with, and for designs like this bracelet

-
EDIT: Just finished instructions, which you can find here.
the rounder shape of seed beads works a lot better than cylinder beads. 
I use the larger sizes in seed bead designs like the bracelet above, which is made with size 8 gunmetal, size 8 silver gray ceylon and size 11 matte black and crystal. I also use the larger sizes a lot in thread crocheted amigurumi dolls. They work perfectly for eyes and small details. 
I think my favorite thing about them is the range of colors and the consistency of them. 
I'll be posting instructions for the bracelet on beadwork at BellaOnline after I get it all diagrammed. My husband thinks the technique would work very well for USA flag bracelets so I'll graph one. I think this bracelet design would also work very well using seed bead mixes, and Auntie's Beads has some lovely color themed mixes available on their seed beads page.
The button clasp came from my personal button collection.


Thursday, February 24, 2011

Spiral Wire Ear Cuffs

I posted instructions for these spiral wire ear cuffs at Beadwork at BellaOnline.
My wire came from my copper stash, but I stopped and checked the price of copper wire in the same gauge at Rings and Things and found out they charged less than the hardware store I bought my wire at.  *adding copper wire to her next order from Rings and Things*
This is a good thing. My son has learning to work with copper. They carry 14, 16, and 18 gauge which are really nice sizes to work with. 

Tuesday, February 22, 2011

Turquoise Donut Necklace


I love turquoise. It's the alternate birthstone for December which when my son was born. The greenish blue color of it goes with jeans, to the office and with some dressier clothes. It's down to earth. 
Auntie's Beads sent me these to use for a project. They have a wonderful selection of gemstone beads in all sorts of colors and shapes. The beads used for this project are 

I also have to admit right now, I have a weakness for grab bags. The wonderful surprises in them. This one had 2 donuts, a pink pendant, a cross, and a blue round pendant. The round pendant has a bail on it that I made from wire for part of another project.

Instructions assume basic wireworking skill like wrapped links and making simple bails.
You will also need chain,  10 inches fine chain and 20 inches of heavier chain, sterling was used in the example. 22 gauge wire, headpins and a clasp. I used a toggle.
Cut 1.5 inches off the heavier chain.
If you take a look at the example above, I attached the clasp in the front of the necklace making it a design element, as well as having it in a place it won't get tangled in my hair. The clasp is attached with wrapped links  to the long chain ends. One side on each end. Then the smaller piece of chain is attached to the jump ring that came with the toggle to the circle part of the toggle. I like the asymmetric look of having the polished smooth rondelles on one side and the nugget on the other.,plus it makes it easier to close the toggle. 
Then the fun part. Make a bail for the donut using the wire and attach it to the end of the 1.5 inch chain. Then cut the 10 inch fine chain into 4 equal length. Cut a piece of wire 2 inches long and turn a small spiral on one end. String on one rondelle, 2 of the chains, 1 rondelle, the other 2 chains, 1 rondelle and turn another small spiral on the other end. This can be modified if the center of your donut is larger. Just add more rondelles to the ends. Thread the 4 chains through the donut. Now, add beads on head pins to the ends of all the chains. Because of the size of the nuggets, they won't pull through. I used nuggets on 2 chains, and rondelles on the other 2. 
The holes on these are a nice size, they aren't drilled impossibly small like a lot of gemstone beads are. Which makes them great for stringing and other projects, but if you find the hole is a little big for the headpin, just put a seed beads or a 2mm round bead on the headpin first.
It's done. A nice necklace with a lot of visual and textural interest that's still very wearable.

Monday, January 10, 2011

Delicate Wire and Chain Earrings


If you look at the right hand side of my blog, you'll see a fairly short list of links to sites I like. More links are under the links tab at the top of my page. 
One of those links is Auntie's Beads and it's been there for almost as long as this blog has been up. Because the site has good prices and some of the best "How to bead" videos I've seen on YouTube. Look on the side bar of their page under resources for those. 
So when they asked if I wanted to use some beads and post a project made with them, I jumped on the chance. 
They sent 5 sparkly strands of faceted crystal beads. 
The first thing I made was the pair of earrings above. They are very simple to make, have a ton of sparkle and shine, and the design can be changed up to suit other looks very easily by changing the metal and color of the beads. So if you used gunmetal with jet and metallic plum it would be very dark and gothic. Copper with bright colors would be a great Bohemian look. The earrings are very light to wear and have a lot of swing.
I work with my wire right on the coil or spool so I have less waste. Check out their glass beads page for lots of colors and options.
You'll need:
5 inches of chain
earring hooks
15 inches of wire- I used 24 gauge sterling
2 head pins
beads! 
I used 
4 6x8mm rondelles
6 4mm bicones
4 6mm bicones
10 3x5 rondelles
4 4x6mm rondelles

-basic wire working skills-

Cut the chain into 8 lengths, 4 at 3/4 inches, 4 at 1/2 inch 
On a headpin, string on a 6mm bicone, 3x5 rondelle, 4mm bicone. Make a wrapped loop on top. Repeat for the other headpin
 Cut off 2.5 inches of the wire and make a wrapped loop. String on a 3x5 rondelle, 6x8 rondelle, 3x5 rondelle, Make just the loop part for the bottom, don't wrap it yet. Add on 3/4 inch chain, 1 decorated head pin, 3/4 inch chain. Finish loop.
Cut off 3 inches from the wire. Start a loop on the end, slide that on one 3/4 inch chain, and finish the wrap. String on 4 mm bicone, 1/2 inch chain, 4x6 rondelle, 6x8 rondelle, 4x6 rondelle, 1/2 inch chain, 4 mm bicone. Hold the beads in place while putting a soft curve in the beaded wire. Because of the shape of the beads, you need some "slack" in the wire or extra space. If you wrap the second loop without curving the wire first, you might not be able to curve it. Start the loop at the end, slide the other 3/4 inch chain on the loop, finish the wrap.
The bottom piece is done with a 2 inch piece of wire. Make a small loop on one end. Slide the half inch chain on the loop, finish the wrap. String on 1 3x5 rondelle,1 6mm bicone and 1 3x5 rondelle. Make loop, slide the other chain on the loop, finish the wrap. Repeat for the other earring.
The basic technique is pretty adaptable and makes a great project while watching tv. If you wanted, you could skip the head pin entirely and add more layers of chain sections for longer, even more sparkly earrings.

The cup I displayed the earring on is part of my personal collection. I love my no handle cups for tea or chocolate on cold days! This one was made by Ember Haynes of Silverbear Sundries.


Thursday, December 30, 2010

Pixel Beading

I just posted an article on pixel beading using cube beads. I didn't really have room in the article for all the patterns that I made, so here is the full set if you'd like it.
Based off of these mood icons.
Click the image for the full sized, full set of patterns.

And as a bonus, this simple pattern for a Book of Spoilers necklace or pin. I'm beading this up for my daughter.


Friday, November 26, 2010

Snowflake Ornament Pattern- Beading

This is the ornament pattern that I've been using as my user pic on Facebook. I hope you enjoy it.
Click on the images for the full sized versions. These are the patterns that inspired the snowflake set of printables a few days ago.  Don't forget that until Friday Dec. 3 you can use the coupon code Thanks2010 at my Etsy shop for 20% off. Earring patterns and blank box templates.


Saturday, March 20, 2010

Currently... (heart bead pattern)


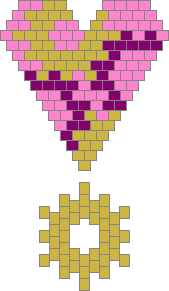
I posted a review of Jean Campbell's Steampunk Style Jewelry here. Just before Valentine's Day while I was working on bead patterns for the holiday, I graphed this heart with gears that I didn't wind up using. Hopefully you can!


For recent finished objects, I made a pair of earrings and a Legion flight ring.


I'm going to work on a non-trademarked ring in the same style as the Legion flight ring to post on BellaOnline. Something fun and springlike.

Recently posted reviews on Amazon:
Craft and Cookbooks-
Steampunk Style Jewelry by Jean Campbell
Chocolate Cakes- 50 Great Cakes for Every Occasion by Elinor Klivans
The Little House Cookbook- Frontier Foods from Laura Ingall Wilder's Classic Stories by Barbara M. Walker
My 1 inch circle punch, it's made by Uchida and this is the punch I used for the bottle cap necklace project.

Music-
Jamie Anderson's Three Bridges- a folk album Mike got me last year. It's one of my favorites
Boca 2008: Best of College a Cappella- a great collection of pop songs done a cappella
Jill Tracy's The Bittersweet Constrain another favorite album.

Sunday, January 31, 2010

Brick Stitch Earrings

I finished my how to make basic brick stitch earrings e-book! Lots of fun. I got the coding done easily enough including a clickable TOC which my bread book doesn't have (I need to fix that now that I know how!). I made mistakes uploading it though and had to correct those, which delayed my announcement. But it's all up and live now and I've bought a copy myself so I could see exactly how my graphics looked on my Kindle. They are very clear, and the patterns take up the full screen of my Kindle 2 so you could bead straight off the screen. You can buy the e-book here. I haven't made up a PDF version yet.


This is the pattern from the cover. Since it's only 2 colors, it shows up very well in the e-ink tech.
Still to do today:
Working on a pair of earrings I'll post next week on Beadwork at Bellaonline and review a really wonderful bead book.
Dinner tonight will be pizza quesadillas. My back hurts pretty badly from everything we did yesterday.
I think I also want to write a tutorial on writing Kindle books for people like me who only have very basic HTML skills, but like a lot of my ideas, it's on a list for now of things I might do in the future.

Friday, December 11, 2009

Right Angle Weave Photo Pendant


It's reversible. The other side is Glinda the Good. I used the art from the wicked little box.
You can find instructions for this pendant here.

Sunday, August 16, 2009

Stuffed Magazine and kokeshi dolls

While I was out having coffee with Miss Teri Friday night, I picked up the second issue of Stuffed Magazine by Stampington and Company, the same wonderful company that does Somerset Studio.
It's wonderful. The sort of high quality photography you expect from this company and the projects are lovely and artistic. There are a lot that are just pure inspiration and the techniques are varied. There are hand sewn dolls and a pattern for a Coraline type doll that just thrilled my daughter, and amigurumi that made me very happy. Sock dolls and furry monsters. It's a great magazine if you are into making stuffies, and really, who isn't? I think I must make myself a Coraline style mini-me.


In amigurumi news, I'm working on a pattern for a base for a Momiji style amigurumi. (you know, all the Japanese words I know are craft related?) Ideally, I'll take notes so I can post the pattern for a simple doll form that will have a channel in the bottom that you can put rolled notes into. I could do it for cards, but I think rolled notes will be easier. Momiji are secret message dolls, they are shaped a lot like kokeshi dolls and have a space in the bottom for a wee note.

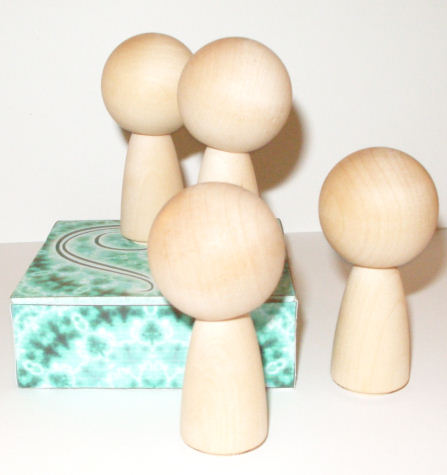
Speaking of kokeshi dolls, blank kokeshi can be a little expensive, but Miss Teri found a dowel cap and doll form combination that's got great proportions for beading kokeshi style dolls.

I didn't get the packaging from her on Friday to find out what exactly she got that fit together that perfectly, but I will ask. The dowel caps make perfect really big cute heads don't they? You could paint them, or wood burn them, or use thread crochet to cover them, or do what I'm planning and bead them like my little ninja. First one I want to do will be a little green alien, but I look at them and see Guardians of Oa too.