This is from my old blog. Originally posted July 2008.
I was too impatient to try baking bread with whey to wait the amount of time it takes to make a sourdough starter without yeast, so I went ahead and made up some bread today. It turned out good. E is planning to have some tomorrow with strawberry jam and the chocolate cheese we made.
Chocolate Cheese
Okay, this is fun to do with kids because of how it works. Milk has a lot of protein, sugar and fat solids in it, and the protein is resistant to acids, so when you add an acid to milk which is heated up so the molecules are less tightly together, the acid mixes fine into some of the sugars and liquid of the milk, but not into the proteins, which causes the proteins to separate from the rest. It winds up looking curdled, with solid curds and liquid whey. Most recipes call for a gallon of milk, but I had, like I said, a half gallon of organic milk.Measurements are American, I apologize, worse, we cook by volume, not weight. There are a lot of sites with conversions though.
Sauce pan, one big enough for a half gallon of milk, plus a couple inches head room, spoon, I have a wood angled flat stirrer I use, strainer, bowl (to drain the whey into), cheese cloth, a container to put the finished cheese in, some jars for the whey, spoon, hand blender or food processor (I don't HAVE a food processor, I do have a hand blender)
1 half gallon of milk
3 Tbs white vinegar
1/2 tsp salt (I use sea salt)
1/4-1/2 cup cocoa powder
3/4 cup sugar, or sugar to taste
1 tsp vanilla
1/4 cup of milk
Line the strainer with a couple layers of cheese cloth, and set it over the bowl.
Bring the milk to a simmer, about 185° F, or until bubbles are just forming on the sides, stir frequently to keep from burning the milk. Add in the vinegar, you'll see curds start to form immediately, keep cooking and stirring over a low flame or low heat if you have electric pulling the pan off occasionally to keep it from boiling over. Lots more curds will form. After 10 minutes, pull it off the heat and pour the whey and curds into the strainer. You'll probably have to take the strainer off before you get it all poured to pour some of the whey into a jar, so do that, then set the strainer back over the bowl and finish pouring. Take the sides of the cheese cloth and fold them over the top of the solid curds, and push down with your spoon to express a bit more of the whey out, then put a cloth over the top, and set it all some place cool for a couple hours to finish draining.
After a couple hours, take the stainer off the bowl, pour the whey into the jars, close them, and put it in the fridge to use for baking later, it can be used for the liquid in almost anything. Rinse the bowl out, and turn out the cheese into the bowl, add in the other ingredients, blend well. The extra little bit of milk helps make this very creamy and spreadable. I think with a bit of powdered sugar, not too much, this would make an amazing not too sweet frosting for cupcakes. I'm thinking a bit of chocolate ganache, and a dollop of this cheese on top of devil's food. Oh yeah! That's what I'm forgetting, put the cheese into your container for it. I love my Lock&Locks!
Whey Bread
Recipe makes two loaves of bread.
big bowl, wooden spoon*, oil/fat of some sort to grease the pans and the dough while it's rising, 2 bread pans
Proofing the yeast
1/4 cup warm water in the bowl
1 tsp sugar or sweetener**
4 tsp yeast or 2 packets.***
Proof the yeast, which means mix the sugar into the water, then sprinkle in the yeast. Give one stir with the wooden spoon.
Let it set for 10 minutes, if it's foamy looking at 10 minutes, your yeast is living and you're good to go.
Mixing the Dough
2 cups of whey
3 Tbs butter or other fat
6-8 cups of flour, I used an unbleached, organic all-purpose flour, if you are using a dark flour, you might need a bit more.
1 Tbs salt
2 Tbs sugar
Preparing the liquid parts of the bread
My old Betty Crocker cookbook from the 60s calls for scalding milk, but microwaves make it so easy.
Put cup and a half of your whey mix into a microwave safe cup, I use my Pyrex measuring cup, add 3 Tbs of butter, zap it for a minute. Stir in a half cup of cold whey to cool it down to "won't kill happy little yeast" temperature. Pour into your yeast mixture.
Put 2 cups of flour, the salt, and the sugar, and stir it in the liquids.
Keep stirring in the rest of the flour a cup at a time until you can't stir anymore, then flour your hands, and get in and start kneading in more flour. After you've added most of the rest of your flour (I've never needed all of it before I can't add more) keep kneading until it gets smooth and elastic. Kneading develops glutens, which creates the chemical reaction that turns your mix of whey and flour into a big mass of nice smooth uniform bread dough. I love this process. Now, most people turn it out onto a counter top, with a working surface of some sort put on to it, I just knead in the bowl, less clean up. When it's all a nice big smooth uniform ball of dough, oil the dough ball all over, and cover the bowl with a clean towel, and let it rise for an hour in a warm place.
Baking the bread
After an hour, grease your bread pans then check to make sure the dough doubled by pushing down with a fingertip, if the indention doesn't rise back up out of it, it's doubled. Punch it down, and knead again. Divide it into two balls, form loaves, and put it into the pans. Lightly grease or butter the tops, cover again, and set someplace to rise again. After it's risen the second time, put in the oven at 425°F for 45 minutes. After 45 minutes, check by thumping the bread, if it just goes *thud* it needs a couple minutes more, if it sounds hollow, it's done. Let it set for as long as your family will let you. Which in my case was less then 10 minutes, then E was finding my bread knife. I think it's a hint I don't make bread often enough. She had a big slice off the heel of buttered bread fresh out of the oven.
The bread turned out a bit sweet, whey has a lot of milk sugars in it, and it rose a bit more then my usual recipe rises. It's a lovely bread.
*Yeast can be reactive with metal, and slow down or even stop the process, so I always use my big glass bowl, and a wooden spoon, it does make a difference in how much rise you get.
**NOT a no sugar sweetener, yeast won't grow on Nutrasweet. Honey, molasses, cane sugar, raw sugar, organic cane sugar, maple sugar, or birch syrup is fine. Something with sugars in it for the yeast.
*** Since E loves making pizza, we always buy jarred yeast, but if you only make bread occasionally, packets are the more economical choice since you won't risk it going bad waiting for next time. My ex-husband never saw the point of proofing the yeast until a batch failed on him. He wound up making cinnamon-cayenne crackers (also unintentional, he meant to make cayenne savory and cinnamon sweet) which were good, and an excellent reuse of failed bread, but really, it only take 10 minutes to proof.
This recipe, and several more yeast bread recipes are available in my Kindle e-book.

Printing Tips

If you'd like to support this site and all the free things I post- please check out my Don't Eat the Paste Mandala collection coloring book for 9.99 at Amazon.
Showing posts with label bread. Show all posts
Showing posts with label bread. Show all posts
Monday, October 15, 2012


Sunday, March 27, 2011
Book Review - Simply Great Breads
I love baking fresh bread by hand.
So a book with a title like Simply Great Breads is always going to appeal to me.
The author, Daniel Leader is as enthused about bread baking as I am, and the introduction is wonderful. He discusses the necessity of using the best ingredients and using recipes that allow the grain you're baking with to take center stage rather than using a lot of fats and flavors that mask the characteristics of the grain you're using. It also explains a bit about the science part of bread making and about artisan doughs.He lists different ingredients and their attributes like cornmeal which is used both as a release and as a nice bit of texture to things like English muffins.
The recipes are a mix of savory and sweet. They are yeast breads, he suggests using a dough hook in a stand mixer, but they can all be done by hand as well.
The recipes and the photos are just gorgeous. This is one of the prettiest bread baking books I've ever seen. The recipes are drool worthy and inspiring. All yeasted, even things like pancakes that aren't generally made with yeast. The author also came up with what has to be my favorite crumpet recipe ever.
The variety of methods and types of yeasted breads is just wonderful, 28 recipes total with extra variations for some of them to increase the range. There is even a recipe for yeasted fry bread. Most fry bread recipes call for baking powder, but the recipe my family uses is a sweet yeast recipe. This one will make a lovely base for savory treats.
If you love baking bread, I really do recommend this cookbook. You can get it directly from the publisher, Taunton Press My review policy is visible using either the link on the right side bar or using the page tabs at the top of the page.
So a book with a title like Simply Great Breads is always going to appeal to me.
The author, Daniel Leader is as enthused about bread baking as I am, and the introduction is wonderful. He discusses the necessity of using the best ingredients and using recipes that allow the grain you're baking with to take center stage rather than using a lot of fats and flavors that mask the characteristics of the grain you're using. It also explains a bit about the science part of bread making and about artisan doughs.He lists different ingredients and their attributes like cornmeal which is used both as a release and as a nice bit of texture to things like English muffins.
The recipes are a mix of savory and sweet. They are yeast breads, he suggests using a dough hook in a stand mixer, but they can all be done by hand as well.
The recipes and the photos are just gorgeous. This is one of the prettiest bread baking books I've ever seen. The recipes are drool worthy and inspiring. All yeasted, even things like pancakes that aren't generally made with yeast. The author also came up with what has to be my favorite crumpet recipe ever.
The variety of methods and types of yeasted breads is just wonderful, 28 recipes total with extra variations for some of them to increase the range. There is even a recipe for yeasted fry bread. Most fry bread recipes call for baking powder, but the recipe my family uses is a sweet yeast recipe. This one will make a lovely base for savory treats.
If you love baking bread, I really do recommend this cookbook. You can get it directly from the publisher, Taunton Press My review policy is visible using either the link on the right side bar or using the page tabs at the top of the page.
Tuesday, September 8, 2009
Grandma's Recipe Box- Cranberry Bread


While I was looking for something else in our spare room which is actually used for storage, I found my Grandma's recipe box. Over the next however long it takes, I'm going to try and get the whole thing scanned and transcribed for my kids. Some recipes I'll post here.
Cranberry Bread
Recipe from: Holly Bradley Serves: 1 loaf
1 c. sugar
2 c. Flour
1 1/2 tsp. bk pwd
1/2 tsp soda
1 tsp salt
Sift these together. Grate rind of one orange, juice of one orange- add enough water to make 3/4 cup liquid
2 tbsp shortening or oil
Add this to first mixture.
1 cup cranberries cut in half.
1 c. chopped nut meats
1 egg beaten
Add to other mixture- Bake in loaf pan 350° -60 to 70 min.
Updated recipe-
There are 3 mixes you have to make than mix together to make this bread, it's a quick bread so it doesn't need time to rise.
Start with one loaf pan, and butter it. If you want to make it just like my grandma did, butter then sugar the pan. She always sugared her pans instead using flour for anything sweet.
Pre-heat oven to 350°F
Orange
water
2 Tbsp. shortening or oil
Grate the peel from one orange into a glass measuring cup, cut the orange in half and squeeze juice into the cup. Add enough hot water to make 3/4 cup liquid. Stir in oil or shortening.
In a large bowl, sift together
1 c. sugar
2 c. flour
1 1/2 tsp. baking powder (can reduce to 1 tsp without a problem, get a non-aluminum baking powder, Bob's Red Mill is a good one)
1/2 tsp. baking soda
1 tsp. salt (can reduce to a half tsp. Seriously. I would.)
in another bowl (it's worth it, I swear)
1 egg beaten*
1 c. fresh cranberries- cut in half
1 c. coarsely chopped walnuts*
Mix the orange juice mixture into the dry mixture and stir until it's a nice lumpy thick batter. Stir in the nuts and egg and mix to incorporate the egg well.
Pour mixture into greased loaf pan.
Bake at 350°F for 55-65 minutes, or until pick inserted in the middle comes out clean.
Serve with cream cheese or homemade creme fraiche. Okay.. serve with homemade creme fraiche. Seriously. Because wow! If you want to make it a little fancier, put a splash of Grand Marnier into the creme fraiche and serve the slices of bread warm with a little puddle of creme fraiche. (Last suggestion is all mine)
Homemade Creme Fraiche- Night before
EASIEST thing in the world. In a clean jar, mix 1 cup heavy cream with 2 Tbsp. buttermilk. Just put the ingredients in, cap it, give it a good shake. Let it set out at room temp. for 24 hours. When you come back it will be a nice thick gorgeous cream. Put it in the fridge. To that you can add vanilla or Grand Marnier, amaretto, whatever flavors will compliment what you are serving it with, and you can use creme fraiche where ever you would use cream cheese. But.. creme fraiche is better. And check out supermarket prices on it, they want like 5.00 for a few ounces!
* her recipe calls for it to be added last, which just adds one more dish to wash since it's hard to beat an egg with nuts and cranberries in the way
the original calls for chopped nut meats, but generally in her recipes, that means walnuts unless it specifically calls for filberts, pecans or almonds. But pecans would be wonderful!
The chop you are going for is still a little bit chunky so you have bits of walnuts in the bread, not the fine grind I use for my yeast bread recipes. Although.. I think I will try it with pecan butter instead of chopped walnuts.
Saturday, May 16, 2009
Chocolate Banana Bread
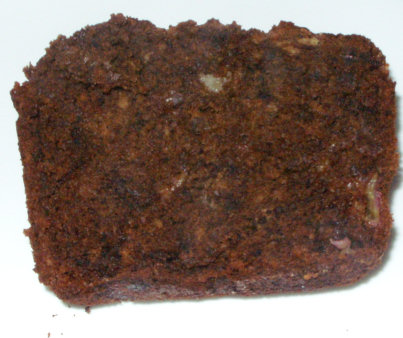
Sugar Free Chocolate Banana Bread
4 large ripe bananas, a little overripe is fine for this. Mine were just edging into "banana bread" only stage.
1 egg
1/3 cup melted butter
1 cup Splenda
2 Tbsp vanilla extract (your mileage may vary, but I like a lot of vanilla)
pinch of salt
1 Tbsp. baking soda
1/3 cup unsweetened cocoa
1 1/2 cup flour -I used Bob's Red Mill whole wheat pastry flour
Preheat oven to 350°F.
Mash up bananas well with a wooden spoon. You don't have to be too picky, you can see banana chunks in mine. Mix in butter, Splenda, egg, vanilla and mix it to a really disgusting gloppy looking mess.Stir in baking soda and salt, then mix in the dry ingredients. Cocoa first to get it well mixed in, then the flour.
Pour into greased loaf pan.It will just fill a greased loaf pan to 2/3rd full or thereabouts.
Bake for 1 hour. Let rest for about 10 minutes, and turn out.
With Sugar Chocolate Banana Bread-
4 large ripe bananas (same, overripe is fine)
1 egg
1/3 cup vegetable oil (I used canola, you could use melted butter. It might make it too rich though)
3/4 cup sugar- any kind, I used white because it was convenient. I think if I were using maple or brown I'd use 3/4 plus 1 Tbsp.
2 Tbsp vanilla extract (your mileage may vary, but I like a lot of vanilla)
pinch of salt
1 Tbsp. baking soda
1/4 cup unsweetened cocoa
1 1/2 cup flour I used my old standby organic white unbleached (also Bob's Red Mill)
Preheat oven to 350°F.
Mash up bananas well with a wooden spoon. You don't have to be too picky, you can see banana chunks in mine. Mix in oil, sugar, egg, vanilla and mix it to a really disgusting gloppy looking mess. Stir in baking soda and salt, then mix in the dry ingredients. Cocoa first to get it well mixed in, then the flour.
Pour into greased loaf pan. It will just fill a greased loaf pan to 2/3rd full or thereabouts.
Bake for 1 hour.
Let set for 10 minutes or until the teenager in the house figures out something just came out of the oven and comes into the kitchen sniffing and looking like you've starved her for weeks. Or maybe that just happens here?
Your cake may turn out lighter in color if you use white flour. I think since the leavening is baking soda no gluten flours will be fine.
The sugar version was a HUGE hit in our house, and the sugar free version was a hit with my Uncle, who didn't look like he felt bad at all while we ate cake. After all, we had to share the cake, and he had a loaf of banana chocolate-y goodness all to himself.
Subscribe to:
Posts (Atom)