Printing Tips

Check out my printing tips if you're having problems printing to the right size
If you'd like to support this site and all the free things I post- please check out my Don't Eat the Paste Mandala collection coloring book for 9.99 at Amazon.
Showing posts with label foraging. Show all posts

Wednesday, September 8, 2021

Air fried puffball recipe


air fried puffball mushrooms

My family does a lot of foraging in spring/summer/fall and one of our favorites has always been puffball mushrooms.


Usually puffballs in Alaska don't get much larger than a golf ball, compared to the soccer ball sized ones down south. But the last few weeks have been very rainy and we've found a lot of bigger ones, closer to tennis ball sized. 


My kids and I liked them cooked differently. My favorite was cooked with scrambled eggs, my daughter liked them sauteed in butter with a light sprinkle of salt and garlic. 


Then my son came up with a recipe for air fried puffballs that has rapidly become everyone's favorite way to eat them. (more on identifying and preparing puffballs after the recipe) 

Air fried puffballs: 


You will need:

Puffball mushrooms

1 cup panko crumbs

1 cup dry grated Parmesan cheese (yes, the stuff in the green can, not fresh) 

1/2 tsp garlic powder

1/2 tsp salt

flour (on a plate, small amount for dredging)

one lightly beaten egg (in a bowl) 

olive oil spray

Mix panko, cheese, garlic and salt together. 

Clean and cut the puffball into nugget sized pieces.  Dredge them in the flour then coat in the egg, then roll in crumb mixture.


Lightly spray with olive oil. 


Put in the air fryer at 425F for 7 minutes then turn and cook another 5 minutes. 


Leftover crumb mixture can be used on onions or dandelion blossoms. (we have!!) 


These are fantastic. The inside is soft, gooey and good, the outside is crunchy and delicious. The egg provides a bit more crunch than using milk. They have become so much my daughter's favorite that she has eaten them 3 times this week. 


So finding puffballs- 

Puffballs are one of the safest and easiest to identify wild mushrooms around. There are some look-alikes which are poisonous, but slicing the mushroom in half will show you if it's safe to eat edible puffball. 


Puffballs are round, potato shaped or pear shaped. Not "mushroom shaped". 

When you slice open a puffball, what you are looking for is a solid white marshmallow like interior. 

There shouldn't be a trace of anything that looks like gills, or an immature mushroom. Gills or a standard mushroom shape on the inside indicate it's an immature amanita and could be poisonous. 

A solid interior that is yellowing, greening or browning show that it's too mature for eating. 

What you're looking for is that solid white marshmallow interior. 

We clean our mushrooms with a damp coffee filter or a soft brush and we don't peel them because they are so small here. Larger ones can be peeled. The exterior of a puffball can be slightly bitter. 


Sunday, September 22, 2019

Culture Camp- Part 1


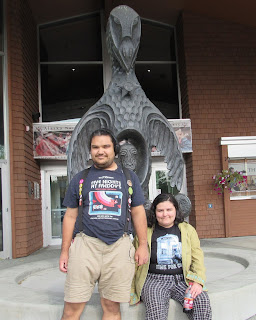
TG and William at the Raven statue at the Alaska Native Heritage Center
William and TG at the Alaska Native Heritage Center
This is going to be a few posts because I took a LOT of photos.

Last month, my children and I had a chance to go to a culture camp. If you're not indigenous, culture camps are a way to learn about our heritage from Elders and people who live a traditional life. This one was a mixed culture camp, centering on Traditional Foods for the various indigenous people from Alaska. We were really excited about it.

It took place at the Alaska Native Heritage Center. This is definitely a place you should visit if you're ever in Anchorage. They have a village area set up in the back of the museum with the various building structures used by the tribes up here. The grounds grow a lot of plants that are used traditionally for food and medicines. It's educational and interesting and they focus on creating opportunities for Native peoples. There are young interns who do presentations, and there is dancing and indigenous artists selling beautiful things.

My family is Tanana Athabaskan. We come from the interior, even though my children and I have lived in Anchorage our whole lives. If you have younger children, you may be watching Molly of Denali with them. Molly is Athabaskan too.

The first day of camp, a whole bunch of us were processing salmon for canning. So we went straight to work. TG, William and I were in the classroom a little early, so we helped the teacher set up.

Salmon is preserved in a lot of ways, and canning is a modern one and important. We learned how to pack salmon into jars, why our teacher preferred jars to cans and we cut and packed up a lot of salmon.

Salmon
TG processing salmon


At the end of the day, I asked TG and William if they had fun. They had worked, listened to a presentation on safe canning methods, and we walked around the museum some. I also got myself a pair of baleen hair sticks from one of the artists on side.


They both agreed it was a whole lot of fun. 


The qaspeq that TG is wearing is one that belonged to her grandmother. It's about 50 years old. You can get my free qaspeq coloing page here-Qaspeq/Kuspuk Coloring Page

A couple days later, we got to work on canning the fish. 

salmon before and after canning

The salmon was packed into the jars raw. You can see what it looks like before and after canning in this photo. Canning it cooks it, and the bones soften so much that they can be eaten. A good source calcium!!  Canning can also be used to preserve other meats using a pressure canner. Our local extension service has instructions for canning walrus!! Becky told us how she made her canned moose stew. 


We also had a class on safety procedures. That was good. TG won a water bottle in that class and she was really happy. 

I missed a class on plants because I had an appointment. TG and William took extensive notes and enjoyed the class a lot. They both came home with jars of yarrow salve from that class. 

The plant class I did take, taught by Meda DeWitt was about nettles. We went out and picked some nettles, and stripped them. We learned about how to use the seeds to make a tincture, how to use the leaves for tea and food, and then made a simple hand-spun twine using the fiber. 


Then we got a presentation from Chef Sean Sherman. That was fantastic. If you don't know who Chef Sherman is- he is a James W. Beard award winning chef with a passion and vision for indigenous foods. He is also known as the Sioux Chef. 

I went totally fangirl when I found out he was going to be here! A couple friends of mine from Minnesota who had been to some of his presentations told me how much I was going to enjoy it. 

An Elder gifted him with some muktuk (whale fat and skin) that he shared. It was the first time that my children had tried muktuk. It was not the last time that week they had muktuk. They both loved it. Chef Sherman said it tasted like the sea. 

Chef Sean Sherman sharing muktuk. 
His vision is wonderful. It's about creating new recipes and learning the old recipes. Finding how which foods have been traditionally harvested in various regions, wild foods, foraged foods. He wants to empower indigenous people to set up businesses both for supply and finished products such as restaurants. It is an exciting vision and you can find out more at The Sioux Chef and NATIFS.

If you're interested in Chef Sean Sherman's book, you can buy it using the link below. Amazon affiliate links won't affect your price, and the small commission they pay helps fund this page.

Thursday, May 30, 2019

Eating Weeds: Dandelions

Bee on a dandelion

I was just asked on Facebook about eating dandelions.

The answer deserves it's own blog post, not just a reply to a comment.

Dandelions are one of those superfoods in every way. Every part of a dandelion is edible. My family doesn't eat the stems, because they take some preparation and can cause stomach upset. But the rest of it we do. Fortunately, when my children were little they blew lots of dandelions and my lawn is not chemically treated.

First thing: Make sure your dandelions come from places that are not treated with chemicals or close to busier roads with exhaust particulates that will fall on the dandelion. You don't want to eat those things.

Okay, have a safe place to harvest?

In the spring, young green leaf rosettes can be pulled up or cut off at the base. Rinse them, pat them dry, and fry them in a tempura batter for a nice treat.

Later in spring, start looking for buds close to the ground, the buds should be tightly closed and sort of squared off at the top. A tapering bud like formation is after blooming but before going to seed. A new bud tapers down to a rounded end at the stem and has a flat wide top in comparison to the base. (I'll post a picture here later). The buds can fermented like pickles to use as a substitute for capers. I have some fermenting now! You'll use a basic salt brine, plus seasonings you like. Mine have garlic, red pepper, onions and peppercorns in them. A basic salt brine is 2 Tablespoons of salt to 1 qt of water. Clean all your ingredients, chop your onions if you're using them, and put them in the brine. Weight it down using either specially made weights, a smaller jar full of brine or a small zip bag full of brine. Make sure all your vegetables are completely submerged. Put the top on the jar finger tip tight and put it in a warm but not too warm part of your house. Check every day to make sure that it's not building up too much pressure. You'll see bubbles forming, that's normal. If the button on the top of the jar won't press down, relieve the pressure by carefully opening it just a little. After two weeks, check the tartness and if it's where you want it, put it in the fridge to slow (not stop) the fermenting. Eat within a couple months. If you want it more sour, let it ferment longer. Watch for mold, but as long as everything is properly submerged, there shouldn't be any.

Also in spring, young leaves can be used in salads. They are delicious, and considered a bitter.

Dandelion blossoms can also be fried, made into jelly or made into wine. A quick internet search will turn up a lot of recipes for dandelion wine.
My Dandelion Jelly Recipe
My Fried Dandelion Recipe 

You can rinse and freeze dandelion blossoms for later use in wines or jellies. Rinse, use a salad spinner to extract excess water or even squeeze it dry, freeze in single layers, then put in a labelled bag in your freezer to make the jelly when you have time.

For fried dandelion blossoms, any basic tempura batter works just fine though.

Older but not huge leaves can be boiled as any other vegetable, then used in soup. Discard the boiling water. Boiling helps get rid of some of the oxalates.

The bigger they get, the more bitter they get, so there is a point where you won't want to eat them.

The seeds can be collected, and threshing them lightly in a paper bag then using a fan to blow away the fluffs makes for a free seed that you can use to grow microgreens in the winter. Just sow as you would any other seed. They can also be sprouted, but I find microgreens a more effective use of time, plus if you miss some fluff, it won't matter with microgreens which you are cropping.

Dandelions are high in vitamins A, C, K and a good source of dietary fiber.

In the late fall, you can dig up the roots, cut them up and let them dry to hard, roast them either in the oven at 350 degrees Fahrenheit or toast them in a cast iron skillet. Store in an airtight jar. A decoction made by simmering the root in water makes a tasty non-caffeine coffee substitute.

More dandelions on this site include:

Dandelion Printable Recipe page

Dandelion and Bee coloring page

Dandelion Lined Paper Printable

Thursday, April 25, 2019

Some of us are foraging coloring page

foraging clip art by Shala Kerrigan


First- this design IS available on a shirt without the striped background at my Redbubble shop.

You can get it here- Foraging Shirt

But you can also download and color this page.

Click the images below for larger versions to print and color.

Some of us are foraging small jpg version:
foraging coloring page available in jpg and transparent png versions #mushrooms #berrypicking

Some of us are foraging lg transparent png version:
foraging coloring page available in jpg and transparent png versions


Tuesday, May 16, 2017

How to make spruce tip salt

Spruce Tips

This year the spruce tips are coming out a little later than normal. Spruce tips are an easy to forage wild edible that's widely available. They have a green, citrus-y flavor that's bright and my family is pretty wild for it.

Any time you're trying a new wild edible, pick a couple and taste them before harvesting, because you want to make sure you like the flavor! If they need some sort of process to eat- like some mushrooms need to be cooked (NEVER PICK MUSHROOMS UNLESS YOU KNOW WHAT YOU'RE DOING!) - pick a couple, bring them home, and cook them. Just make a note of where you found them.

Spruce tips can be eaten raw. You're looking for just the tips that come out in spring- they will be a light green and the needles are quite tender compared to the rest of the needles. You pick them like berries, just pinching them off the tree. As with any wild edible, harvest sustainably. There are enough tips that you can collect from different places on the trees, and leave most of them in place.

Spruce tips

These are the picked tips. See that papery brown coating? It slips right off. Take that off, and discard it. Make sure there is no debris on the tips.

Chop up the tips. You could use a food processor- but I don't like even the mild heat that a motor can generate, or how much gets stuck or pasty because of the slight moisture. Chopping a bunch at a time by hand doesn't take very long.

Mix it with white sea salt. In this case, I got some sea salt from an artisan salt maker in Valdez. She gets sea water and evaporates it. I wanted my spruce tip salt to be made using Alaskan sea salt.


I like a 50/50 mix.


 This is just some of the tips added.

Spread it in a thin layer in a baking sheet and allow to dry overnight. The salt helps it dry quickly. Then put in jars.


What can you do with it?
Spruce tip salt is delicious on vegetables, fish and chicken- and probably good on pork. I'm not really a pork eater.

It makes a lovely, personal gift.


Monday, May 13, 2013

Book Review- Backyard Foraging


Backyard Foraging: 65 Familiar Plants You Didn't Know You Could Eat by Ellen Zachos is a collection of weeds as well as commonly grown garden and landscaping plants that are edible and not generally grown for food.

It's written for people who have recently started foraging or who have been doing it only for a short time and would like to know more about what is edible and ways to prepare it. Full color photographs and lots of information written in an easy to follow conversational fashion make it a very accessible book for people who are just starting out.  The plants cover a fairly wide range of regional zones.

It starts with learning how to identify plants to be safe and how to harvest in an ethical way, and then talks about how to harvest in a way that doesn't destroy the appearance of your garden and landscaping. It explains about young shoots, foraging flowers, nuts and fruits and digging for edible roots. It also has a great section on the tools you'll need to enjoy your harvest.

Getting into the plants, each plant is described completely and has both the common name and the Latin name listed. The text explains how to harvest, and which parts of the plants are edible, and how they are best eaten. It will also show dangerous lookalikes and how to tell the difference. It's sectioned by types of edibles.

The first section is leaves and stems that are edible. This includes things like chickweed and miner's lettuce that can be eaten raw in a salad as well as things like fern fiddleheads that are best cooked.

The next section covers edible fruits and flowers. This covers crabapples and highbush cranberries as well as  things like juniper berries, roses and prickly pears.

Next up, nuts and seeds- I'm really impressed with the authors attention to detail about harvesting throughout the book, but this is where it's handiest. Nuts can be hard to harvest and she explains very well about how to harvest and prepare the nuts.

After that, roots, tubers and rhizomes (generally the stuff that is underground)- there are plants you expect to find like wild garlic, but also a lot of flowers that have edible roots and bulbs.

The last regular plant chapter is those superstar plants like my favorite dandelions that are almost all edible. It explains how each part of the plant that is edible might be eaten from root to flower.

Then comes the easy to identify 5 safe mushrooms- everyone who forages and likes mushrooms should become knowledgeable about these. She explains the dangers of mushroom hunting and why mushrooms should always be cooked. Then she shows how to identify spored, gilled and toothed mushrooms. After that, she introduces the reader to 5 kinds of mushrooms that are very easy to identify and safe to eat.

The last chapter covers cooking and recipes for your harvest. It discusses preservation techniques and has some great recipes for jams and jellies. It also has recipes for baked goods, soups and other dishes.

It's very well indexed, and this a book that I happily recommend to anyone who is beginning at foraging and wildcrafting. I've been an active forager for years, and found some things in it that I'd forgotten about or that I didn't know.

Published by Storey Publishing- check out their Facebook page for lots of great contests, recipes and ideas.

I received a complimentary copy of this book to review, I received no other compensation, and my review is my honest opinion of the book. You can read more about my review policy here.