Printing Tips

Check out my printing tips if you're having problems printing to the right size
If you'd like to support this site and all the free things I post- please check out my Don't Eat the Paste Mandala collection coloring book for 9.99 at Amazon.
Showing posts with label holiday. Show all posts

Tuesday, April 15, 2014

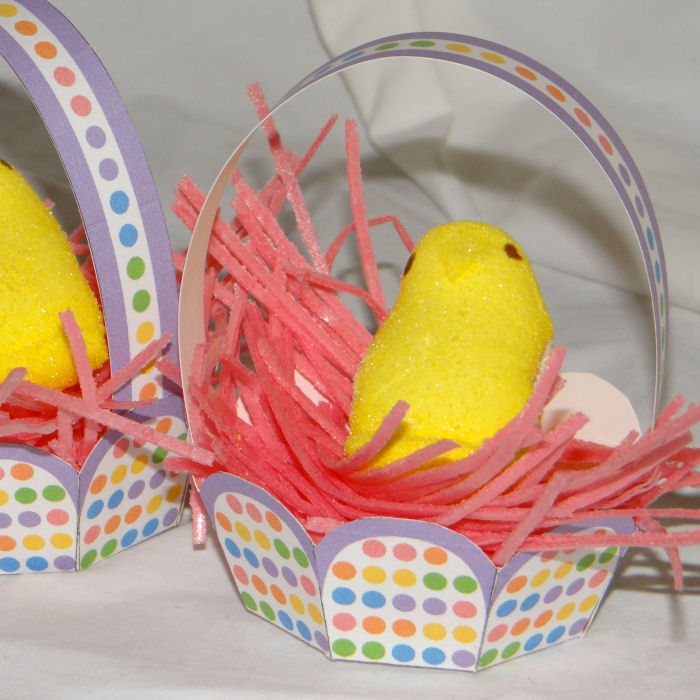
Printable Mini Baskets

Mini Basket for Easter

These mini baskets print two to a page and easily fit one plastic egg, or a Peep! The grass used in the photo is an edible Easter grass (Kroger brand). I also like using paper grass sometimes.

Click the image below for a large version to print and make. Follow the instructions in the corner to assemble it.


Monday, December 2, 2013

Sunny Christmas Coloring Page

Remember when I posted the Sunny Christmas printable box? This is especially good for people in places that just don't get snow at all for Christmas and was inspired by a lady in Australia.

Here's a coloring page for you all. I hope you enjoy it!
Click on the images for larger versions to print and color.

Small JPG version:

Large transparent PNG:


Saturday, January 15, 2011

Martin Luther King Jr. printable quote


With Martin Luther King Jr. Day coming up soon, I wanted to make something to celebrate this amazing man and his life. The quote I picked is one that also reminds me of my mother because it's something she said a lot as well. "Life's most persistent and urgent question is 'What are you doing for others?'".
First I made this printable art piece, it's 300 ppi and will print out at 8x10 inches. Click on the image for the full sized version and feel free to re-color it.

Then I decided that I wanted to do a coloring page with the same quote and worked on this yesterday. Drawing the frame was a lot of fun. Click on the image for the full sized version.


Monday, November 29, 2010

Cold November Morning- card

On Black Friday, as we were coming back from the mall at 9:30 am, which happens to be about sunrise right now in Anchorage, I snapped this picture for my beadwork newsletter subscribers.

That's taken fairly close to my house. When I took it, I remember thinking "I hope that pretty pink shows well." 
I also recently got a suite of applications that included one called Paint It (affiliate link). Fairly inexpensive as a standalone product, just over 20 dollars from Amazon. It is a program I thought my daughter would like. It only does one thing, but it does that one thing fairly well. It creates painting effects of your photos. Running this photo through the application turned out pretty, and also fairly well got rid of that street lamp in the background without me fussing with it. It has 10 different effects and I like all of them except the pen drawing. That one doesn't pick up enough detail. The first image below using the detailed watercolor effect, the second uses my favorite effect, illustration. 

I thought the first one looked like a pretty card image, so I put it on a card! 

300 ppi, click the images to download the full sized versions.


The card measures 3.5 wide by 5 inches tall. The envelope is just over 5 inches wide and 3.5 inches tall, which makes it an okay size for mailing.Print the envelope on paper, and the card on card stock. Here's the blank templates to design your own. Gif format, so you'll have to increase color depth, the envelope is horizontally oriented for designing, so print on landscape settings or rotate it 90 degrees to print. Pixel drawn, 300 ppi. 


,

Sunday, November 7, 2010

Review-Page Maps 2 and a printable Christmas Card

Page Maps 2 by Becky Fleck is a scrapbooking book full of ideas for mapping out scrapbook pages and cards. 
It starts with traditional layouts and shows a couple examples of the layouts done completely differently so you can see how adaptable they are, how easy they are to customize by changing the shapes a bit, changing the colors and the themes. The next chapter is my favorite, cards! I like cards a lot, but I tend to think in terms of one main image, background, frame. The scrapbook inspired card layouts help me think in terms of layers of elements to create a card that more dynamic, has more going on, without being too busy or too much.
Chapter 3 is over the top layouts, busy exciting scrapbook pages with room for journaling.
Chapter 4, Beyond the page, has a bunch of great ideas and layouts for round pages, for art created to hang in your house including a calendar idea that is just wonderful. Clipboards, clocks and other artistic pieces using your scrapbooking skills to create gifts that take a lot less time than making a full album. 
The last chapter, near and dear to my heart, is about digital scrapping. Layouts combined with the credits under the photos telling where the elements come from make it very inspiring for people who would rather have an undo button and the ability to get just the right color element. 
At the end of the book are perforated cards that have a hole in the corner so you can put them on a book ring and have mobility with these ideas. You can keep the sketched layouts on hand for a night of scrapping with friends or just on your work table without it taking up much space at all. The cards are glossy, with the sketch on one side and a full color photo of an example layout on the other side. (Amazon link is an affiliate link)
Using one of the layouts in this book, I created this Christmas card. It's 300 ppi, click on the images for the full sized version. In the book, the original layout was to fit a 3.5 x 8 inch card. Because I wanted to make mine digitally with a matching envelope, I changed the size to 3.5x7 inch. This is a mailable size, within USPS limits for letters. I always recommend sealing printables with an acrylic spray, but if it's going through the mail, it's a really good idea just in case it's anywhere moisture can cause ink bleed.


Friday, November 6, 2009

Sparkly Recycled Cardboard Ornaments


 We keep cardboard food packaging to use for crafting. It becomes the frame work for duct tape purses, new boxes, covers and backs for mini-notebooks and all sorts of other things. I like these a lot too. Glittered ornaments for our tree.
What you'll need is templates or craft punches a small hole punch, all but the heart I used a 1/8 inch punch on, glitter, we used Martha Stewart's because I have lots of it I bought on sale after the holidays last year,glue and some sort of spray sealer.
If you use my templates, print them out on paper, then cut them out. Trace the shapes on to your cardboard and cut out the cardboard. A craft knife is helpful for the peace symbol, but if you work carefully you can use scissors.
Punch a small hole near the top, and cover the shapes with glue and sprinkle glitter on them. Let dry. Seal. If you want them to come out very nice and neat looking, you could spray paint the shapes before spreading the glue and glitter on them, but I like the way these look without it. We put the glitter on the plain brown side.
You can actually decorate these all sorts of ways. I offered my daughter buttons and sequins as well. She did the green ones.She also wanted me to point out the shapes make nice negative stencils to decorate clothing with. Click on the templates for the full sized version.


Friday, April 10, 2009

Printable Bunny Box


Happy Easter. Here's a last minute box to fill with goodies.
Click on the image to get the full sized versions. One is blank to color in, and the other is colored in, it has the same circle type close at the top as my Sun top box.
Print at 100 dpi on cardstock, and score all fold lines before
assembling.


Click here to grabe some tips on how to recycle your old items.