Printing Tips

Check out my printing tips if you're having problems printing to the right size
If you'd like to support this site and all the free things I post- please check out my Don't Eat the Paste Mandala collection coloring book for 9.99 at Amazon.

Friday, May 30, 2014

I love this quote about imagination and making things happen (printable quote)

Imagination is the beginning of creation. -George Bernard Shaw
Imagination is the beginning of creation. You imagine what you desire, you will what you imagine and at last you create what you will.
-George Bernard Shaw
I really like that quote. The version above is available for sharing from my FB page, or you can print it without the URL by clicking the image below for a larger version. It prints out at 8x10 inches, and I'm wild for how these black and white designs look on Astrobrights paper.

Imagination is the beginning of creation. -George Bernard Shaw printable quote

Wednesday, May 28, 2014

How to Make Chalkboard Garden Bricks

This is a Sponsored post written by me on behalf of FrogTape Brand Painter’s Tape. All opinions are 100% mine.

How to Make Chalkboard Garden Bricks 

Chalkboard Garden Bricks

Step-by-step Instructions

Step 1:

Prep your glass bricks by getting them clean with rubbing alcohol. Make sure all labels are removed.
Prepped Glass Bricks

Step 2: 

Decide where you want the base color of paint. Tape off the area that will be bare glass with FrogTape® Multi-Surface and burnish the tape carefully around the ridges and curves.
Burnished tape

Step 3:

Paint the first color, use 2 thin layers. Use an exterior 2 in 1 latex paint and primer so you don't have to prime the surface first.
Painted brick- first coat

Step 4:

Remove the tape after painting the second layer. FrogTape® Multi-Surface can actually be removed after the paint is touch dry if you'd prefer.
First paint color

Step 5:

After it's had 3 days to cure, apply FrogTape® Multi-Surface to mask off where you want the chalkboard surface.
Masked for chalkboard surface

Step 6:

Using a dark exterior flat or matte paint, paint the chalkboard surface. Flat or matte paint has enough tooth to mark on with chalk, and an exterior paint will handle weather better than chalkboard paint.
Painted with chalkboard color

Step 7:

Remove the tape, let dry for 3 days then put it out in your garden.
Bricks-final

I plan to use these bricks to tell when the last time my beds were watered. If it's raining, and the the bricks are too wet to write on, they don't need to be watered. Latex paint can peel off of glass, and one of the things I loved about using the FrogTape® Multi-Surface is that it didn't peel up the first layer of paint when I went to put on the second color. It will work on all sorts of surfaces, including glass.
The other thing I love about the FrogTape® line is the PaintBlock® Technology. What's that mean? It means super clean lines. The tape has a polymer in it that's activated by latex paints to create a seal that gives just the cleanest edges. As long as you make sure that's it's burnished down properly so there are no gaps, you will get a gorgeous edge with no little jagged areas that need to be cleaned up.
Check out more great projects using FrogTape® - FrogTape how-to
Also, follow @FrogTape on Twitter for great ideas, tips, projects and inspiration. Then look at the things around you and decide what might look great with some creative painting!
Visit Sponsor's Site

Monday, May 26, 2014

Flowing Mandala to color

Flowing mandala

I hope you like this mandala. Not being sure what to call it, flow seemed like a good name because of the curves. It was a lot of fun to draw and hopefully you have just as much fun coloring it in!
Click on the images for larger versions to color.
JPG version:
Flowing mandala to color- also available in transparent PNG format #coloring #paper #mandala

Large transparent PNG version:
Flowing mandala to color- also available in jpg format #coloring #paper #mandala


Friday, May 23, 2014

Printable sunny fan gift box

Print and make this cute fan shaped gift box #printables #gifts
I don't make these open topped gift boxes nearly often enough, and I like the style because they can be so decorative. I hope you enjoy this fan shaped box as much as I do. The sunny design is inspired by the gorgeous weather we've been having up here in Alaska.

Instructions are on the file you print, and they are very simple to make. I use regular scissors to cut out the main parts, then do the fiddly bits with smaller scissors, but you can absolutely do it with a craft knife too.

Print on card stock, cut out, score folds, fold, glue!!


Wednesday, May 21, 2014

Book Review- Deco Cakes

Deco Cakes by Junko
Junko has written several cookbooks with some of the cutest ideas and designs, well illustrated and explained to be easy to recreate in your home kitchen. Unfortunately, most of them haven't been translated to English. Just this one so far!

This was a great choice to translate, and I'm so glad to have it. There are a lot of fantastic designs. For Mother's Day, Christmas, Valentine's, and all-occasion cakes, this is a great collection. There are tips for decorating and packaging to turn your gorgeous cakes into gifts for friends. Believe it or not, the decorated versions are even better than the cover photos. The baked inlaid designs are impressive looking on their own, combined with themed decorations, it takes it right over the top into something that looks very professional.

To start with, you'll need a 25x25 cm swiss roll pan to make the cakes following the recipes in the book. Unfortunately, that's not a common size in the USA, but a 10x10 inch square pizza pan will work just fine. I imagine a 10 x 10 inch cake pan will work too, but it's easier to get the cake out of the shallow pizza pan than a deep cake pan. A 10 inch pan is just a tiny bit bigger than 25x25 cm.

The instructions are written originally in precise weight based measurements that are used commonly, and to get the exact cake recipe recommended, you'll also need a kitchen scale. However, US style volume measurements are included.

After that, it's just following the step by step instructions, which also include filling ideas. These cakes have lots of flavor and texture coming from the combination of cake, cream and fruit fillings. If your only experience with jelly roll cakes is the kind sold in supermarket bakeries, or worse luck, those chocolate dipped, plastic wrapped individual cakes- these will be a revelation. Great flavors using good ingredients makes a big difference.

The designs are fantastic, for the more complex designs, there are stencils to trace on parchment paper to follow. For the simple designs, they are well illustrated and the techniques explained well. You don't need to be an artist to make a fantastic looking cake using this method. It's nearly as simple as a coloring book. Some of the designs have elements painted on after baking, but most of the design is done before that.

I absolutely recommend it. If you have your own ideas, but just want to practice with the technique and get a good recipe for making these gorgeous confections- it's a good starting point. If you want to be able to make impressive looking from scratch cakes with minimal effort, it's a good choice.

Published by Vertical Inc., check out  their Facebook page!


Amazon.com affiliate links don't affect your cost, and provide extra income to me personally, which helps support this site.

I received a complimentary copy of this book to review, I received no other compensation, and my review is my honest opinion of the book. You can read more about my review policy here.

Sunday, May 18, 2014

Dandelion and Bee Mandala to color


It's GLORIOUS here. The weather, my garden and the incredible amount of dandelions that comes from living in one place since your daughter was little and blowing dandelion clocks all over the place. Fortunately, I like dandelions. They taste good, look bright and cheerful, and they are a good plant for bees.

I hope you enjoy this dandelion and bee inspired mandala. Click the image for a larger version to print and color.
Small JPG:
Bee and dandelion mandala to color- also available in transparent PNG #coloring

Large transparent PNG:
Bee and dandelion mandala to color- also available as a jpg #coloring

Dandelions for bees

The image above is on my Facebook page if you'd like to share it. 

Friday was my birthday. My husband got me the camera I wanted. I'm all sorts of thrilled, and so is the Turnip Girl, because she got my old camera. There will be a summer photo post soon! 


Thursday, May 15, 2014

Crabby Bread Recipe

Crabby Bread recipe
Actually, this is kind of a non-recipe because it's quick, adaptable and so very, very good. It's more of an overview of how to make crabby bread. A family favorite.

You will need:

  • 1.5 lb Snow Crab clusters  OR 12 ozs of cooked lump crab meat*
  • 8 oz container soft cream cheese
  • 1 tsp. lemon juice
  • 1/2 tsp. hot sauce (optional)
  • 1 loaf of French bread sliced in half lengthwise
  • 2 cups shredded mozzarella cheese
  • marinara sauce (optional, good quality jarred is fine)


This can be made either under a broiler for a crispy, toasted cheese look that's very pretty and yummy or done on a grill which doesn't make the cheese as pretty, but cooked over a wood fire adds all that great smoke flavor.
Shell the crab if you have legs/clusters. Or have your son do it because he doesn't mind doing it if it means he gets crab for dinner. (my son really, really loves crab)
Mix the crab, cream cheese , lemon juice and hot sauce.
Toast the cut sides of the bread. Spread the bread with the crab mixture. 

Top with the shredded cheese. 


Then put it on the grill or under the broiler until the cheese is all melted. Serve with warm marinara.


It's that easy, and the flavor is pretty fantastic. The 4 of us ate nearly all of it on Mother's Day when my husband made it on the grill over a birch fire for dinner. He also made salmon, asparagus, potatoes and carrots and I was so stuffed from the crab bread and asparagus that I had the salmon the next day for lunch! It was darn good cold too. 

Variations- all sorts. You can switch out the cheese, you can use different sauces, different breads. Doing the same basic thing but with Alaskan smoked salmon, cream cheese and a touch of horseradish on a rye loaf is amazing but very salty. Really good to serve with a very cold beer and some fresh fruit or berries. My husband also likes the crab with smoked Gruyere, but I'm pretty sure you could melt smoked Gruyere on shoe leather and he'd ruin my good steak knives to eat it. 

*Most Alaskan crab is already cooked. Including snow crab. I know that down south buying lump crab meat is less expensive per lb than buying any kind of Alaskan crab legs because people have told me what they are paying. Up here- snow crab goes on sale frequently and winds up being less expensive per ounce of meat than the stuff shipped up here. 

Don't forget to enter my $50 dollar Better Sleep giveaway!

Tuesday, May 13, 2014

A good place to sleep and a giveaway!!

This is a Sponsored post written by me on behalf of Better Sleep Council for SocialSpark. All opinions are 100% mine.
Good Night Sleep Quote
A good night's sleep is one of the best things in the world for so many reasons. But sometimes it's pretty hard to sleep well. Having a good place to sleep is a good start.

Here's  a guide for how to get better sleep . My own tip? When there is a lot on my mind, I do word or math puzzles. Get into a comfortable position, close my eyes, breathe slowly and regularly. Pick a subject like animals, names or colors and work through the alphabet, or try to find as many words as possible in a phrase or longer word. Sometimes I'll draw a manala just in my thoughts, or count in Fibonacci sequence. It works pretty well. That's how I get on top for a good night's sleep.
The Better Sleep Council has a ton of information on their site, including some pretty fun things like what does your sleeping position say about your personality.
Between my back problems, and the fact that my husband is a large man, our mattress needed replacing recently. It had developed a husband shaped dip on his side that was making it hard for me to get really comfortable. My previous mattress was a high quality innerspring mattress. The fault in the mattress was simply that it was time to replace it, time and nightly use wore it out. If your mattress is more than 5 years old, you might need a new one.
So how do you shop for a new mattress?
  • Check out how to buy a mattress.
  • Start with research! There are a lot of types of mattresses out there. 
  • Talk to friends, find out who they trust. As my husband says, you can buy mattresses nearly anywhere these days- but getting questions answered and finding the perfect mattress takes a little more time. You're could spend over 10,000 hours in the next 5 years on that mattress. Make sure it's the right one for you.
  • Ask the questions. What are your issues? Weight, height, how much room you use when you sleep, how it handles heat, and explain what kind of support you like. 
  • Test the mattress using the SLEEP method described on the Better Sleep Council's website.
It turns out that the store that my friends recommended to me is one that links to the Better Sleep Council from their website! So my husband and I went and tried out a lot of mattresses.
Mattress testing at The Mattress Ranch
The person working was willing to answer all our questions and told us to take our time, to take a nap if we wanted to really know how good the mattress was for our sleeping style. He also had a measuring tape handy so if we needed measurements to figure out if we could fit it in our door, he could tell us. He was knowledgeable and super helpful.
So we got our new mattress, and how does it help? Like I said, we got it a few months ago. In that time, both my husband and I are sleeping better. He's woken up and his first words have been "I love our bed." My back, well, that's not going to be completely better, but because of the way our mattress dissipates heat and how well it contours, I'm not waking up in pain as often. My good days start out good.
So think about shopping for a new mattress on Memorial Day.
So the giveaway? There are actually 2!
Get on Top, win $1,000 giveaway like The Better Sleep Council on Facebook and enter the Get on Top Sweepstakes for a chance to win $1000.00
The giveaway on Don't Eat the Paste is for a $50.00 Visa Gift Card.
Open to US residents, 18+
Contest is open from now until May 30, 2014.
To Enter- just leave a comment on THIS post about your sleeping troubles and how a new mattress would help.
Read the official rules right here. Izea will pick a winner, and we will need a way to contact you so make sure you include an email address.

Visit Sponsor's Site

Sunday, May 11, 2014

Easy crochet slippers pattern

Easy Crochet Slipper pattern

The story behind this pattern-
My grandmother had a friend who used to knit slippers. I think it was the only thing he knew how to knit, and he would knit hundreds of pairs over the course of a year. In different sizes and colors, everybody had a pair of slippers he made. He knit them long and narrow for grandma, short for kids like me, and large pairs for men. The secret is that it was a super simple slipper, knit in the round a bit over halfway, then knit flat the rest of the way in garter stitch. He'd use the tail from knitting the toe to cinch it up into a circle, then the tail from the end to stitch the back seam. All done.

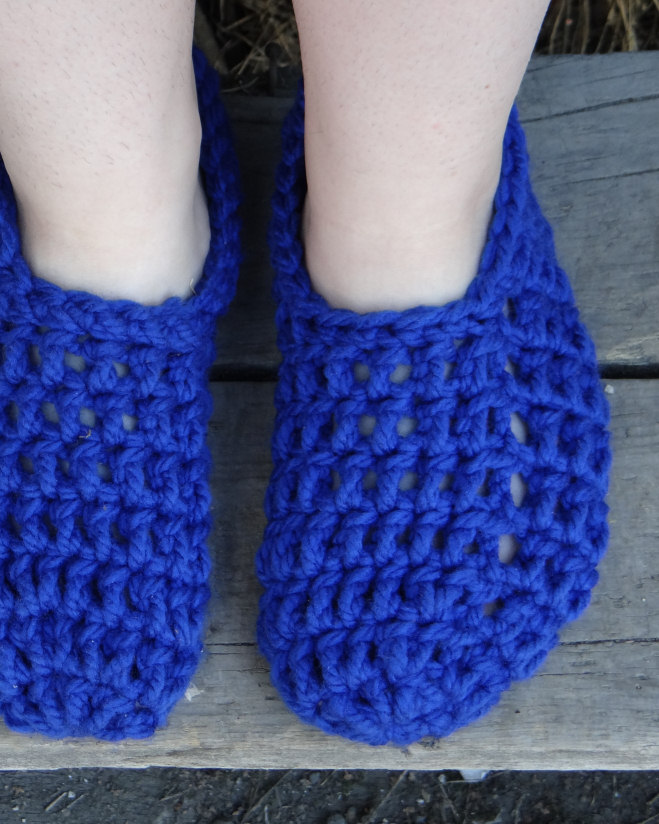
Making a pair in crochet that was as easy to adapt has been a plan for a while, and one that I finally did this weekend. Using a bulky yarn, and a size K hook, they stitch up really fast. But you could easily adapt it for worsted or even thread. The trick is just getting the toe right, so you may experiment to get the right number of stitches and increases for that, then the rest of the slippers are a breeze. They can also be adapted in other ways. Make the vamp shorter and add a strap for Mary Jane style slippers, or a drawstring or bow for ballet type slippers. So as I work on adaptations for this patterns, I'll post those patterns. But feel free to play with it however you want. The heel on my slippers has some very slight shaping to make it more fitted than the hand knit originals.

Overview- Crochet in the round in double crochets, making increases until it fits around your foot, then continue crocheting in the round until it's close to long enough to reach your ankle. Crochet in rows after that for 3/4s (rounded up to an even number of stitches) of the total circumference until it's near to heel length. The heel has some small shaping- so crochet that with doubles, half doubles, singles in the middle, then work out the other way to mirror the first side. Seam the heel. Crochet single crochets in each stitch around. Weave in all ends.

So here's the actually pattern to make a pair of women's medium slippers-

dc= double crochet
ch= chain
hdc= half double crochet
sc= single crochet
sl st= slip stitch
st or sts= stitch or stitches
repeat ** means repeat what is between the asterisks.

Note: on the chain 3 starts for the rows, I do the first chain tight, then the other two chains with normal tension, it seems to be neater for me, but ymmv. So do it however your most comfortable.

You will need:

  • Chunky yarn- I used Bernat Softee Chunky in Royal Blue (it's really soft and cushy, and used less than one skein for a pair of slippers)
  • Size K (6.5 mm)
  • scissors or snips
  • yarn needle (big one!)
Make 2

Ch 2 or make a magic ring
Rnd 1: Ch 3 (counts as first dc here and throughout), dc 7 times in first st or ring, sl st to join (8 sts)
Rnd 2: Ch 3, dc in same stitch, 2 dc in each st around, sl st to join (16 sts)
Rnd 3: Ch 3, dc in next 2 sts, 2 dc in next st, *dc in next 3 sts, 2 dc in next st*, repeat ** 2 more times. Sl st to join (20 sts)
Round 4-7: Ch 3, dc in each st, sl st to join (20 sts)
Row 1: Ch 3, dc in next 15 sts (16 sts)
Row 2-5: Ch 3, turn, dc in next 15 sts (16 sts)
Row 6: Ch 3, turn, dc in next 4 sts, hdc in next st, sc in next 4 sts, hdc in next st, dc in next 5 sts (16 sts)

Break off yarn, and fold heel in half meeting up the mirrored stitches and stitch shut. Knot securely.

Edging- join in yarn, sc around the top of the slipper. I worked 2 sc in the bars, and a single crochet in each of the 4 stitches in the middle of the vamp. 

I gave the finished slippers to The Amazing Turnip Girl. She likes them a lot. I'm going to make myself a pair in pink. 

Friday, May 9, 2014

Hearts printable gift box


I hope you enjoy this printable box. The colors were inspired by chocolate covered strawberries, and it's an all-occasion box. I'll probably make some more boxes using these elements and colors for a full set because I really like them.
Click on the image for the larger version, print on card stock, cut out, score fold, fold, glue!

More HEART themed projects including boxes and coloring pages.

Wednesday, May 7, 2014

Some tips on getting your self-published book reviewed


This is a note on my Facebook page. I'm posting it here so it's easier for people to find. We will return to more normal postings soon. 
For readers of Don't Eat the Paste, or anyone looking for reviews on Don't Eat the Paste, my usual review policy is where to look for information about that.

I get lots of requests for reviews every week from hopeful self-published authors who realize that reviews on Amazon do help sell books.

Amazon has a great reader/user review system with every day people contributing their thoughts and experiences with books and products. There is a ranking system in place, nobody is really sure how rankings are calculated, but how helpful your reviews are, how many reviews you've written and how recently you've reviewed all play into it.

If you're in the top 100,  you're getting and turning down review requests regularly.

So.. some tips on getting your self-published masterpiece reviewed:

  • DON'T send it as an attachment with your request. Really, this is just common sense. As many people download things on their phones or using public and fairly slow wi-fi, it's annoying to spend 5 minutes downloading your mail to find out you've got 3 messages and one of them is a self-help memoir style book that will change your life about the author who kicked his Neopet addiction, or a teen dystop about surviving zombie bunnies that will eat your eyes while your sleeping. Yes, that's exaggeration. But just barely. Sending me, unasked, a nice big file of your 300-1000 page masterpiece, especially if you're going to tell me why it's my privilege to get the chance to read it WILL get it deleted. 
  • Don't underline or italicize your entire request. Do use a font that's easy to read and clear. While most Amazon reviewers are not professional, we do appreciate a professional inquiry. It's easier to read and less distracting.
  • Be polite. I know that all the best self-help books, including the one you've written say you need to act with confidence. There is a difference between being confident and seeming egotistical. You're asking me to give up hours of my time to read and write a review that's coherent and might just help sell your book. That would be favor. From me. Not to me. As much as you might think you're doing me a favor, you aren't.
  • Don't get too personal in your review request, unless it does actually pertain to the book (e.g. , "The story is based off of my experience as a collector and spinner of dust bunnies"). If it's about your qualifications to write the book you want reviewed, or has something to do with it, wonderful. If it's just something really bizarre that you want the world to know, announce it on Facebook or on your blog. 
  • Read and re-read your email before you send it. Glaringly bad grammar or spelling errors in the email WILL get your masterpiece rejected by most reviewers. We don't want to go through 100,000 words with the same sort of errors that were painful in 200-400 words. 
  • Be prepared for criticism. Sorry. I know it's your baby, but my integrity is on the line. My integrity means every bit as much to me as your book does to you. If you want only good reviews, stick to asking friends and family. But I do strongly suggest having someone who can be honest with you read your baby before offering it to stranger. If you can't afford an editor, having someone who can be honest with you does help. They also might catch spelling errors and mixed up, run on sentences that you don't notice.
  • Consider a variety of offered formats- some reviewers prefer Kindle only, some like paper. 
  • Don't just look at the top reviewers. Seriously. People have a real habit of looking at the top reviewers list to see who has email addresses listed. I do, and if you are polite and offer me my choice of formats for the book, I'll at least consider it. However, like a lot of reviewers, I have my specialty areas. The best way to get a review is to look at books that are similar to yours and read the reviews on those. When you see a reviewer who's style you like, who uses more than "THIS ROX! YOU NEED TO BUY THIS BOOK NOW!" and who is obviously interested in your topic, see if they have an email address listed. A well-written review doesn't have to be from a top reviewer to count. It just needs to be well-written in a style your potential readers will understand.
Be nice, don't send the book until asked, consider your audience, and grow a thick skin. 


Sunday, May 4, 2014

Lotus Om Mandala to color

Lotus Om mandala

I hope you enjoy this mandala, it's a bit more traditional than the ones I usually draw.
The symbol in the middle is the Om (aum) symbol in Devanagari.

Click the images below for a larger version to print and color.

Sm jpg version:
Lotus Om mandala to color or embroider- also available in transparent PNG

Large transparent png version:
Lotus Om mandala to color or embroider- also available in jpg