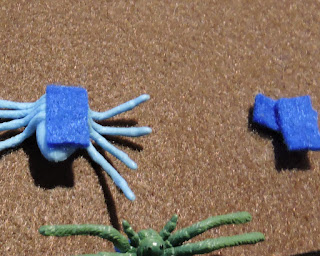
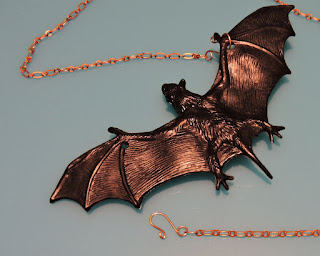
I bought some very inexpensive spiders and bats to make accessories. The reason I got bright, colorful spiders is that they are less disturbing to the arachnophobe in my family.
To make the hair slides- the easy way is to use bobby pins that have a gluing pad. The thing is I don't actually like using those in my hair. So I did something a little different so I could use my preferred bobby pin type-
So for there easy spider hair pins, you will need:
- Bobby pins
- Instant type glue (I used Krazy Glue)
- White craft glue (I used Elmer's Glue All)
- Craft felt
- Plastic spiders with a largish body
- scissors
Craft felt is made out of plastic, so are the spiders. Krazy Glue works great for bonding them together. Cut 4 strips per pair of spiders of craft felt that are about 1/4 inch wide and the length of the spider body. Glue one strip to the bottom of each spider.
Slide the other strips into the bobby pins, and spread white craft glue on the craft felt on the spider, then press the strip in the bobby pin to the spider and hold for a couple minutes. Let the glue dry.
Wow. See? Insanely easy. Now you could do a lot to the spiders before gluing them to the bobby pins. You could cover them in glitter, or use a plastic safe metallic spray paint on them. Make them as fancy as you'd like.
Bat necklace!
Same thing, if you want, you can absolutely glitter or paint the bat. I went with plain black for mine.
So for this one- you will need
- Plastic bats- they come in all sorts of colors. I have some that are neon green!
- chain
- 22 gauge wire- half hard if you have it.
- round nose pliers
- wire snips
- 1/8 inch hole punch
So this is just as easy as the project above, and if you're a jewelry crafter- you might have the supplies on hand. I used some copper chain that I had, and bronze 22 gauge wire. Bronze is fairly hard compared to copper- if you're using a soft wire, lightly hammer the hooks before attaching them to the chain to harden them slightly.
Punch a hole in the top of both wings with the hole punch. Then cut 2 1.5 inch pieces of wire and coil the top into a loop, then curl the rest into a hook with a little bit curled over at the end.
Put one wire on each end of the chain, and slide through the holes in the bat wings.
Back in 2011, I posted a project for Eyeball hair sticks using the plastic eyeballs that available this time of the year. That project is also an instant costume. Moms always have eyes in the back of their head!


No comments:
Post a Comment
Thank you for leaving a comment! Because of the high spam levels and still wanting the site to be friendly, I switched to moderating comments instead of a captcha. As long as you aren't a spammer or spambot this comment will show soon!